Every winter, plumbers across the country are flooded with emergency calls from homeowners dealing with burst pipes, failed water heaters, and flooded basements. The frustrating part is that the vast majority of these disasters are completely preventable with a few hours of preparation in October or early November. A burst pipe alone can release hundreds of gallons of water before you even notice, and the average insurance claim for water damage from frozen pipes runs between $5,000 and $15,000.
Fall is the perfect window for plumbing prep because temperatures are mild enough to work comfortably, parts are readily available before the seasonal rush, and plumbers are still easy to schedule for any professional work you need. Wait until December and you may find yourself competing with dozens of other panicked homeowners for the same technician during a cold snap. The goal of this checklist is to close that window of vulnerability before winter opens it for you.
This post covers every plumbing system in a typical home, from outdoor hose bibs and irrigation lines to water heaters, interior pipes, and sump pumps. Whether you want a quick one-hour walk-through or a thorough DIY deep-dive, you will find a clear, prioritized plan here. We have also included real cost estimates, payback periods, and the specific signs that tell you when to stop DIYing and call a pro.
What You’ll Need
Click on an item below to shop for the recommended items for this recipe on Amazon.
As an Amazon Associate, we earn from qualifying purchases.
How to Do It
- Disconnect all garden hoses from outdoor spigots. Even frost-free hose bibs can freeze and crack if a hose is left attached, because the hose traps water in the bib body. Store hoses in a garage or shed.
- Locate your main water shut-off valve and confirm it turns freely. If it is stuck or corroded, note it for replacement but do not force it. Knowing where this valve is and that it works is critical if a pipe bursts.
- Set your water heater thermostat to 120 degrees Fahrenheit if it is currently higher. This reduces standby heat loss and mineral scaling without sacrificing performance for most households.
- Check under every sink for slow drips or moisture. Tighten any loose supply line connections by hand plus a quarter turn with a wrench. A slow drip becomes a flood when pressure fluctuates in cold weather.
- Test your sump pump by pouring a 5-gallon bucket of water into the pit. The float should rise and the pump should activate within a few seconds, then shut off cleanly. If it does not run or runs continuously, schedule service before ground freezes.
- Open cabinet doors under sinks on exterior walls during the first hard freeze (below 20 degrees Fahrenheit overnight). This allows warm household air to reach the pipes and is the single easiest freeze-prevention measure available.
- Flush your water heater to remove sediment. Attach a garden hose to the drain valve at the base of the tank, run the hose to a floor drain or outside, turn off the cold water supply, and open the drain valve. Let it run until the water flows clear (usually 10 to 20 minutes on a tank with significant buildup). Close the valve, refill the tank, and restore power or re-light the pilot. Do this annually for best results.
- Inspect and test the temperature and pressure relief (TPR) valve on your water heater. Lift the lever briefly and release it. You should hear a rush of water or steam into the drain tube. If nothing happens or if it drips continuously afterward, the valve needs replacement. A new TPR valve costs $15 to $30 and is a straightforward swap for a competent DIYer.
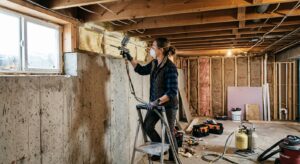
- Insulate all exposed hot and cold water pipes in unheated spaces: basement, crawl space, attic, and garage. Use foam pipe insulation sleeves (R-3 per inch), which cost about $0.50 to $1.00 per linear foot. Pay special attention to pipes within 12 inches of exterior walls. Secure all joints with foil tape.
- Inspect outdoor hose bibs. Turn off the dedicated shutoff valve inside (usually in the basement near the wall), then open the outdoor spigot to drain any remaining water. Leave the outdoor spigot handle in the open position over winter so any residual water can escape. If you do not have a dedicated shutoff or if the bib is not a frost-free type, add a foam insulating cover ($3 to $6 each) as a secondary measure.
- Check your irrigation system shutoff and blow out the lines. If you have an in-ground sprinkler system, shut off the irrigation water supply valve and use a compressor (or hire an irrigation tech for $50 to $100) to blow compressed air through each zone until no water exits the heads. Skipping this step is the leading cause of cracked irrigation pipes and backflow preventer damage.
- Inspect the sump pump discharge line outside the home. The pipe that carries water away from your foundation must terminate at least 10 feet from the house and must not be obstructed by leaves or frozen ground. Clear any debris, and if the pipe is uninsulated above grade, wrap it with foam pipe insulation to delay freezing during prolonged cold.
- Check washing machine supply hoses for bulging, cracking, or corrosion at the fittings. Rubber hoses older than 5 years are at elevated risk of burst failure, which can discharge 500 gallons per hour. Replace with braided stainless steel hoses ($15 to $25 per pair) if due. Turn off the supply valves if you plan to be away more than a week.
- Inspect all visible caulk and pipe penetrations where pipes exit the foundation or pass through exterior walls. Fill any gaps larger than a quarter inch with foam backer rod and paintable caulk, or use expanding foam for larger voids. Cold air infiltrating around pipes dramatically increases freeze risk.
- Schedule a licensed plumber for a full plumbing inspection in October, before the seasonal rush drives up wait times and prices. Ask specifically for a winterization-focused review.
- Request that the plumber check water pressure at multiple points. Normal residential pressure is 40 to 80 psi. Pressure above 80 psi accelerates wear on every fitting, valve, and appliance in the home. A pressure reducing valve (PRV) installed by a plumber costs $250 to $500 and pays for itself in reduced leak risk.
- Have the plumber inspect and, if needed, replace the anode rod in your water heater. This sacrificial magnesium or aluminum rod prevents tank corrosion and typically needs replacement every 3 to 5 years. A plumber can do this in 30 minutes for $80 to $150 in labor plus the cost of the rod ($20 to $40).
- Ask the plumber to evaluate any pipes in unheated spaces and recommend heat tape or additional insulation where needed. Self-regulating heat tape costs $1 to $4 per linear foot plus installation and is the right solution for pipes that cannot be adequately insulated due to their location.
- Request a written report summarizing any issues found, their severity, and recommended timelines for repair. This documentation is valuable for insurance purposes and for planning your home maintenance budget.
Why It Works: The Benefits
A single burst pipe releases 250 gallons or more per hour. The average insurance claim for pipe freeze damage is $10,900, and many policies include a deductible of $1,000 to $2,500. A few hours of fall prep eliminates most of that risk entirely.
Flushing sediment from a water heater, insulating the first 6 feet of hot water pipes, and setting the thermostat to 120 degrees Fahrenheit (down from the common factory setting of 140) can cut water heating costs by 10 to 15%, saving $30 to $60 per year on a typical gas bill.
Annual maintenance adds 3 to 5 years to the life of a water heater and prevents premature pump failure. Replacing a water heater costs $900 to $1,800 installed; a $15 anode rod replacement every 3 to 5 years can push the unit well past its rated lifespan.
Emergency plumber rates in winter often run $150 to $300 per hour with after-hours surcharges. Preventive maintenance done in fall, during normal business hours, typically costs 40 to 60% less for the same tasks.
Homes that have been properly winterized allow you to leave for the holidays or travel for work without worrying about a catastrophic failure while you are away. This is especially valuable for vacation homes or households with frequent travelers.
💰 Savings Impact by Action
Proper pipe insulation and hose bib winterization eliminate freeze risk in all but the most extreme or unusual circumstances, preventing claims that average $10,900.
Removing sediment buildup restores water heater efficiency by 8 to 12%, cutting the energy used for water heating proportionally.
Insulating hot water supply lines reduces heat loss in transit, cutting water heating energy use by up to 8% and reducing wait time for hot water.
Lowering water heater temperature from 140 to 120 degrees Fahrenheit reduces standby heat loss by 4 to 8% annually.
Fixing existing slow leaks and drips can cut household water waste by 10 to 15%, saving the average home $70 to $140 per year on water bills.
🏠 Key Concepts Explained
The Science Behind It
Water’s behavior at the freezing point is what makes plumbing winterization such a high-stakes task. Unlike most substances, water expands when it freezes, increasing in volume by roughly 9%. Inside a rigid pipe, that expansion has nowhere to go, so pressure builds rapidly. Copper pipe rated to handle 1,000 psi of working pressure will fail catastrophically when frozen water generates 2,000 psi or more against its walls. The pipe does not always burst at the frozen section; the pressure wave travels through the liquid water in the pipe and often fails at the weakest point, which may be a fitting, a joint, or a section that was already stressed by corrosion.
The rate at which a pipe loses heat to its surroundings is governed by conduction and convection. An uninsulated copper pipe in a 10-degree-Fahrenheit crawl space loses heat roughly 30 times faster than an insulated pipe in the same location. Foam pipe insulation creates a layer of still air around the pipe, slowing thermal transfer significantly. In practice, foam insulation can delay freezing by 2 to 4 hours during a cold snap, which is often enough time for the outdoor temperature to rebound above freezing or for you to take preventive action like a slow drip from the faucet.
Water heater efficiency is a function of standby heat loss and recovery efficiency. Every degree of temperature above what you actually need costs energy to maintain around the clock. Sediment at the bottom of the tank acts as an insulating barrier between the burner flame and the water, so the burner must run longer to achieve the same result. A 2018 study by the American Council for an Energy-Efficient Economy found that a tank with significant sediment buildup consumed 8 to 12% more energy than a clean tank. Flushing that sediment annually is one of the highest-return maintenance tasks available to a homeowner, costing nothing but time and delivering measurable savings every month afterward.
Frequently Asked Questions
▼ How do I know if a pipe is already frozen before it bursts?
The clearest sign is reduced or zero water flow from one or more faucets during or after a cold snap. You may also notice frost or an unusually cold section on an exposed pipe. If you find a frozen pipe, open the faucet it serves to relieve pressure as the ice melts, then apply gentle heat with a hair dryer starting at the faucet end and working back. If you cannot locate the frozen section or if water still does not flow after 20 minutes of heating, call a plumber immediately.
▼ My water heater is making a popping or rumbling noise. Is that a problem?
Yes, that sound is almost always sediment at the bottom of the tank being disturbed by the heating element or burner. It means sediment buildup is significant enough to affect performance. Flush the tank as described in the DIY approach. If the noise continues after flushing, the tank may have corrosion or a failing element, and you should have a plumber evaluate it. A water heater that has been noisy for years without maintenance may have its lifespan significantly shortened.
▼ What if I rent and cannot make any plumbing changes?
Renters still control several high-impact actions. You can disconnect and store garden hoses, place foam insulting covers over hose bibs (they just slip on and require no tools), install battery-powered water leak sensors under sinks and near the water heater, and open cabinet doors during freezing nights. Report any dripping faucets, running toilets, or visible pipe condensation to your landlord in writing so you are documented if damage occurs and they can address it before winter.
▼ How do I know if my sump pump is big enough to handle spring snowmelt?
A sump pump is generally sized to the pit and the drainage area of the home. If your pump runs continuously during heavy rain and the pit level is not dropping, the pump is undersized or partially failed. A 1/3 horsepower pump handles most average homes, while 1/2 horsepower is appropriate for high water table areas or larger basements. A plumber can assess the right size, and a quality replacement pump costs $150 to $350 for the unit plus installation. Adding a battery backup unit ($200 to $400 extra) is strongly recommended in areas prone to power outages during storms.
▼ Is it worth insulating pipes in a home that already has heated basement space?
For pipes in a fully heated and conditioned basement, freeze risk is low but pipe insulation on hot water lines still pays off through reduced heat loss. Uninsulated hot water pipes in a basement can lose 3 to 4 degrees Fahrenheit per 10 feet of run, meaning you wait longer for hot water and your water heater works harder. Pipe insulation on hot water lines typically pays back in 1 to 2 years through energy savings alone, and it is one of the easiest DIY projects available.
Quick Tips
- Take photos of your main shutoff valve, water heater label, and sump pump model number each fall and store them in your phone. You will have this information instantly if a plumber needs it during an emergency.
- If you leave home for more than 3 days in winter, set your thermostat no lower than 55 degrees Fahrenheit and turn off the main water supply. This combination eliminates freeze risk without leaving the heat running at full cost.
- Add a Wi-Fi water sensor ($15 to $30 each) near your water heater, under the kitchen sink, and next to the washing machine. These inexpensive devices send phone alerts the moment they detect moisture, giving you time to respond before minor leaks become major damage.
- Label your shutoff valves with colored tags or a permanent marker indicating which zone or fixture each one controls. During an emergency, knowing which valve to turn is worth far more than any tool you own.
Variations for Your Situation
- Apartment or Condo: Renters and condo owners typically cannot access the main shutoff or water heater, but you can still take meaningful action. Place battery-powered leak sensors ($15 to $30 each, brands like Govee or Ring) under every sink, behind the toilet, and near the dishwasher. Disconnect hoses from the washing machine supply lines if you leave for more than a week, and report any signs of dripping or moisture to building management in writing before cold weather arrives. Ask your landlord or HOA about the building’s winterization schedule.
- Tight Budget (under $50): Prioritize the zero-cost steps first: disconnect hoses, open cabinet doors during freezes, locate your main shutoff, and set the water heater to 120 degrees. Then spend your budget on two or three foam pipe insulation sleeves for any exposed pipes in unheated areas ($8 to $15), a foam hose bib cover for each outdoor spigot ($3 to $6 each), and one basic water leak sensor ($15 to $20). These three purchases cover the highest-risk failure points for under $40 total.
- Older Home (pre-1980): Homes built before 1980 often have galvanized steel pipes that have been slowly corroding for decades, reducing interior diameter and increasing burst risk. They may also have original shutoff valves that are difficult or impossible to fully close. Have a licensed plumber assess your main shutoff and any galvanized supply lines before winter. Do not skip the professional inspection approach, as a stuck shutoff valve in a burst-pipe emergency is a worst-case scenario. Budget $200 to $400 for the assessment and prioritize replacing the main shutoff valve if it is original to the home.