Most homeowners focus on their furnace, air conditioner, or thermostat when energy bills creep up, but the real culprit is often hiding in the attic, crawlspace, or inside the walls. Your ductwork is the delivery system for all that expensive conditioned air, and the U.S. Department of Energy estimates that the typical home loses 20 to 30% of heating and cooling energy through leaky, poorly insulated, or improperly designed ducts. That translates directly into higher monthly bills and rooms that never quite reach the right temperature.
The frustrating part is that duct problems are nearly invisible. You cannot see air leaking from a gap in a flex duct connection or feel the heat baking into uninsulated sheet metal running through a 130-degree attic. But your energy bill feels it every single month. A home spending $200 per month on HVAC could be throwing away $40 to $60 in wasted energy before the air ever reaches a living space.
This post breaks down the five most common ductwork problems, explains exactly how each one wastes energy, and gives you practical steps for diagnosing and fixing them yourself or with professional help. Whether you are a confident DIYer or prefer to call a pro, understanding what is happening inside your ducts puts you in control of the fix and helps you ask the right questions.
What You’ll Need
Click on an item below to shop for the recommended items for this recipe on Amazon.
As an Amazon Associate, we earn from qualifying purchases.
How to Do It
- Turn your system to fan-only mode and walk through the basement, crawlspace, garage, and attic with your hand near duct joints and connections. Feel for airflow indicating leaks at seams, end caps, or where flex duct connects to metal boots and plenums.
- Look for disconnected sections, torn flex duct outer wrap, or visible gaps at joints where two duct sections meet. Any gap you can see daylight through or feel air escaping is costing you money every day.
- Apply UL 181-rated mastic sealant (a thick paste, not regular duct tape) to all accessible leaking joints using a chip brush or gloved hand. Mastic outlasts standard duct tape by 20 or more years and flexes without cracking.
- For larger gaps over one quarter inch, embed fiberglass mesh tape into the wet mastic before applying a second coat. Allow to dry for 2 to 4 hours before restoring full system operation.
- Check that all flex duct connections are secured with draw bands at both the inner liner and outer jacket, and verify that no flex duct sections are kinked or compressed, which can reduce airflow by 50% or more.
- After sealing, note whether previously weak supply vents now feel stronger. If comfort or airflow improves noticeably, you have confirmed leakage was costing you money and more comprehensive sealing will yield further gains.
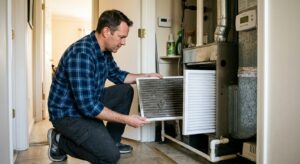
- Identify all duct runs located outside the conditioned living space, particularly in the attic or crawlspace. These are your biggest thermal loss points. In summer, attic air can reach 130 to 150 degrees, turning every uninsulated duct into a heat exchanger working against your AC.
- Seal all leaks first using mastic as described in the quick fix approach. Adding insulation over leaky ducts traps the leaking air inside the insulation layer and reduces the effectiveness of the fix significantly.
- For sheet metal ducts, wrap with R-8 duct wrap insulation (2-inch thick fiberglass with a foil facing), overlapping seams by 3 inches and securing with metal foil tape rated for HVAC use. Avoid standard duct tape, which degrades within 1 to 2 years in attic heat.
- For existing flex duct with inadequate insulation, replacing with pre-insulated R-8 flex duct is often more cost-effective than adding wrap over old material. Cut sections to the shortest straight run possible to minimize airflow resistance.
- Insulate the entire duct including all fittings, elbows, and plenums. Fittings are commonly missed and account for a disproportionate share of heat gain and loss due to their irregular shapes and thinner walls.
- After completing insulation, check that no insulation is blocking return air pathways and that all access points to ducts remain reachable for future filter changes and maintenance.
- Hire a certified HVAC contractor or home energy auditor to perform a duct blaster test, which pressurizes the duct system and measures total leakage in cubic feet per minute. This gives you a baseline number and confirms whether duct work is worth the investment before spending money.
- Review the test results. Leakage above 15% of total system airflow is considered poor performance and typically justifies professional sealing. Many older homes test at 25 to 40% leakage.
- Request a quote for Aeroseal or equivalent duct sealing process, where a contractor pressurizes the duct system with atomized sealant particles that adhere to and seal leaks from the inside out, including joints and seams in walls and ceilings that are otherwise inaccessible.
- Ask the contractor to also insulate any accessible duct runs in the attic or crawlspace to at least R-8 as part of the same project, since mobilization costs are shared and the combined savings justify the additional scope.
- After the work is complete, request a post-sealing duct blaster test to verify leakage reduction. A quality job should reduce leakage by 70 to 90%. Get the before and after numbers in writing for your records and for any utility rebate applications.
- Submit utility rebate paperwork within 30 days of project completion. Many programs require the post-test documentation the contractor provides, so keep all paperwork together.
Why It Works: The Benefits
Sealing and insulating ducts can reduce heating and cooling costs by 20 to 30%, which equals $400 to $900 per year for a home with a $2,500 annual HVAC bill.
Fixing leaks and restrictions eliminates hot and cold spots by ensuring each room receives the designed airflow volume, often resolving rooms that have never felt comfortable despite years of thermostat adjustments.
Reducing static pressure and runtime takes stress off the blower motor and compressor, potentially adding 3 to 5 years to equipment life and reducing service call frequency.
Leaky return ducts in crawlspaces and attics pull in dust, mold spores, and radon gas, so sealing them reduces these contaminants circulating through your home by up to 50%.
Properly sealed ducts prevent unconditioned humid air from entering the system, helping maintain indoor relative humidity in the healthy 40 to 60% range and reducing mold risk.
💰 Savings Impact by Action
Sealing accessible duct leaks reduces conditioned air loss and cuts heating and cooling costs by 20 to 30% in homes with poorly performing duct systems.
Insulating attic ducts to R-8 reduces heat gain and loss across duct runs by up to 85%, translating to 10 to 20% savings on seasonal HVAC costs.
Straightening kinked and sagging flex duct restores designed airflow capacity and can reduce blower runtime by 10% by eliminating unnecessary static pressure.
Adding or enlarging return air pathways reduces system static pressure, improving airflow efficiency and reducing blower electricity consumption by up to 12%.
Aeroseal pressurized sealing reduces total duct leakage by 70 to 90%, delivering average measured energy savings of 25 to 30% on HVAC operating costs.
🏠 Key Concepts Explained
The Science Behind It
Your HVAC system is designed as a closed loop: conditioned air leaves the supply side, flows through ducts, exits registers into living spaces, and returns through return ducts back to be reconditioned. Any break in that loop means the system is drawing in unconditioned air from wherever it can find it, whether that is a hot attic, a damp crawlspace, or the outdoors. This unconditioned air adds directly to the heating or cooling load, which is why a leaky duct system forces the equipment to run longer cycles and consume more electricity or gas to maintain the same thermostat setpoint.
Thermal bypass in duct insulation follows basic heat transfer physics. When a duct carrying 55-degree supply air runs through a 130-degree attic, the temperature differential drives heat into the duct at a rate proportional to that gap. An uninsulated sheet metal duct in that environment can see supply air temperatures rise by 10 to 20 degrees over a 30-foot run, meaning the air arrives at the register significantly warmer and with far less cooling capacity than intended. Adding R-8 insulation reduces the effective temperature differential across the duct wall by roughly 85%, cutting that heat gain to 1 to 3 degrees over the same run.
Static pressure in duct systems works like water pressure in a pipe. Kinks, crushed sections, undersized ducts, and excessive bends all add resistance that the blower motor must overcome. Every 0.1 inch of water column increase in static pressure above design specification reduces airflow by roughly 5 to 10% and increases blower electricity consumption measurably. In severe cases, high static pressure causes the blower to overheat, leading to premature motor failure that costs $300 to $700 to replace. Correcting duct restrictions pays back in both energy savings and avoided equipment replacement costs.
Frequently Asked Questions
▼ How do I know if my ducts are leaking without hiring someone?
The most reliable DIY method is the hand test with the fan running on a warm day. Hold your palm within an inch of every accessible duct joint, connection, and seam and feel for escaping air. You can also light an incense stick near joints and watch for the smoke to deflect, which reveals even small leaks. If multiple joints show airflow or you have rooms with consistently weak supply, the system likely has significant leakage worth addressing.
▼ My energy bills went up but my HVAC unit was just serviced. Could it be the ducts?
Yes, a perfectly tuned HVAC unit still cannot compensate for duct losses. If the unit checks out mechanically but runtime has increased or bills are higher, duct leakage or insulation degradation is a logical next suspect, especially in homes over 15 years old where original duct tape has dried and failed. A duct blaster test costing $150 to $300 will give you a definitive answer with actual leakage numbers.
▼ Can I use the flex duct from the hardware store to replace damaged sections myself?
Yes, replacing a damaged flex duct section is a reasonable DIY job. Buy pre-insulated R-8 flex duct in the same diameter as the existing run, typically 6, 8, or 10 inches. Cut out the damaged section, connect the new piece using approved collars and draw bands on both the inner liner and outer jacket, and seal every connection with mastic. Avoid making the new section longer than necessary, since every extra foot of flex adds airflow resistance.
▼ What if my ducts are inside the walls and ceiling where I cannot reach them?
Inaccessible in-wall ducts are exactly what the Aeroseal process was designed for. The pressurized sealant reaches every internal leak regardless of location. This is the most compelling application for professional duct sealing and typically the situation where the cost is most justified, since no amount of DIY effort can address leaks hidden in finished walls and ceilings.
▼ How much can I realistically save by sealing my ducts in a typical house?
The DOE estimates duct sealing and insulation together save the average home 20 to 30% on heating and cooling costs. For a household spending $150 per month on HVAC, that is $360 to $540 per year in savings. A professional Aeroseal job costing $2,000 would pay back in 3 to 5 years and then deliver savings for the remaining life of the home. DIY sealing of accessible ducts costing under $100 can deliver 5 to 10% savings with a payback measured in weeks.
Quick Tips
- Check your flex duct runs for sags and droops. Flex duct should be supported every 4 feet and pulled taut, not sagging between supports, since sagging creates bends that restrict airflow by up to 50%.
- Close crawlspace vents in winter only if you have fully sealed and insulated the crawlspace floor and walls. Closing vents in an uninsulated crawlspace traps moisture and causes rot and mold.
- If one room is always too hot or cold, check whether its supply duct has any disconnected joints or collapsed sections before blaming the HVAC equipment. Duct problems cause the vast majority of room comfort complaints.
- When adding bathroom or kitchen exhaust fans, never vent them into the attic or connect them to return ducts. This adds humidity directly to your HVAC system or attic, causing mold and degrading duct insulation.
- Ask your utility company for a free home energy audit. Many utilities will perform a blower door test and duct leakage test at no charge, giving you a professional diagnosis before you spend money on any fixes.
Variations for Your Situation
- Apartment or Condo: Residents in multifamily buildings typically share duct infrastructure that is the landlord’s responsibility. Focus on sealing the visible connections at your supply and return registers using foam backer rod and paintable caulk to reduce air exchange between units. Request a maintenance inspection in writing if rooms are consistently uncomfortable, since landlords are typically obligated to maintain HVAC performance. Portable air purifiers can offset indoor air quality issues from shared duct systems.
- Tight Budget Under $50: Start with mastic sealant and a chip brush ($15 to $25 total) and spend two hours sealing every accessible joint in the basement or utility room. This single step on accessible plenum and main trunk connections can deliver 5 to 10% savings with a payback of one to two months. Look for utility-sponsored free energy audits in your area, which often include duct assessment at no charge.
- Older Home Pre-1980: Homes of this era often have original metal duct systems with dried-out duct tape at every joint and minimal or no insulation in attics and crawlspaces. Before sealing, have any silver flexible duct wrap tested for asbestos, a common insulation material in that era. Prioritize sealing the supply and return plenum connections first since these are the highest-pressure and highest-leakage points. Budget for professional assessment since older systems often have design deficiencies such as undersized returns that cannot be corrected with sealing alone.