Working nights flips your world upside down, and your home’s cooling system was never designed for it. Standard HVAC programming assumes an empty house during the day and occupied rooms at night, but you need deep, consistent cooling from roughly 8 AM to 4 PM, exactly when outdoor temperatures are climbing, the sun is hammering your roof, and utility time-of-use rates hit their peak. The result is an AC that runs longer, works harder, and costs more than it should.
The good news is that a few targeted changes can work with your schedule rather than against it. Pre-cooling your home before peak heat arrives, blocking solar gain at the right windows, and isolating your sleep space from the rest of the house can dramatically reduce how hard your system has to work during the hours that matter most to you. These are not vague suggestions: proper window shading alone cuts solar heat gain by up to 77%, and pre-cooling before 10 AM can let your AC coast for two to three hours through midday at a fraction of the normal cost.
This post covers everything from free zero-effort fixes you can apply tonight to a dedicated DIY bedroom cooling upgrade that pays for itself in a single season. Whether you rent an apartment or own a house, there is a realistic path to a cooler, quieter bedroom and a lower monthly bill.
What You’ll Need
Click on an item below to shop for the recommended items for this recipe on Amazon.
As an Amazon Associate, we earn from qualifying purchases.
How to Do It
- Reprogram your thermostat with a night-shift schedule: set it to pre-cool to 68 to 70°F starting at 7 AM (before you get home), hold that temperature through your sleep window (typically 8 AM to 4 PM), then allow a setback to 76 to 78°F from 4 PM to 10 PM while you are at work, and another setback to 72 to 74°F starting around 11 PM so the house is comfortable when you return.
- Close every blind or curtain on south and west-facing windows before you leave for your shift each evening. This single step blocks 40 to 77% of solar heat gain depending on your window coverings, and it costs nothing.
- Close interior doors to all unused rooms (guest room, home office, formal dining room) and partially close their AC vents. This concentrates cooling in your bedroom and main living area, reducing the conditioned volume by 30 to 50%.
- Place a rolled towel or draft stopper at the base of your bedroom door during your sleep window. This keeps the cool air you have generated from migrating into the warmer rest of the house.
- Check your ceiling fan direction: blades should spin counterclockwise in summer (when viewed from below) to push air straight down. Run it on medium during your sleep window. Moving air feels 3 to 4 degrees cooler, which means you can raise the thermostat by that margin without losing comfort.
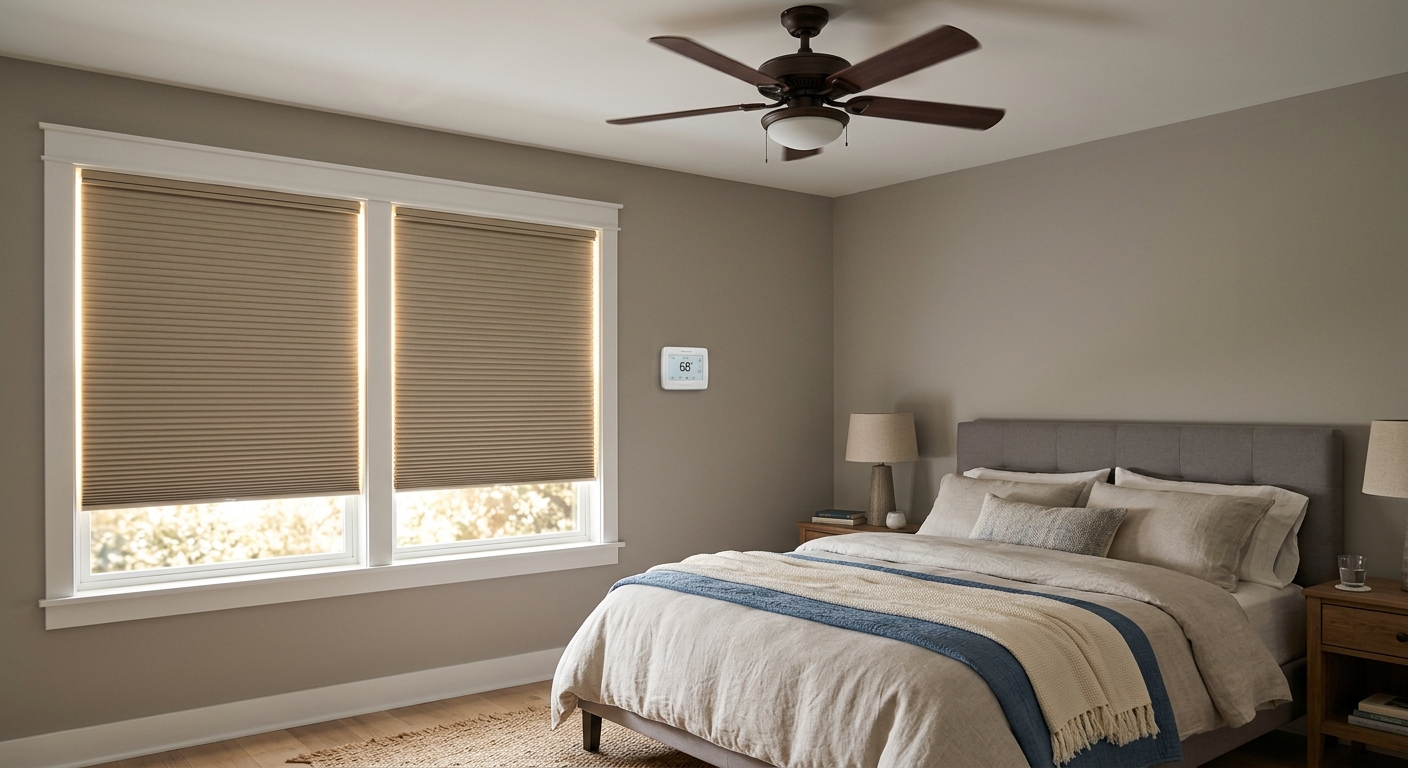
- Install blackout cellular (honeycomb) shades on all bedroom windows. A single-cell blackout shade blocks 99% of light (critical for daytime sleeping) and has an R-value of about 3.0 to 4.0, reducing both solar gain in summer and heat loss in winter. Budget $25 to $60 per window for standard sizes. Measure width and drop carefully and order to fit inside the window frame for the cleanest seal.
- Apply V-strip weatherstripping around the bedroom door frame. This seals the gap between the door and the frame on the latch side and hinge side, preventing warm air infiltration from the hallway. A $10 to $15 roll of self-adhesive V-strip covers one door. Clean the frame with isopropyl alcohol first so the adhesive bonds properly.
- Add a foam door sweep to the bottom of the bedroom door. The gap under an interior door can be 0.5 to 0.75 inches, which is large enough to exchange meaningful air volumes between rooms. A stick-on or screw-on sweep costs $8 to $15 and takes five minutes to install.
- If your bedroom has a single-zone portable AC or window unit available, set it as the primary cooling source for your sleep window and raise the central thermostat setback by 4 to 6 degrees during that time. A 8,000 BTU window unit costs roughly $0.08 to $0.12 per hour to run and can keep a 150 to 250 square foot bedroom at 66 to 68°F while your central system rests, saving $1 to $2 per day during peak cooling months.
- Hang a heavy blackout curtain or thermal curtain panel over the bedroom door itself if it is a hollow-core interior door. Hollow doors conduct heat readily. A thermal door curtain ($25 to $45) adds a meaningful insulation layer between your sleep zone and the warmer hallway.
- Place a small digital thermometer and humidity monitor ($10 to $15) on your nightstand. After a few days of sleeping, you will have real data on whether your bedroom is staying in the 65 to 68°F and 45 to 55% RH sweet spot. Adjust thermostat setpoints and fan speed based on actual readings rather than guessing.
- Install a smart thermostat (Ecobee or Google Nest, $130 to $200) that supports fully custom multi-period scheduling and occupancy sensing. Program a night-shift-specific schedule: aggressive pre-cool from 6 to 9 AM, hold cool through your sleep window, deep setback while you are at work from 4 to 10 PM, gentle ramp back down before you return at 11 PM. Smart thermostats with occupancy sensing can also detect when you come home early and adjust automatically. Expected savings: 10 to 15% on annual cooling bills.
- Install a radiant barrier in your attic. A foil-faced radiant barrier stapled to the underside of the rafters reflects up to 97% of radiant heat before it ever reaches your attic floor or ductwork. In a hot climate, this can reduce attic temperatures by 20 to 30°F on a summer afternoon and cut cooling loads by 5 to 10%. DIY cost for a 1,500 square foot attic is roughly $150 to $300 in materials (perforated foil barrier roll). Allow 4 to 6 hours and wear long sleeves, gloves, and an N95 mask in the attic.
- Seal accessible attic duct connections with UL 181-rated mastic sealant (not standard duct tape, which fails within a few years). Focus on the joints at each register boot, the main supply plenum connection, and any flex duct connections you can reach. A tube of mastic is $10 to $15. Even partial DIY duct sealing at obvious joints can recover 5 to 10% of conditioned air that was previously leaking into the attic.
- Schedule a professional duct leakage test and aeroseal treatment if your home is older than 20 years or if your AC runs excessively long cycles. Professional aeroseal costs $1,500 to $3,000 but can seal ducts to near-zero leakage, recovering 15 to 25% of cooling efficiency. The payback period is 3 to 6 years in a hot climate with high electricity rates.
- Add R-38 to R-60 blown-in insulation to your attic floor if current levels are below R-19 (common in homes built before 1990). This is a job for a professional insulation crew ($1,500 to $3,500 for a typical home) but qualifies for a 30% federal tax credit under the Inflation Reduction Act, reducing net cost to $1,050 to $2,450. Payback in a hot climate is typically 4 to 7 years, and the comfort improvement is immediate.
Why It Works: The Benefits
Combining pre-cooling, window shading, and room isolation can reduce daytime AC runtime by 25 to 40%, translating to $30 to $80 per month in savings for a typical 2,000 square foot home in a hot climate.
A stable bedroom temperature of 65 to 68°F, confirmed by sleep research as optimal for adults, reduces nighttime (your daytime) awakenings caused by heat spikes. Fewer interruptions means better recovery after night shifts.
An AC that short-cycles or runs continuously during 95°F afternoons ages faster. Reducing peak runtime by even 30 minutes per day adds up to roughly 180 hours less runtime per cooling season, extending compressor life meaningfully.
Pre-cooling before 10 AM on a time-of-use rate plan lets you store coolness in your home’s thermal mass for free and ride it through the expensive noon-to-8 PM window, cutting your peak-rate consumption by 30 to 50% on good pre-cooling days.
An AC that runs in shorter, less frantic cycles produces less compressor noise and fewer on-off clunks. Combined with blackout curtains that double as sound dampeners, your bedroom becomes measurably quieter during the hours you need to sleep.
💰 Savings Impact by Action
Pre-cooling to 68 to 70°F before 10 AM lets the home coast on stored thermal mass, reducing peak-hour AC runtime by up to 15% on a typical summer day.
Blackout cellular shades on south and west windows block 70 to 77% of solar heat gain, reducing whole-home cooling load by up to 18% in high-sun climates.
Sealing and cooling only the bedroom and essential zones reduces the conditioned volume by 40 to 60%, cutting that portion of cooling energy by up to 20%.
Sealing leaky attic ducts recovers 15 to 25% of conditioned air that was being lost to unconditioned space, with gains largest during peak afternoon hours.
A properly programmed night-shift thermostat schedule with setbacks during unoccupied hours saves 10 to 15% annually on cooling costs according to DOE data.
🏠 Key Concepts Explained
The Science Behind It
Your home gains heat through three pathways: conduction (heat moving through solid materials like walls, roof, and glass), convection (warm air infiltrating through gaps and cracks), and radiation (infrared energy transmitted through windows and absorbed by surfaces). During the day when you are sleeping, all three are working against you simultaneously. The sun angle peaks between 11 AM and 3 PM, and west-facing windows receive maximum direct radiation from 2 PM to sunset, which is squarely inside most night-shift sleep windows. A single unshaded west window in a bedroom can add 500 to 1,000 BTUs per hour of heat gain, requiring your AC to run an additional 10 to 20 minutes just to offset that one window.
Pre-cooling works because of thermal mass. Every pound of drywall, wood, concrete, and furniture in your home can absorb a measurable amount of heat energy before its temperature rises. If you cool those materials to 68 to 70°F before the outdoor heat peaks, they act as a cold battery, absorbing heat gain from the outside slowly and delaying the rise in indoor air temperature by one to three hours depending on your home’s construction. This is why a well-insulated, pre-cooled home stays comfortable until 1 or 2 PM even if the AC is set back, while a poorly sealed home starts warming by 10 AM. The thermal mass effect is the physical basis for the pre-cooling strategy and why timing matters so much.
Room isolation works on basic fluid dynamics. Air, like any fluid, flows from high pressure to low pressure and from warm zones to cool zones. When you open the door between a 68°F bedroom and a 78°F hallway, mixing occurs immediately and you lose the temperature differential you worked to create. By sealing the bedroom door with weatherstripping, a door sweep, and a thermal curtain, you create a microclimate that your AC (or a single window unit) can maintain with far less energy than conditioning the whole house. The physics are simple: halving the volume you need to cool roughly halves the cooling load, all else being equal.
Frequently Asked Questions
▼ I pre-cooled my house but it still hits 78°F in my bedroom by noon. What am I doing wrong?
The most common causes are unshaded windows and inadequate room isolation. Check whether your south or west bedroom windows have any solar blocking during the late morning. Even a thin curtain helps but a blackout cellular shade blocks dramatically more. Also check that your bedroom door is sealed at the bottom and sides, since a 0.5 inch gap under a door lets warm hall air flood in continuously. If both are addressed and the problem persists, your attic insulation may be insufficient and that heat is conducting straight through the ceiling.
▼ My electricity bill is still high even though I adjusted my thermostat schedule. What else can I do?
Thermostat scheduling helps, but if your ducts run through an unconditioned attic and are leaking or uninsulated, you can lose 20 to 30% of every cooling dollar before the air ever reaches your room. Pull down your attic hatch and visually inspect the duct connections at the main air handler plenum and at each boot where ducts connect to ceiling registers. Look for disconnected flex duct, loose metal connections, or gaps you can see daylight through. Sealing these with mastic sealant is a half-day DIY project that often produces the single biggest efficiency gain in an older home.
▼ Can I do any of this if I rent an apartment and cannot modify the HVAC or install window shades?
Yes, start with removable blackout film applied directly to the window glass ($15 to $30 per window, no damage to frames) and a freestanding portable AC unit in your bedroom ($250 to $400 for 10,000 to 12,000 BTU) vented through a window kit that requires no permanent installation. Ask your landlord about a programmable thermostat swap since it is a non-destructive swap that leaves the system intact and many landlords will agree. A draft snake at the bedroom door base and a ceiling fan running counterclockwise round out a renter-friendly setup.
▼ My bedroom faces west and still gets hot even with the blinds closed. Is there anything stronger?
Standard horizontal blinds block only about 20 to 30% of solar heat gain even when fully closed because they do not seal the edges and the material itself heats up and radiates inward. Upgrade to a blackout cellular (honeycomb) shade installed inside the window frame with side channels, or apply solar control window film with a Solar Heat Gain Coefficient (SHGC) below 0.25 directly to the glass. Window film is a semi-permanent solution but removes cleanly with a razor blade and heat gun if you move. For extreme west exposure, exterior solar shades or awnings block heat before it hits the glass and are the most effective solution of all, reducing solar gain by up to 80%.
▼ How long until I notice actual savings on my electricity bill after making these changes?
Behavioral changes like thermostat scheduling and closing blinds show up on your very next monthly bill, sometimes within two weeks if your billing cycle aligns. Physical upgrades like blackout shades and door sealing are effective from day one, and you will notice the bedroom temperature impact immediately. Compare your usage in kilowatt-hours (not just dollar amount, since rates fluctuate) from the same month the prior year to get a clean comparison. Most homeowners who implement the full quick fix approach see a 15 to 25% reduction in cooling-related usage within the first full billing cycle.
Quick Tips
- Use blackout curtains with a white or reflective backing on south and west windows. The white side reflects solar radiation before it enters the room rather than absorbing it as heat inside the fabric.
- Run your bathroom exhaust fan for 20 minutes after showering before you go to sleep. Shower steam adds significant humidity to your bedroom microclimate, and high humidity makes any temperature feel warmer. Removing that moisture lets you sleep 2 to 3 degrees warmer without discomfort.
- If your utility offers a time-of-use rate plan, enroll in it and schedule your pre-cooling to finish by 10 AM. You will pay off-peak rates for all the energy used to create your cool buffer and then coast through the expensive peak window on stored coolness.
- Keep a small electric fan pointed at your body rather than just circulating room air. Direct airflow across skin accelerates evaporative cooling and can make you feel 4 to 6 degrees cooler without changing the room temperature at all, meaning you can raise the thermostat and still sleep comfortably.
Variations for Your Situation
- Apartment/Rental: Focus on zero-modification options since you cannot change the central HVAC schedule or install permanent window coverings. Buy removable blackout window film ($15 to $30 per window) for instant solar blocking with no hardware. Add a portable 10,000 to 12,000 BTU AC unit ($250 to $400) for your bedroom, which uses a window kit requiring no permanent installation and lets you cool just your sleep space without paying to air condition the entire apartment. A USB-powered smart plug with scheduling ($15 to $25) lets you run the portable unit on a pre-cool schedule even if the landlord controls the central system.
- Tight Budget (under $50): Start with the four free steps: reprogram your existing thermostat, close blinds and curtains before leaving for your shift, close interior doors to unused rooms, and reverse your ceiling fan direction. Add a foam draft stopper for the bedroom door ($8) and a basic digital thermometer and humidity monitor ($12 to $15) so you know what temperature and humidity you are actually sleeping in. Together these cost under $25 and can reduce your daytime cooling load by 15 to 20% with no further investment.
- Older Home (pre-1980): Homes built before modern energy codes typically have attic insulation below R-11, single-pane windows, and duct systems with 20 to 30% leakage rates, meaning efficiency gains from behavioral changes are smaller relative to the building envelope problems. Prioritize duct sealing first since it addresses the most waste, then attic insulation to R-38 minimum. Both qualify for the 30% federal energy efficiency tax credit. Until those structural issues are addressed, a dedicated room AC unit for your sleep space is the most cost-effective short-term fix because it bypasses the leaky duct system entirely and conditions only the room you occupy.