Your sump pump sits quietly in a pit in your basement, ignored for months at a time, and then suddenly it is the only thing standing between your home and a catastrophic flood. According to the Insurance Information Institute, water damage is one of the most common and costly home insurance claims, with basement flooding averaging $10,000 to $50,000 in repairs depending on the extent. The cruel irony is that sump pumps fail most often during the exact conditions they are needed most: extended power outages during storms, overwhelmed systems during heavy rainfall, and mechanical wear that goes undetected for years.
Most homeowners never think about their sump pump until they hear it grinding, smell something burning, or walk downstairs to find standing water. The good news is that sump pump failures are almost entirely preventable with a predictable maintenance routine and an inexpensive backup system. A $150 battery backup unit and one hour of annual inspection time can protect a basement full of finished flooring, furniture, and mechanicals worth far more than that.
This post covers every layer of sump pump reliability: the quick checks you can do right now in under 15 minutes, the DIY maintenance routine that extends pump life and catches problems early, and the professional upgrades worth considering for high-risk homes. Whether your basement has flooded before or you want to make sure it never does, these steps give you a clear and actionable plan.
What You’ll Need
Click on an item below to shop for the recommended items for this recipe on Amazon.
As an Amazon Associate, we earn from qualifying purchases.
How to Do It
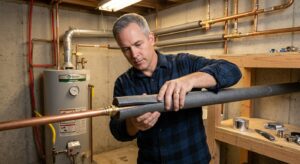
- Locate your sump pit and remove the cover. Look into the pit and confirm the pump is upright, the float arm moves freely without touching the pit walls, and there is no visible debris or silt buildup around the intake.
- Pour a 5-gallon bucket of water slowly into the pit to manually trigger the float switch. The pump should activate within a few seconds of water reaching the float level and drain the pit within 1 to 2 minutes. If it does not start, the float is stuck or the pump has failed.
- Listen while the pump runs. A healthy pump hums steadily. Grinding, rattling, or a high-pitched whine indicate a worn impeller or failing motor bearing and warrant immediate replacement before the next storm.
- Go outside and locate the discharge pipe outlet. Confirm it is not blocked by ice, mud, leaves, or a critter nest. The outlet should terminate at least 10 feet from the foundation and discharge away from the house grade.
- Check the power cord and outlet. The pump should be plugged into a dedicated GFCI outlet. Confirm the outlet is not tripped and the cord has no visible damage, kinks, or pinch points from the pit cover.
- If you have a battery backup unit, press its test button and confirm the alarm sounds and the backup pump activates. Replace the backup battery if it has not been changed in 3 years or if the unit shows a fault light.
- Unplug the pump from the wall before doing any hands-on work. Disconnect the discharge pipe at the union fitting above the pump if present, or loosen the hose clamp. Lift the pump out of the pit and place it on a plastic sheet or into a utility bucket.
- Rinse the pump housing and intake screen thoroughly with a garden hose. Remove any silt, gravel, or debris lodged in the screen. Use a small brush to clear the impeller intake if accessible. A clogged impeller can reduce flow rate by 30 to 50%.
- Inspect the check valve on the discharge line. It should have an arrow indicating flow direction pointing away from the pump. Shake it lightly and listen for the internal flapper moving. A seized or corroded check valve should be replaced now. Replacement check valves cost $10 to $25 at any hardware store.
- Lower the cleaned pump back into the pit and confirm it sits level on the pit floor or on a small paver block to keep the intake off the bottom. Reconnect the discharge pipe and verify all fittings are tight.
- Install a battery backup sump pump system if you do not already have one. These units include a secondary pump that sits above the primary pump in the pit, a marine-grade deep cycle battery, and a trickle charger. Follow the manufacturer wiring diagram and mount the battery on a shelf above the flood line. Typical units handle 1,000 to 2,000 gallons per hour and run for 5 to 12 hours on a full charge.
- Install a water alarm in the pit set 1 to 2 inches above the normal operating water level. Basic audible alarms cost $10 to $20. Wi-Fi connected models that push alerts to your phone cost $25 to $60 and are worth it if you travel or sleep through storms.
- Schedule a plumber or basement waterproofing contractor to inspect your entire drainage system, including the weeping tile or interior drain tile system that feeds the sump pit. A clogged drain tile system can overwhelm even a perfectly functioning pump.
- Ask the contractor to flow-test your primary pump against a measured volume of water and confirm it meets its rated gallons-per-hour capacity. Pumps that have lost more than 20% of rated capacity should be replaced proactively.
- Discuss upgrading to a higher-capacity primary pump if your area receives heavy rainfall events. A 1/2 HP pump moves roughly 2,500 to 3,000 gallons per hour, while a 3/4 HP unit handles 3,500 to 5,000 gallons per hour. For high-water-table homes, the larger pump is often worth the $150 to $200 price difference.
- Have a licensed electrician install a dedicated 20-amp circuit for the sump pump if it currently shares a circuit with other loads. A shared circuit risks nuisance trips during high-demand storms. Cost is typically $150 to $300.
- Consider a water-powered backup pump as a secondary redundancy layer in addition to the battery backup. These units connect to your home’s municipal water supply and require no electricity, making them immune to power outages. They use about 1 gallon of city water for every 2 gallons pumped out, so they are best as emergency backups only.
Why It Works: The Benefits
A single basement flood averages $10,000 to $50,000 in structural and contents damage. Proactive sump pump maintenance costing under $200 per year eliminates the primary failure modes that lead to these events.
The average sump pump lasts 7 to 10 years with no maintenance but can reach 12 to 15 years with annual cleaning, lubrication where applicable, and early detection of wear. That is an additional $150 to $300 in avoided replacement costs per maintenance cycle.
Many insurers offer discounts of 5 to 15% on water backup coverage riders when documented backup systems are in place. A battery backup unit can pay for itself in premium reductions over 3 to 5 years in addition to its protective value.
A tested pump with a functioning backup system and an audible or smartphone-connected water alarm means you can sleep through a heavy storm without anxiety, rather than checking the basement every hour.
Even small seepage events that stop short of visible flooding can raise basement humidity enough to trigger mold growth within 24 to 48 hours. A reliable sump system keeps the pit dry and the basement humidity in check, avoiding mold remediation costs that average $1,500 to $5,000.
💰 Savings Impact by Action
Homes with a maintained primary pump plus a battery backup experience up to 90% fewer flood events caused by pump failure compared to homes with a single unmaintained pump.
Annual cleaning and inspection extends average pump lifespan by 40% or more, pushing replacement from every 7 to 10 years out to 12 to 15 years and saving $150 to $300 per avoided replacement.
Documented backup systems and water alarms can reduce water backup insurance rider premiums by 5 to 15% annually depending on the insurer and policy.
A reliable sump system that prevents standing water reduces the probability of mold growth requiring remediation by approximately 70%, avoiding an average remediation cost of $1,500 to $5,000.
🏠 Key Concepts Explained
The Science Behind It
Sump pumps work by taking advantage of a simple pressure differential. Groundwater saturates the soil surrounding your foundation and naturally migrates toward any low-pressure point, which in a basement means the sump pit. The pit is intentionally the lowest point in the drainage system, so water flows to it rather than seeping through the foundation walls. When the water level in the pit rises high enough to lift the float switch, the pump motor engages an impeller, which is a spinning disk that creates a centrifugal force, throwing water outward into the discharge line and creating a low-pressure zone that pulls more water up through the intake.
The check valve plays a critical thermodynamic role in this system. When the pump shuts off, the water in the vertical discharge pipe above the pump has nowhere to go but back down into the pit due to gravity. Without a check valve, this backflow immediately raises the water level in the pit, triggers the float again, and forces the pump into a short-cycling loop that can burn out the motor in a fraction of the time a normal workload would. A functioning check valve traps that discharged water above it and forces it to continue moving out through the drain line rather than falling back.
Battery backup systems operate on a parallel circuit principle. The backup pump is positioned several inches above the primary pump in the same pit and activates only when the water level rises past the primary pump’s operating range, which means the primary has either failed or is overwhelmed. The battery is kept at full charge by a continuous trickle charger connected to household current. During a power outage, the trickle charger goes offline but the stored battery energy remains available. A fully charged group 27 or group 29 marine battery can typically power a backup pump for 5 to 12 hours depending on how frequently the pump cycles, which covers the majority of storm events and power outage durations.
Frequently Asked Questions
▼ My sump pump is running constantly but the water level in the pit never goes down. What is wrong?
This almost always means either a failed check valve allowing water to cycle back into the pit, or a discharge line that is blocked or terminated too close to the foundation so the water re-enters the drainage system. Start by listening for the sound of water trickling back into the pit within seconds of the pump shutting off. If you hear that, the check valve is faulty and needs replacement, which is a $15 to $25 part. If the valve is fine, walk the discharge line outside and confirm the outlet is clear and draining downhill at least 10 feet from the house.
▼ My pump turns on but I can hear it humming and no water is moving. Is it burned out?
A pump that hums without moving water usually has a seized or jammed impeller, not a fully burned motor. Pull the pump out of the pit and check the intake for debris, gravel, or silt packed into the impeller housing. Clear it with a brush or pick, then lower the pump back in and retest. If the impeller spins freely but the pump still cannot move water, the internal capacitor may have failed, which in older pumps often costs more to repair than to replace the unit outright.
▼ How do I know if my sump pump is strong enough for my basement?
A standard 1/3 HP pump moving 1,500 to 2,000 gallons per hour is adequate for most residential basements with moderate groundwater. If your pump runs more than 3 to 4 times per hour during a moderate rainstorm, or if the pit level rises faster than the pump can drain it, you need a higher-capacity unit. Upgrade to a 1/2 HP or 3/4 HP model, which handles 2,500 to 5,000 gallons per hour and is widely available for $150 to $350.
▼ Can I install a battery backup sump pump myself, or do I need a plumber?
Most battery backup kits are designed for DIY installation and include all fittings, wiring, and instructions. The plumbing connection requires a basic understanding of PVC pipe and a T-fitting or Y-fitting into the existing discharge line. No solvent welding is needed in most kits since they use rubber couplings and hose clamps. If your discharge line is copper or you are not comfortable with basic pipe work, a plumber can install the system in about one hour for $100 to $200 in labor.
▼ My basement has never flooded. Do I really need to maintain the sump pump?
Yes, and this is exactly when proactive maintenance matters most. A pump that has never been tested or cleaned may have a stuck float, degraded impeller, or backup battery at 20% capacity without any visible sign of a problem. The first flood you ever experience will be the test, and failed equipment cannot be swapped out mid-storm. Spending 15 minutes per year on testing costs nothing compared to the deductible and emotional toll of a first-time flood.
Quick Tips
- Test your sump pump manually every 3 months by pouring a bucket of water into the pit. Do not wait until a storm season to discover it has failed.
- Replace a battery backup unit’s battery every 3 to 5 years regardless of whether it appears to be holding a charge. Battery capacity degrades gradually and a weak battery will fail in the first hour of real demand.
- Keep the pit cover on at all times except during maintenance. An uncovered pit allows humidity to escape into the basement and lets debris fall in that can jam the float or clog the intake.
- If your basement has finished walls and flooring, consider installing a low-water-level alarm set to trigger before the pit overflows, giving you time to respond before any water reaches the floor surface.
- In cold climates, insulate the last 2 to 3 feet of exterior discharge pipe or use a freeze-proof discharge outlet adapter to prevent the pipe from freezing solid during winter storms.
Variations for Your Situation
- Apartment or Condo with Shared Sump System: If you rent a unit with basement storage or live in a condo where the sump system is maintained by the building, your best defense is a standalone water alarm placed at floor level near any floor drain or low point. Units like the Govee Wi-Fi water sensor ($20 to $30) connect to your phone and alert you to rising water before damage spreads. Document any flooding events in writing to your property manager immediately, as response time is your primary protection.
- Tight Budget (Under $50): Skip the battery backup system for now and focus on the two highest-impact free actions. First, do the bucket test today to confirm your pump actually works. Second, spend $10 to $20 on a basic audible water alarm placed in the pit. Early warning gives you time to use a shop vac or submersible utility pump to manage water manually during a small event. Add the battery backup system as soon as budget allows, prioritizing it before the next rainy season.
- Older Home (Pre-1980): Homes of this age often have clay tile or deteriorating concrete drain tile that feeds the sump pit. These systems crack and collapse over decades, reducing their ability to channel groundwater to the pit before it seeps through walls. If your basement walls show efflorescence (white mineral deposits) or recurring damp spots despite a working pump, the drain tile system itself may need inspection or replacement by a waterproofing contractor. This is a $3,000 to $10,000 project but is the root cause that no pump upgrade alone can solve.