Most homeowners are surprised to learn that the sum of all the small cracks and gaps in a typical house adds up to the equivalent of leaving a window wide open all year long. That small gap where a pipe enters the wall, the hairline crack where window trim meets siding, the space around an electrical outlet on an exterior wall — individually they seem harmless, but together they create a constant exchange of expensive conditioned air for unconditioned outdoor air. The result is higher bills, drafty rooms, and a revolving door for ants, spiders, and stink bugs.
The good news is that caulking is one of the highest-return projects in home efficiency. The Department of Energy estimates that sealing air leaks can reduce heating and cooling costs by 10 to 20 percent, and a complete caulking project costs between $20 and $80 in materials depending on the size of your home. That puts the typical payback period well under a single heating season. Unlike insulation upgrades or HVAC replacements, this is a project most homeowners can complete in one Saturday morning.
This guide covers exactly where to look, which caulk to use where, and how to get a clean, lasting seal the first time. Whether you have 30 minutes for the highest-priority spots or a full weekend to do the job right, you will find a clear plan here along with the building science that explains why this simple fix delivers such outsized results.
What You’ll Need
Click on an item below to shop for the recommended items for this recipe on Amazon.
As an Amazon Associate, we earn from qualifying purchases.
How to Do It
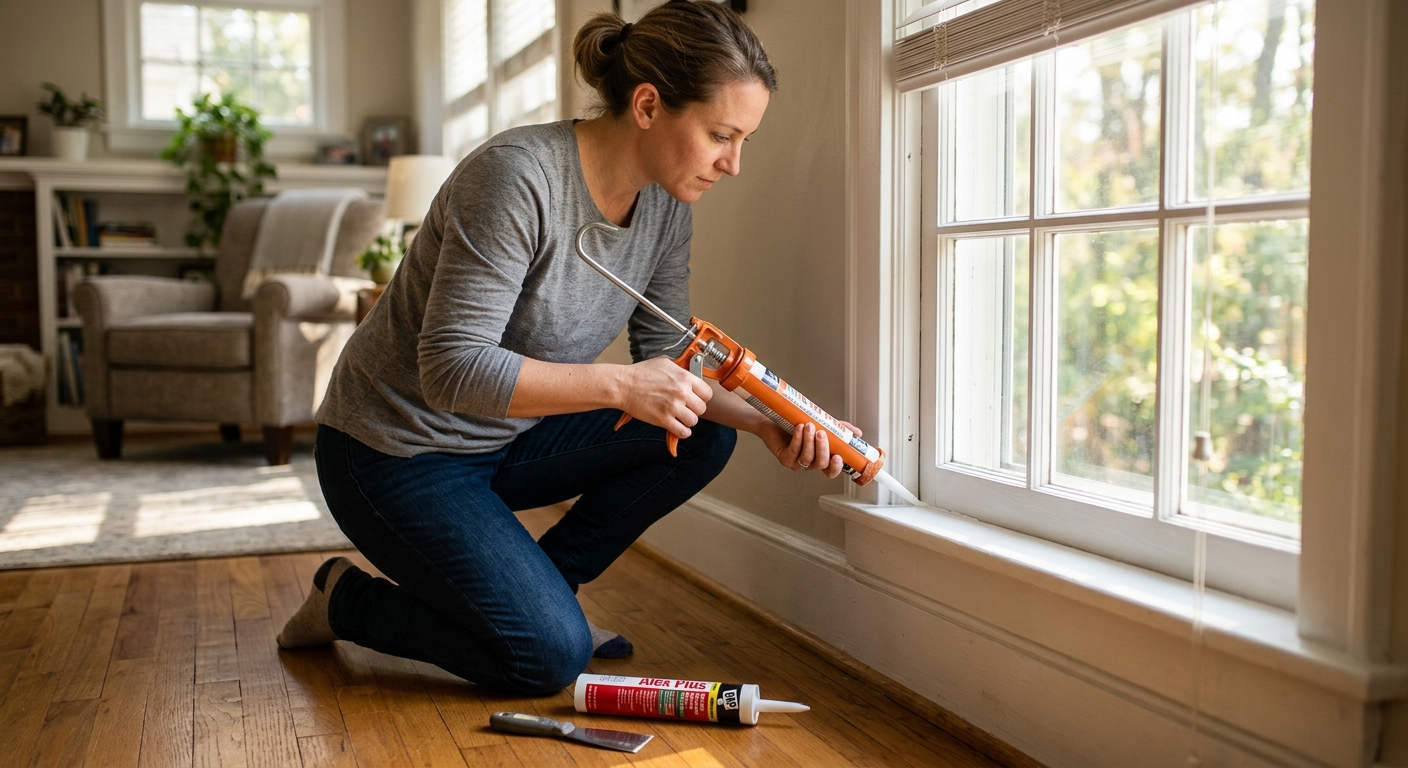
- Buy one tube of paintable siliconized acrylic latex caulk and a basic caulk gun at any hardware store. This combination works on most interior and exterior painted surfaces.
- Check all window and door frames where the trim meets the wall or siding. Press a damp finger along the joint — if you feel air movement or see a gap wider than a credit card thickness, it needs caulk.
- Cut the caulk tube tip at a 45-degree angle to create a 3/16-inch opening. Apply a steady bead into each gap, holding the gun at a consistent angle and moving at an even pace.
- Smooth each bead immediately with a wet fingertip or a plastic caulk tool. This presses the caulk into the gap and creates a clean, professional finish.
- Check where any pipes, cables, or dryer vents exit through exterior walls and apply caulk around the perimeter of each penetration. These spots are often overlooked and are major insect entry points.
- Allow 24 hours before painting over latex caulk. Silicone caulk cannot be painted, so use latex anywhere paint coverage is needed.
- Walk the entire exterior perimeter with a notepad and mark every gap, crack, or penetration. Check where foundation meets siding, around all window and door frames, at corner boards, where utilities enter, and along roof edges at gable ends.
- Purchase the right caulk for each zone: 100 percent silicone for areas that stay wet (around exterior window sills, faucets, areas exposed to standing water), siliconized acrylic latex for painted exterior joints, and fire-rated caulk or fire-stop foam for any gaps where wires or pipes pass through framed walls between floors or into an attached garage.
- Start exterior work on a dry day with temperatures above 50 degrees Fahrenheit so the caulk cures properly. Remove old cracked caulk with a putty knife or oscillating tool before applying new caulk over cleaned surfaces.
- Apply caulk to all exterior locations systematically, starting at the foundation and working upward. Use backer rod foam rope to fill any gaps wider than half an inch before caulking so the caulk does not sag or bridge unsupported.
- Move indoors on day two and check along the base of all exterior walls, around window and door trim on the inside, and inside any closets on exterior walls. Feel for drafts using a stick of incense or a candle held near baseboards and trim.
- Seal interior penetrations in the attic floor (top plates where wires and pipes pass through) using fire-rated caulk or canned spray foam rated for that application. These attic bypasses are often the single largest air leakage zone in the home and are frequently missed.
- Do a final walkthrough with a thermal camera app on your phone or a borrowed infrared thermometer to confirm sealed areas no longer show temperature differentials on cold days.
- Hire a certified BPI (Building Performance Institute) or RESNET energy auditor. Many utilities offer subsidized audits or rebates that reduce the out-of-pocket cost to $0 to $150.
- During the blower door test, the auditor depressurizes the home to 50 Pascals and uses a smoke pen or infrared camera to map every air leakage location. This test quantifies your current ACH number so you have a measurable baseline.
- Review the auditor’s report, which will prioritize leaks by their impact. The top three to five locations typically account for 60 to 80 percent of total leakage and are where professional sealing delivers the most value.
- The contractor seals identified locations using a combination of caulk, spray foam, rigid foam board with tape, and fire-rated materials depending on the zone. Attic top plate sealing and rim joist sealing at the foundation are common high-value targets.
- Request a post-sealing blower door test to verify the improvement and document the new ACH number for utility rebate paperwork if applicable. Many programs require this verification for rebate eligibility.
Why It Works: The Benefits
The DOE estimates air sealing saves homeowners 10 to 20 percent on heating and cooling annually. For a household spending $1,800 per year on energy, that translates to $180 to $360 in savings every year.
Caulking exterior penetrations, foundation gaps, and window perimeters closes the entry points most insects use. Homeowners who complete a thorough sealing project often report a dramatic reduction in ants, spiders, and stink bugs within the first season.
Drafts near windows and exterior walls disappear after sealing, making rooms near the building perimeter noticeably warmer in winter and cooler in summer. Consistent surface temperatures also reduce the radiant chill that makes a room feel cold even when the thermostat reads 70 degrees.
Sealing gaps where warm indoor air can contact cold exterior surfaces reduces condensation inside wall cavities, lowering the risk of mold growth and wood rot that can cost thousands of dollars to remediate.
A tighter building envelope means your furnace and air conditioner run shorter cycles to maintain setpoint, reducing wear and potentially extending equipment life by several years.
💰 Savings Impact by Action
Caulking the perimeter of windows and doors reduces infiltration through these joints by up to 10 percent of total annual heating and cooling cost according to DOE estimates.
Sealing pipe, wire, and duct penetrations through exterior walls and the attic floor eliminates high-velocity air pathways that collectively account for roughly 8 percent of whole-home energy loss.
Sealing and insulating the rim joist band at the foundation can reduce heating load by 10 to 15 percent in homes with unfinished basements or crawl spaces where this area is currently open.
Sealing interior wall top plates from the attic floor stops warm air from bypassing insulation and rising directly out of the building, reducing attic-related heat loss by up to 18 percent.
A comprehensive air sealing project addressing all zones together can cut total heating and cooling costs by 10 to 20 percent per year based on DOE and ENERGY STAR field data.
🏠 Key Concepts Explained
The Science Behind It
Air infiltration is driven by pressure differences across the building envelope. In winter, the stack effect creates positive pressure at the top of the house as warm air rises and tries to escape, while negative pressure at the bottom draws cold air in through every available gap. This pressure differential increases as the temperature difference between inside and outside grows, meaning your leakiest days are also your coldest and most expensive heating days. Caulk creates a continuous barrier that eliminates these pressure-driven pathways without relying on friction or compression seals that degrade over time.
The reason a small gap has a disproportionately large impact is fluid dynamics. Air flowing through a narrow crack behaves like water through a pinhole: the velocity increases as the opening shrinks, which means even a tiny gap can move a surprising volume of air per hour when the pressure difference is high. A 1/8-inch gap running the full length of a standard window frame is roughly equivalent in air leakage to a 2-inch diameter hole in the wall. Caulk fills these linear gaps completely and bonds to both surfaces, creating a seal that resists pressure from either direction.
Caulk also addresses the moisture dynamics that make unsealed gaps particularly damaging in cold climates. When warm humid interior air moves outward through a wall gap, it cools as it travels and can reach its dew point inside the wall cavity, depositing liquid water on framing and sheathing. Over several years this cycle causes wood rot, mold, and deteriorating insulation. By stopping the airflow at the interior surface, caulk prevents this warm moist air from ever reaching the cold zone inside the wall, protecting the structure while also reducing heat loss.
Frequently Asked Questions
▼ I caulked all my windows last year but I still feel drafts. What did I miss?
Window frame caulk seals the trim-to-wall joint but does not address the gaps inside the window unit itself, around the sash, or between the window frame and the rough opening inside the wall cavity. Pull off a piece of interior window trim and look for gaps between the window frame and the framing — large voids here should be filled with low-expansion spray foam. Also check that weatherstripping on the sash is intact, as that is a separate seal from caulk.
▼ Can renters do this project without landlord permission?
Most caulking work inside the unit, such as around interior window trim, baseboards on exterior walls, and under the kitchen sink where pipes enter, is considered normal maintenance that does not alter the property and is generally acceptable without asking. For exterior caulking or any work involving building penetrations, a quick note to your landlord is a good idea and many will appreciate the maintenance. Avoid using spray foam in rented units unless you are certain of color match and removal, as it is harder to reverse than caulk.
▼ How long will my caulk last before I need to redo it?
High-quality 100 percent silicone caulk on exterior joints lasts 20 years or more when applied to clean surfaces. Siliconized acrylic latex caulk on painted trim typically holds well for 5 to 10 years before cracking under UV and thermal cycling. Check exterior caulk every fall as part of your seasonal maintenance walk and touch up any joints that show cracking, separation, or gaps. Interior caulk in low-movement areas can last indefinitely.
▼ What if my home is older than 30 years and has layers of old caulk already?
Old caulk that is cracked, peeling, or pulling away from the surface must be removed before applying new caulk, or the new bead will fail at the same rate. Use a utility knife, oscillating tool, or dedicated caulk removal tool to scrape out old material, then clean the joint with a wire brush and let it dry completely. In homes built before 1978, be aware that old caulk may contain lead. Treat removal the same way you would treat lead paint: wet the area slightly to reduce dust, wear an N95 respirator, and dispose of scrapings in a sealed bag.
▼ My caulk keeps cracking within one season. What am I doing wrong?
The three most common causes are applying caulk in cold temperatures below 50 degrees Fahrenheit, applying it over a dirty or damp surface, or using latex caulk in a location that stays wet or gets direct UV exposure. Match the caulk type to the application: silicone for wet and UV-exposed locations, latex only for painted interior joints with minimal movement. Also check that your bead is not too thin — a bead under 1/8 inch wide on a moving joint will tear with the first major temperature swing.
Quick Tips
- Run a candle or incense stick slowly along baseboards and window trim on a windy day to find leaks invisibly before you start caulking. The flame or smoke deflects clearly at even small gaps.
- Clean and dry all surfaces before applying caulk. Caulk applied over dirt, old paint flakes, or moisture will peel within one season regardless of brand or quality.
- For gaps between 1/4 inch and 1/2 inch, press in foam backer rod first to create a backing surface. Caulk spanning a gap unsupported will sag and crack under UV and temperature cycling.
- On exterior horizontal surfaces such as window sills, do not caulk the bottom edge of the sill-to-siding joint. Leave that lower edge open to allow any water that gets behind the trim to drain out rather than being trapped and rotting the framing.
- Buy one tube more than you think you need. Running out mid-project and returning to the store breaks your momentum and the partially applied caulk may skin over before you return, requiring cleanup and restart.
- In cold climates, schedule exterior caulking for late summer or early fall when temperatures are consistently above 50 degrees Fahrenheit and rain is unlikely for at least 24 hours. Caulk applied in cold temperatures will not cure properly and may not bond.
Variations for Your Situation
- Apartment or Rental: Renters can achieve meaningful results without touching the building exterior. Focus on interior locations that landlords expect tenants to maintain: caulk around window and door trim from the inside, seal gaps under kitchen and bathroom sink cabinets where pipes enter, and use peel-and-stick foam weatherstripping on drafty windows and doors. These materials cost $15 to $30 total, require no permission, and are fully reversible. Rope caulk pressed into window sash gaps is another renter-friendly option since it peels out cleanly at move-out.
- Tight Budget Under $25: Buy one tube of siliconized acrylic latex caulk and one can of low-expansion spray foam, totaling about $15 to $20. Spend your time exclusively on the three highest-impact locations: the joint where your foundation sill plate meets the framing (accessible from the basement or crawl space), the gaps around where pipes and wires enter your exterior walls, and the perimeter of your worst drafty window. These three areas alone typically account for 30 to 50 percent of a home’s total leakage and require less than an hour to seal.
- Older Home Pre-1980: Homes of this era were built without the air barriers and vapor control layers standard today, so infiltration rates can be two to four times higher than a modern house. Prioritize the rim joist area at the foundation (the band of framing just above the foundation wall, often completely unsealed and uninsulated), the attic floor top plates, and all plumbing and electrical penetrations through exterior walls. Plan to use two to three times as much material as you might expect. If your home has knob-and-tube wiring, do not cover it with spray foam or insulation without an electrician’s sign-off first, as that wiring requires open air to cool safely.