
If your heating bill jumps 20 to 40 percent every February compared to December or January, you are not imagining things. February brings the coldest average temperatures of the year across most of the continental U.S., and your heating system has already been running hard for two to three months by then. Filters are clogged, thermostat schedules have drifted, and small air leaks that were manageable in October become major heat drains when outdoor temperatures drop into the teens or single digits.
The frustrating part is that most homeowners assume the spike is purely weather-related and do nothing about it. But building science tells a different story. The temperature difference between inside and outside, called the delta-T, directly controls how fast heat escapes your home. When that gap jumps from 30 degrees in November to 55 degrees in February, every unsealed crack, uninsulated pipe, and drafty door becomes dramatically more costly. A gap that costs you pennies in fall can cost you dollars in February.
This post breaks down exactly why February bills spike, which fixes deliver the fastest payback, and how to make sure next February looks a lot cheaper than this one. Whether you have 15 minutes or a full weekend, there is a strategy here that fits your schedule and budget.
What You’ll Need
Click on an item below to shop for the recommended items for this recipe on Amazon.
As an Amazon Associate, we earn from qualifying purchases.
How to Do It
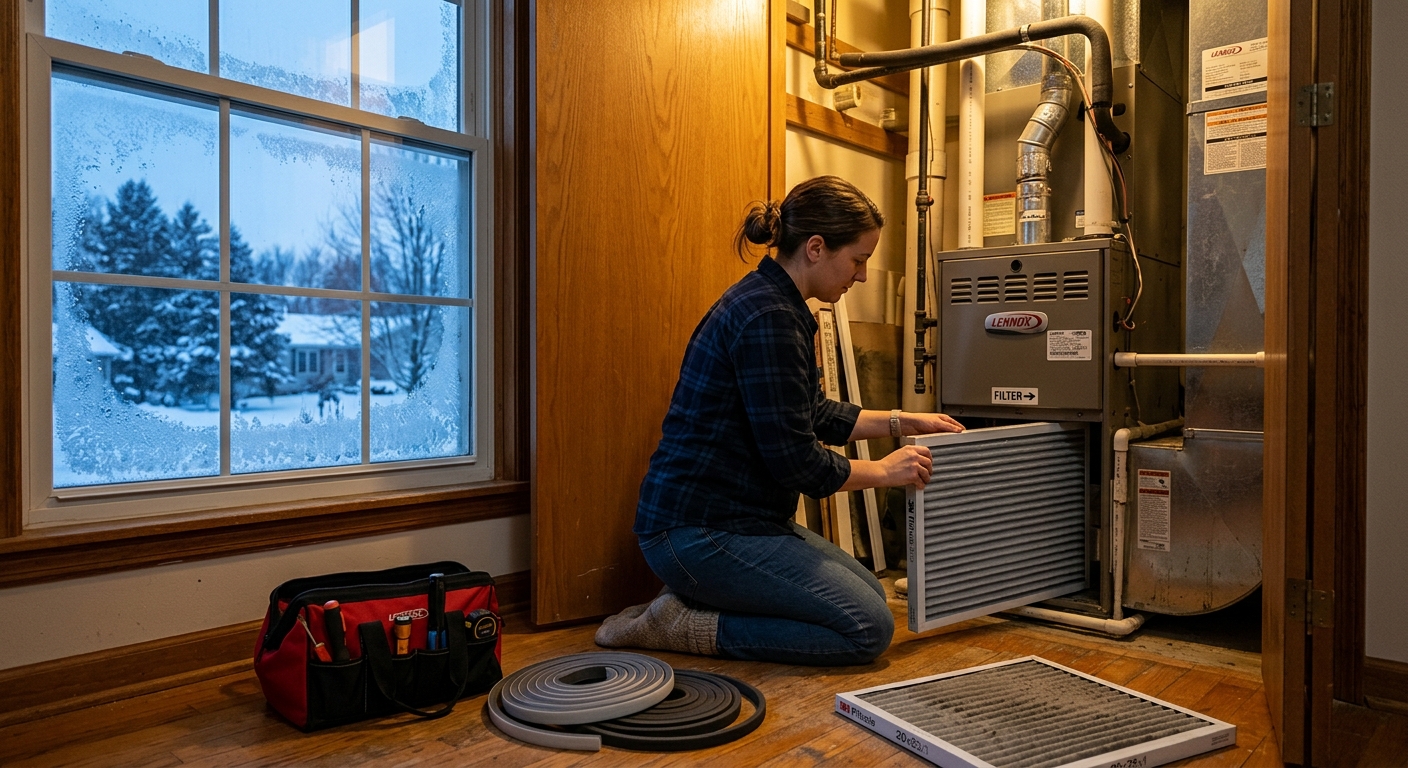
- Check and replace your furnace filter if it has been more than 60 days since the last change. Hold the old filter up to a light source. If you cannot see light through it, replace it immediately. A fresh filter alone can restore 10 to 15 percent of lost system efficiency.
- Pull up your thermostat history or app if you have a smart thermostat, and look for nighttime and away setpoints. If your setpoint is 68 degrees or higher all day and night, program a setback to 62 to 65 degrees between 10 p.m. and 6 a.m. to save 8 to 10 percent on overnight heating.
- Walk your home and feel for cold drafts at the base of exterior doors. Press your hand against the threshold seal. If you feel cold air, roll up a towel or use a door draft stopper as an immediate fix while you plan a proper weather-strip replacement.
- Check your attic hatch or pull-down stairs. This is one of the most overlooked heat loss points in any home. If the hatch feels cold or has no insulation on top, place a folded moving blanket over it as a temporary measure.
- Close fireplace dampers completely if the fireplace is not in use. An open damper is like leaving a 12-inch hole in your ceiling, pulling warm air out constantly.
- Buy one can of low-expansion spray foam, one tube of paintable latex caulk, and a roll of self-adhesive foam weather stripping before you start. Total materials should run $40 to $70 at any hardware store.
- Seal around all exterior electrical outlets and switch plates on outside-facing walls. Remove the cover plate and use foam gaskets (sold in packs of 10 for about $3) behind each one. This step alone can reduce infiltration by 5 to 8 percent in older homes.
- Apply fresh caulk along the base of all exterior door frames and window frames where the frame meets the wall. Use a utility knife to remove old cracked caulk first. Apply a continuous bead and smooth it with a wet finger. Let cure 24 hours before painting.
- In the attic, use low-expansion spray foam to seal around every plumbing vent pipe, electrical wire chase, and the top plates of interior walls where they meet the attic floor. These bypasses are responsible for up to 40 percent of stack-effect heat loss.
- Replace door weather stripping on any exterior door where daylight is visible around the frame or where the existing strip is cracked or compressed. Self-adhesive V-strip or door sweep kits cost $8 to $20 per door and take about 20 minutes each to install.
- After sealing, run your furnace for one full cycle and walk through the home again with your hand near previously drafty spots to confirm improvement. Note your next gas meter reading in two weeks to measure your savings.
- Schedule a professional HVAC tune-up in early January before the February peak. A technician will clean the heat exchanger, test combustion efficiency, check refrigerant levels on heat pumps, and verify that the system is operating at rated efficiency. A well-tuned furnace runs 10 to 15 percent more efficiently than a neglected one.
- Ask for a combustion analysis report showing actual flue gas temperatures and CO levels. This tells you whether your furnace is losing heat up the flue, which is common in older 80 AFUE units running at 70 to 75 percent real-world efficiency.
- Schedule a home energy audit with a blower door test through your utility company (often free or subsidized) or a certified BPI auditor. The blower door depressurizes the home and reveals exactly where air is escaping using a smoke pencil or thermal camera.
- Use the audit report to prioritize sealing work. Auditors typically find that attic bypasses, rim joists in the basement, and duct connections in unconditioned crawlspaces are responsible for 60 to 70 percent of total air leakage in most homes.
- If duct leakage is found, have ducts professionally sealed with mastic sealant. Leaky ducts in unconditioned spaces waste 20 to 30 percent of heated air before it ever reaches living areas, and no amount of thermostat adjustment compensates for that loss.
Why It Works: The Benefits
Combining a fresh filter, targeted air sealing, and a corrected thermostat schedule can reduce February heating costs by 15 to 30 percent, which translates to $40 to $120 in savings on a typical $300 to $400 February gas bill.
Sealing air leaks and clearing filter restrictions improves airflow balance, reducing the hot-and-cold room variation that forces homeowners to crank the thermostat just to keep one bedroom comfortable.
A clean filter and properly sealed duct connections reduce strain on the blower motor and heat exchanger. Overheating from restricted airflow is one of the top causes of premature heat exchanger failure, a repair that costs $1,500 to $3,500.
Homes with significant air leaks can take 30 to 60 minutes longer to recover temperature after a nighttime setback. Sealing leaks means the furnace reaches setpoint faster and runs shorter cycles, saving fuel and wear.
A 20 percent reduction in natural gas heating use for one household eliminates roughly 200 to 400 pounds of CO2 per month during peak winter, equivalent to avoiding several hundred miles of driving.
💰 Savings Impact by Action
Replacing a clogged filter after 60 to 90 days of winter use restores airflow and combustion efficiency, reducing fuel consumption by 10 to 15 percent per heating cycle.
Sealing attic bypasses, rim joists, and outlet gaps reduces infiltration-driven heat loss by up to 20 percent of total heating energy, the largest single category of savings available through DIY work.
Programming a 6 to 8 degree overnight and away setback saves approximately 1 percent per degree per 8 hours, adding up to 10 percent annually with most savings occurring in the coldest months.
Professionally sealing leaky ducts in unconditioned spaces recovers 20 to 30 percent of heated air that would otherwise be lost before reaching living areas.
Insulating and air-sealing basement rim joists with rigid foam and spray foam can eliminate 15 to 20 percent of total heat loss in homes built before 1990.
🏠 Key Concepts Explained
The Science Behind It
The physics behind your February bill spike comes down to one equation: heat loss equals thermal conductance times the temperature difference between inside and outside. When outdoor temperatures average 15 degrees Fahrenheit in February versus 35 degrees in November, the delta-T driving heat out of your home more than doubles. Every gap, crack, and under-insulated surface loses heat at a proportionally faster rate, which is why the same house that felt tight in October starts feeling drafty and expensive in February without any structural change.
Air infiltration makes this worse in a non-linear way. As the stack effect intensifies in colder weather, pressure differences between the warm upper floors and cold lower floors increase. This drives warm air out through top-floor gaps and pulls freezing air in through basement and foundation cracks at a faster rate. Research from Lawrence Berkeley National Laboratory found that air infiltration accounts for 25 to 40 percent of heating energy losses in typical American homes, making it the largest single category of heat loss, larger than conduction through walls or windows in many cases.
Your furnace compounds the problem when it is not operating at peak efficiency. Most gas furnaces are rated at 80 or 95 AFUE (Annual Fuel Utilization Efficiency), but a dirty filter, partially blocked flue, or worn igniter can drop real-world efficiency 10 to 20 percent below that rating. In February, when the furnace runs almost continuously during cold snaps, even a 10 percent efficiency deficit can add $30 to $60 to a single month’s bill. Combining air sealing with maintenance means your furnace does less work to maintain the same indoor temperature, and that is exactly where the savings compound.
Frequently Asked Questions
▼ Why is my heating bill higher in February than January even when temperatures are similar?
By February, your furnace filter has been running for three to four months and is likely significantly restricted, forcing longer run times for the same heat output. February also tends to have more sustained cold snaps rather than brief dips, meaning fewer mild days to average down the monthly total. Replace your filter and check if your thermostat setpoint has crept up since December.
▼ I sealed drafts last year but my bill is still high. What am I missing?
The most commonly missed locations are attic bypasses around plumbing and electrical penetrations, rim joists in the basement, and duct leakage in unconditioned spaces. Surface-level caulking around windows and doors addresses only a fraction of total infiltration. Consider a professional blower door test through your utility, which costs $0 to $150 depending on your provider and will pinpoint the actual leakage locations with precision.
▼ Can renters do anything about a high February heating bill without landlord permission?
Yes. Renters can legally use removable window insulation film kits ($20 to $40 per window), door draft stoppers, outlet foam gaskets, and thermostat schedules without any permanent modifications. If you have a smart thermostat already installed, use the scheduling feature aggressively. These steps together can reduce heating costs by 10 to 18 percent with zero damage to the rental unit.
▼ How long before I see the savings reflected on my actual utility bill?
Filter replacement and thermostat changes will show up in your very next billing cycle. Air sealing improvements typically take one to two full billing cycles to show clearly because gas billing periods do not align perfectly with work dates. Compare your consumption in therms or CCF rather than dollar amounts to control for price fluctuations and get a cleaner read on actual energy savings.
▼ My house is all electric with baseboard heaters. Does any of this still apply?
All of it applies and the stakes are higher. Electric resistance heating is the most expensive heat source per BTU, so air leakage wastes energy at a higher dollar cost per cubic foot of heated air lost. Focus especially on outlet gaskets, door sealing, and window film since you cannot offset baseboard inefficiency with a furnace tune-up the way gas users can. A programmable baseboard thermostat ($25 to $60 per zone) will also deliver outsized savings in an all-electric home.
Quick Tips
- Set your thermostat to 68 degrees while home and 62 degrees while sleeping or away. The Department of Energy estimates this schedule saves about 10 percent annually on heating, with most of those savings concentrated in the coldest months.
- Use a stick of incense or a smoke pen near electrical outlets, window frames, and baseboards on a windy day to find invisible air leaks. The smoke will visibly drift toward gaps even when you cannot feel the draft by hand.
- Reverse your ceiling fans to run clockwise at low speed in winter. This pushes warm air that has collected near the ceiling back down along the walls without creating a cooling draft, improving comfort without touching the thermostat.
- Keep interior doors open between rooms to allow heated air to circulate freely. Closed interior doors create pressure imbalances that force more outside air into the home through gaps, increasing infiltration by 10 to 15 percent in tight room configurations.
Variations for Your Situation
- Apartment or Rental: Renters should focus on zero-damage interventions. Use tension-mounted window insulation film kits ($20 to $40 per window at hardware stores), adhesive-backed door draft stoppers ($10 to $15), and foam outlet gaskets behind cover plates. Report visible gaps around window frames or exterior doors to the landlord in writing, as these are maintenance obligations in most lease agreements. These combined steps can realistically cut a renter’s heating bill by 10 to 18 percent.
- Tight Budget (under $50): Start with a new air filter ($8 to $15), a pack of outlet foam gaskets ($3 to $5 for 10), one tube of latex caulk ($5), and a door draft stopper ($10 to $15). These four items address three of the top five heat loss categories and together cost under $40. Prioritize whichever exterior door feels coldest to the touch as your first caulk and draft-stopper project. Expect 8 to 14 percent savings with no ladder or power tools required.
- Older Home (pre-1980): Homes built before modern building codes were adopted often have little to no air sealing in wall cavities, open top plates, and zero insulation on rim joists. Surface fixes help but the real gains come from attic air sealing and rim joist insulation. Budget $100 to $200 for materials for a full rim joist project and plan one to two weekends for attic sealing with spray foam. Older homes typically start with 2 to 3 times more air leakage than newer homes, meaning the payback on sealing work is faster, often under one heating season.