The average central HVAC system costs between $7,000 and $12,500 to replace, yet most homeowners give it almost no attention until something breaks. The result is predictable: systems that should last 15 to 20 years limp along for 10 to 12 before failing at the worst possible time, usually during a July heat wave or a February cold snap. The good news is that the difference between a system that lasts and one that doesn’t usually comes down to four habits that take less than an hour per month combined.
HVAC neglect has a compounding cost. A dirty filter forces your blower motor to work harder, which raises energy use and creates heat stress on components. That stress leads to more refrigerant issues, failed capacitors, and burned-out motors. According to the U.S. Department of Energy, a well-maintained HVAC system uses 15 to 25% less energy than a neglected one running the same number of hours. That gap adds up to hundreds of dollars a year on top of avoiding expensive repair bills.
This post walks you through four specific, science-backed habits, covering what to do yourself and when to bring in a professional, so you get the most out of the system you already own.
What You’ll Need
Click on an item below to shop for the recommended items for this recipe on Amazon.
As an Amazon Associate, we earn from qualifying purchases.
How to Do It
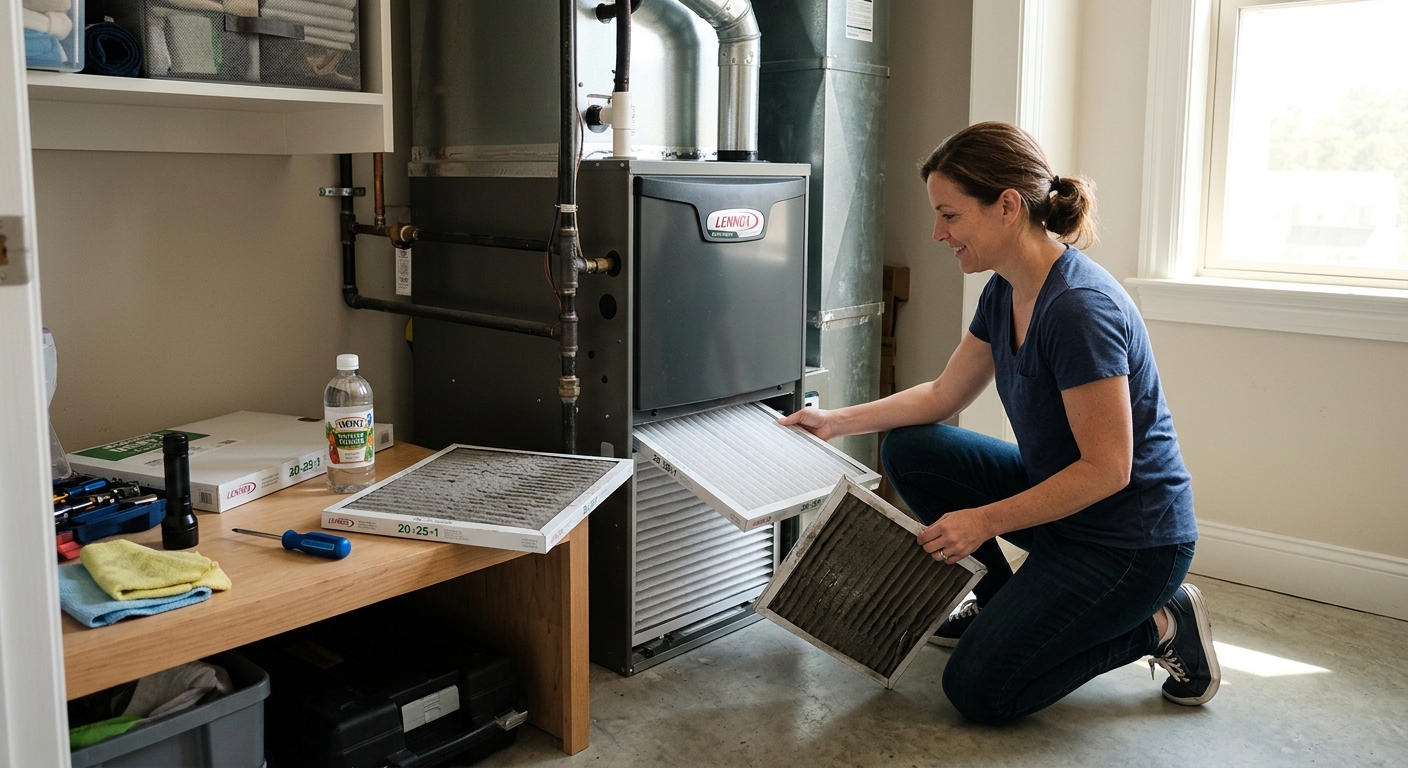
- Change or inspect your air filter every 30 to 90 days depending on filter type and household conditions. A 1-inch standard filter needs replacement every 30 days in dusty homes or with pets. A 4 to 5-inch media filter is good for 6 to 12 months. Hold the old filter up to light: if you cannot see light through it, it is overdue.
- Clear a 2-foot perimeter around your outdoor condenser unit every month during the cooling season. Remove leaves, grass clippings, shrubs, and any debris from the fins. The condenser needs free airflow on all sides to reject heat efficiently.
- Flush the condensate drain line monthly during cooling season by pouring 1 cup of distilled white vinegar into the drain pan access point near your indoor air handler. This prevents algae and mold buildup that causes clogs.
- Check all supply and return air registers monthly to confirm they are fully open and unobstructed by furniture, rugs, or curtains. Blocked registers increase static pressure throughout the duct system and force the blower to work harder.
- Listen to your system for 5 minutes after startup each month. Rattling, squealing, grinding, or clicking sounds that were not there before are early warning signs of a failing component that is far cheaper to address before it causes a cascade failure.
- Turn off power to the outdoor condenser at the disconnect box before doing any work on it. Use a fin comb ($10 to $15 at hardware stores) to gently straighten any bent condenser fins. Bent fins reduce airflow through the coil and drop efficiency measurably.
- Use a garden hose to rinse the condenser coil from the inside out, directing water outward through the fins. Do not use a pressure washer, which can damage the fins. This removes embedded dirt that restricts heat transfer.
- Locate your air handler’s evaporator coil access panel and visually inspect the coil with a flashlight. If you see dust buildup or any black or greenish discoloration indicating mold, apply a no-rinse evaporator coil cleaner spray ($10 to $15) and allow it to drip into the drain pan.
- Check the condensate drain line for clogs by removing the clean-out cap and using a wet-dry vacuum to suction the line from the outdoor termination point for 1 to 2 minutes. Follow with a vinegar flush.
- If your air handler has an older PSC blower motor with oil ports (small rubber caps on the motor housing), add 2 to 3 drops of SAE 10 non-detergent electric motor oil to each port. Do not over-oil, as excess lubricant attracts dust.
- Inspect accessible ductwork connections in your attic, basement, or crawl space for disconnected sections, visible gaps, or deteriorated duct tape (which fails within 5 years). Seal any gaps with UL-listed foil tape or mastic sealant.
- Schedule a professional HVAC tune-up once per year, ideally in March or April for a cooling-dominant climate, or September for a heating-dominant one. Most HVAC companies offer annual maintenance agreements that include two visits and priority service at a discount.
- Ask the technician to check refrigerant charge using manifold gauges and compare readings against manufacturer specifications. Do not accept a technician who adds refrigerant without checking for leaks first, as a leak will simply drain the charge again.
- Request a full electrical inspection including capacitor voltage readings, contactor condition, and a thermostat calibration check. A capacitor that tests at 70% or less of rated capacitance should be replaced proactively, as it costs $15 to $40 in parts versus $300 to $500 for an emergency call when it fails.
- Have the technician measure supply and return air temperatures to calculate system delta-T. A properly operating cooling system should show a 16 to 22 degree Fahrenheit drop across the coil. Numbers outside this range point to airflow problems, low refrigerant, or a dirty coil.
- Request a written report of all findings and any flagged components. This documentation also serves as proof of maintenance if you ever need to file a warranty claim with the manufacturer.
Why It Works: The Benefits
A well-maintained HVAC system routinely reaches 18 to 22 years of service life, compared to 10 to 14 years for neglected systems. Delaying a $10,000 replacement by even 5 years saves the equivalent of $2,000 per year in avoided capital cost.
DOE data shows maintained systems use 15 to 25% less energy than neglected ones. On a $200 monthly summer cooling bill, that is $30 to $50 back in your pocket every month the system runs.
Emergency HVAC service calls average $150 to $300 just for the visit, before parts. Most summer breakdowns are caused by dirty coils, clogged drains, or failed capacitors, all of which are caught during routine maintenance. Homeowners who maintain their systems report 40 to 60% fewer unplanned repairs.
A clean filter and coil system removes more airborne particles and controls humidity more effectively. High humidity above 60% relative humidity encourages dust mite growth and mold, both of which trigger allergy and asthma symptoms.
Most HVAC manufacturer warranties require proof of annual professional maintenance. Skipping tune-ups can void coverage on a compressor replacement that would otherwise cost $1,500 to $2,800 at no charge.
💰 Savings Impact by Action
Replacing a clogged filter restores proper airflow and can reduce energy consumption by up to 15% according to DOE data.
Cleaning dirty evaporator and condenser coils improves heat transfer efficiency and can recover 5 to 10% of lost system capacity.
A clear condensate drain prevents mold on the evaporator coil that reduces dehumidification efficiency and raises indoor humidity load by up to 5%.
A full professional tune-up including refrigerant charge check and electrical inspection maintains peak system efficiency and reduces energy use by 15 to 20% versus a neglected system.
Consistent maintenance extends HVAC service life by 5 to 8 years, delaying a $10,000 replacement and reducing annualized ownership cost by up to 40%.
🏠 Key Concepts Explained
The Science Behind It
Your HVAC system moves heat rather than creates it. In cooling mode, the refrigerant absorbs heat from indoor air at the evaporator coil and releases it outside at the condenser coil. For this heat transfer to happen efficiently, both coils need clean, unobstructed surfaces and adequate airflow. The rate of heat transfer is governed by the temperature difference between the refrigerant and the air passing over the coil. When a layer of dust or debris acts as insulation on either coil, it reduces that temperature differential, forcing the refrigerant to circulate longer and the compressor to work harder to achieve the same cooling effect.
The blower motor and compressor are the two most expensive components in your system. Both are dramatically affected by the conditions they operate in. Blower motors are rated for a specific range of static pressure, which is the resistance the air faces moving through your duct system. A clogged filter can triple or quadruple the static pressure the blower works against, drawing excess amperage and generating heat that degrades motor insulation. Compressors are rated for specific inlet and outlet refrigerant pressures. Low refrigerant charge drops suction pressure and causes the compressor to run at temperatures that break down the lubricating oil inside it, leading to wear that shortens its life from a rated 15 to 20 years down to 5 to 8 years.
Condensate management is a less obvious but equally important factor. When warm, humid indoor air passes over the cold evaporator coil, moisture condenses on the coil surface and drips into the drain pan, exactly like condensation on a cold glass. A well-maintained system removes 1 to 3 gallons of water per hour in humid climates. If the drain path is blocked, that standing water becomes a growth medium for mold and bacteria on the coil surface, further reducing heat transfer efficiency and degrading indoor air quality. Keeping that drain clear is not just a maintenance task, it is a biological control measure.
Frequently Asked Questions
▼ My HVAC runs all day but the house never reaches the set temperature. What is wrong?
The three most common causes are a clogged filter restricting airflow, a refrigerant leak reducing the system’s cooling capacity, or an outdoor condenser coil so dirty it cannot reject heat. Start by replacing the filter immediately. If that does not help within a few hours, check that the condenser fins are clean and clear. If the problem persists, call an HVAC technician to check refrigerant charge, as this is not a DIY repair.
▼ How often should I actually replace my air filter?
The honest answer depends on your filter type and home. A standard 1-inch fiberglass filter needs replacement every 30 days. A pleated MERV 8 to 11 filter lasts 60 to 90 days in most homes, or 30 to 45 days with pets or allergy sufferers. A 4 to 5-inch media filter can last 6 to 12 months. Check your filter monthly by holding it up to light: no visible light through it means it is time to change regardless of what the schedule says.
▼ Is a $80 annual tune-up actually worth it if my system seems to be running fine?
Yes, for two concrete reasons. First, HVAC technicians routinely find and replace capacitors, contactors, or low refrigerant issues before they cause a compressor failure that costs 10 to 20 times as much to fix. Second, most manufacturer warranties on parts require documented annual service, so skipping the tune-up can cost you full price on a covered repair. Think of it as a $80 to $180 insurance premium on a $7,000 to $12,000 asset.
▼ I see ice forming on my refrigerant line. Can I just let it thaw and keep running?
No. Turn the system off at the thermostat immediately and switch the fan to ‘On’ to help melt the ice. Ice forms when the evaporator coil temperature drops below freezing, which means refrigerant pressure is too low due to a leak, or airflow is so restricted the coil cannot absorb enough heat. Running the system in this state risks flooding liquid refrigerant into the compressor, causing catastrophic and often non-warrantied damage. Call a technician before restarting.
▼ Can I do HVAC maintenance myself if my system is still under warranty?
Filter changes, drain line flushing, condenser cleaning, and register checks are all safe for homeowners and will not void your warranty. In fact, neglecting these tasks is more likely to cause a warranty dispute if a technician determines a failure was caused by owner neglect. Tasks involving refrigerant, electrical components, or accessing the sealed refrigerant system must be done by a certified technician to comply with EPA regulations and maintain warranty coverage.
Quick Tips
- Set your thermostat fan to ‘Auto’ rather than ‘On’. Running the fan continuously when the system is not actively conditioning air moves unconditioned air through the ducts, raises humidity in summer, and adds unnecessary run hours to the blower motor.
- Keep the area around your indoor air handler clear of stored items. Many homeowners pack utility closets and basements tight around the air handler, restricting return airflow and making filter changes difficult enough to skip.
- If you have a heat pump, do not turn the system off during mild weather. Heat pumps are designed to run frequently at low capacity and are more efficient doing so. Use a programmable thermostat with setbacks of no more than 2 to 4 degrees, not the 8 to 10 degree setbacks that work well for gas furnaces.
- Take a photo of your filter size and brand with your phone and save it. When you are standing in the hardware store aisle surrounded by a hundred filter sizes, having that photo prevents buying the wrong size and the temptation to defer the purchase.
Variations for Your Situation
- Apartment or Condo: You likely control only the air handler and thermostat, not the outdoor unit. Focus on filter changes every 30 to 60 days, keeping the area around your air handler clear, and flushing the condensate drain with vinegar monthly. Report any unusual noises, ice formation, or performance drops to your building manager in writing so there is a documented record. Some leases require you to supply your own filters, so clarify this with your landlord.
- Tight Budget (under $50 per year): Prioritize filter changes above everything else since a $5 to $8 filter is the single highest-return maintenance item you can buy. Use a free smartphone timer app to remind yourself monthly. Flush the condensate drain with household vinegar at no extra cost. Clear the condenser with a garden hose you already own. These four zero-to-low-cost habits capture roughly 80% of the benefit of a full maintenance program.
- Older Home with an Aging System (15 or more years old): Systems in this age range are approaching the end of their design life and need closer attention. Budget for an annual professional inspection rather than skipping it, since catching a failing capacitor or minor refrigerant leak early on an old system is far cheaper than a compressor replacement on a 17-year-old unit. Ask your technician to assess whether key components like the heat exchanger on a furnace show signs of cracking, which is a safety issue. Start planning financially for replacement so you are not forced into a rushed decision during a breakdown.