Your finished basement might look great, but if it was built before modern energy codes or by a contractor who skipped corners, it could be costing you hundreds of dollars a year in wasted heat. Basement walls, rim joists, and uninsulated floors act as giant thermal bridges, pulling warmth out of your living space all winter and letting humid summer heat creep in during warm months. The frustrating part is that most homeowners assume fixing this means tearing apart a perfectly good room.
The good news is there are several proven strategies for improving basement insulation without demolishing finished walls. From targeted rim joist sealing to interior surface additions and blown-in insulation through small access holes, you can dramatically reduce heat loss while keeping your basement livable. Depending on your climate and current insulation levels, these upgrades can cut basement-related energy losses by 15 to 30 percent and pay for themselves in two to five years.
This post covers the building science behind basement heat loss, the most effective no-demo approaches for different budgets, and a clear breakdown of what a DIYer can realistically tackle versus when to bring in a pro. Whether your basement is already your favorite room in the house or just a space you want to stop losing money on, you will find a practical path forward here.
What You’ll Need
Click on an item below to shop for the recommended items for this recipe on Amazon.
As an Amazon Associate, we earn from qualifying purchases.
How to Do It
- Locate exposed rim joist sections in unfinished utility areas, mechanical rooms, or any area where the top of the foundation wall is visible. Even partial access lets you address a significant portion of heat loss.
- Use a can of minimal-expanding spray foam to seal all gaps and penetrations around pipes, wires, and the sill plate where wood meets concrete. Work slowly and let each section tack up before moving on.
- Cut rigid closed-cell foam board (at least 2 inches thick, R-13) to fit snugly into each rim joist bay. A utility knife and straightedge handle most cuts without special tools.
- Press the foam board firmly into the bay so it contacts the rim joist face and the sill plate. Run a bead of spray foam around all four edges to air-seal the perimeter and lock the board in place.
- In accessible areas where there are existing fiberglass batts with no rigid foam, remove the batts (they trap moisture) and replace with the spray-foam-sealed rigid foam method described above.
- Check your work visually: every bay should have solid foam with no gaps at the edges. On a cold day, a lit incense stick held near the rim joist area will show any remaining air leaks by drifting smoke.
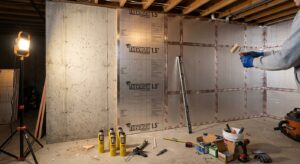
- Measure all above-grade and near-grade wall sections and calculate square footage. Purchase 1-inch to 1.5-inch rigid foam board (polyisocyanurate or XPS), which provides R-6 to R-10 without major thickness loss.
- Remove all outlet covers, switch plates, and any trim or baseboard along the walls you plan to insulate. Set these aside for reinstallation after the work is complete.
- Fasten 1×2 or 1×3 wood furring strips vertically to the existing wall every 16 inches using concrete screws if you are attaching through drywall to a masonry wall, or drywall screws into studs for framed walls. These strips create a fastening surface for the new drywall and frame the foam layer.
- Cut rigid foam panels to fit between the furring strips and press them flush against the existing drywall. Tape all foam panel seams with foil tape to maintain a continuous thermal and vapor barrier.
- Install new half-inch drywall over the furring strips, screwing into the strips for solid attachment. Keep seams staggered and tape and mud all joints for a smooth finish surface.
- Extend electrical outlet and switch boxes to the new wall depth using inexpensive plastic box extenders available at any hardware store. Reinstall trim and baseboard at the new wall face.
- Hire an insulation contractor who is experienced with dense-pack cellulose or injection foam specifically. Ask for references from basement retrofit projects and confirm they use a blower door test or thermal imaging to verify coverage.
- The contractor will use a borescope camera or thermal imaging camera to verify that wall cavities are actually empty before drilling. Drilling into an insulated cavity wastes money and creates unnecessary patching.
- Holes are drilled at regular intervals, typically every 16 to 24 inches following stud bays, using a 1.5-inch to 2-inch hole saw directly through the drywall face. Holes are typically staggered at two heights per bay for complete fill.
- Dense-pack cellulose (R-3.5 per inch) or two-component injection foam (R-4 to R-5 per inch) is pumped in under controlled pressure until the cavity is fully packed with no voids. A pressure gauge confirms full density.
- All holes are patched with drywall compound, sanded smooth, and primed. If done correctly, the patches are barely visible under paint. Painting the patched areas completes the repair.
- Request a post-installation thermal imaging scan if possible, ideally on a cold day, to confirm coverage and identify any cavities that were missed before the contractor leaves the job site.
Why It Works: The Benefits
Properly insulating the rim joist alone can reduce whole-home heating costs by 5 to 10 percent according to DOE data. Adding continuous insulation to basement walls on top of existing assemblies can push total savings to 15 to 30 percent of basement-related energy use annually.
Insulated basement walls can raise average winter floor temperatures by 5 to 10 degrees Fahrenheit, eliminating the cold drafts and chilly floors that make finished basements uncomfortable during heating season.
Sealing rim joists with closed-cell foam simultaneously insulates and acts as a vapor retarder, reducing the cold surface area where warm interior air condensates. This directly lowers the conditions that promote mold and musty odors.
Adding insulation between the basement and upper floors reduces sound transmission, which matters if the basement is used as a bedroom, home office, or media room. Even a 1-inch layer of rigid foam on walls adds noticeable acoustic improvement.
A finished basement with documented insulation upgrades and air sealing can contribute to a better home energy score and improved appraisal value. Energy-efficient homes sell for 2 to 3 percent more on average according to ENERGY STAR research.
💰 Savings Impact by Action
Sealing and insulating rim joist bays with rigid foam can reduce whole-home heating costs by 5 to 10 percent by eliminating the single largest air and thermal leak in most basement assemblies.
Adding continuous rigid foam to above-grade basement walls reduces basement heat loss by up to 20 percent compared to uninsulated framed walls with no thermal break.
Professional injection foam or dense-pack cellulose filling empty wall cavities delivers R-13 to R-20 in existing walls and can cut basement heating loads by 12 to 18 percent.
Caulking and foaming all penetrations, sill plates, and rim joist gaps without adding bulk insulation still reduces infiltration-driven heating losses by 5 to 8 percent.
🏠 Key Concepts Explained
The Science Behind It
Basement heat loss is driven by three mechanisms working at the same time: conduction through walls and framing, air infiltration through gaps and penetrations, and radiation from warm interior surfaces toward cold wall faces. The rim joist is the most vulnerable point because it is wood, which has low thermal mass and mediocre R-value, it spans the transition between the heated interior and the cold exterior foundation, and it is riddled with penetrations from pipes and wires. Sealing it with closed-cell foam attacks all three mechanisms at once because closed-cell foam both insulates and acts as an air and vapor barrier in a single step.
Below grade, the physics shift in your favor. Soil acts as thermal mass, maintaining a relatively stable temperature of 50 to 55 degrees Fahrenheit regardless of what the outdoor air is doing. This is why uninsulated basement walls still feel warmer than uninsulated above-grade walls in January. The biggest payoff from insulation comes from the top 12 to 24 inches of the basement wall that are above or near grade level, where soil buffering ends and outdoor temperature swings have direct influence on wall surface temperature.
When you add a continuous layer of rigid foam over an existing assembly, you are doing two important things. First, you are raising the effective R-value of the total wall without thermal bridging, because rigid foam does not have the stud-interruption problem that batt insulation does. Second, you are moving the condensing surface, the point where interior moisture is likely to condense, to the warm side of the foam layer rather than the cold masonry surface. This is why continuous exterior or interior foam is generally safer in basements than relying entirely on cavity insulation between studs.
Frequently Asked Questions
▼ Will insulating my basement walls cause moisture or mold problems?
It can if done incorrectly, but the right approach actually reduces moisture risk. The key is to never trap moisture between a vapor barrier and a cold surface. Use rigid foam board or closed-cell spray foam directly against masonry walls rather than fiberglass batts, which hold moisture. If you see any active water intrusion, efflorescence, or white staining, fix the water problem before adding any insulation.
▼ My basement already has drywall and looks finished. How do I know if there is any insulation behind it?
Remove an outlet or switch cover plate and look into the wall cavity with a flashlight. You can also drill a small test hole in an inconspicuous spot and probe with a thin wire. An infrared thermometer on a cold day will show noticeably colder wall sections where insulation is missing. If the studs show up as cold lines through the wall, you have thermal bridging with minimal or no insulation in the cavities.
▼ How much room will I lose if I add foam board over my existing walls?
A 1-inch foam board plus half-inch drywall takes about 1.5 inches off each wall. In a 12×20 foot basement, adding foam to two long walls reduces usable floor area by roughly 4 to 5 square feet total, which is barely noticeable in practice. You do need to extend all electrical outlet boxes to accommodate the new wall depth using inexpensive plastic extenders available at hardware stores.
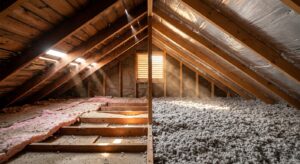
▼ Can I just add insulation to the basement ceiling instead of the walls?
Insulating the basement ceiling (the floor of the story above) keeps the basement itself unconditioned but protects the main living space from basement cold. This is cheaper and simpler, but it means your basement stays cold and any pipes or mechanicals in that space are at risk of freezing. It also does nothing to reduce drafts and cold floors in rooms directly above the basement. Wall insulation is the better long-term choice if the basement is used as living space.
▼ How long will it take to see the savings on my energy bill?
Rim joist sealing with rigid foam shows up in your first full heating or cooling bill after the work because it directly stops the largest source of air infiltration in most basements. Wall insulation upgrades typically show a measurable 10 to 20 percent reduction in heating costs within the first full winter. Payback on materials runs 2 to 5 years depending on your local energy costs and how much insulation was missing to begin with.
Quick Tips
- Prioritize the rim joist first. Per square foot, it is the highest heat-loss surface in most basements and costs the least to fix.
- Use polyisocyanurate foam board for above-grade sections where it will not be in contact with concrete. Use XPS (extruded polystyrene) for any foam that contacts masonry directly, since XPS handles moisture far better.
- Tape every seam in rigid foam with foil tape, not regular duct tape. Foil tape holds up long-term and maintains the continuous vapor control layer that makes the assembly work correctly.
- If you are adding furring strips and a new drywall layer, use this as an opportunity to run any new wiring or low-voltage cables in the furring chase before closing it up.
- In mixed-humid or marine climates, consider using unfaced rigid foam rather than foil-faced to allow some vapor movement through the wall assembly when drying to the interior is needed.
Variations for Your Situation
- Apartment or Condo with Basement Storage: If you share basement space but do not control the walls, focus on what you can reach. Seal visible gaps around pipes and wires entering your unit from the basement using spray foam or fire-rated caulk. Add door sweeps and weatherstripping to any basement access door to reduce cold air migration upward. These no-permission steps cost under $30 and reduce drafts noticeably.
- Tight Budget Under $200: Focus entirely on the rim joist using two-part small-kit spray foam or rigid foam boards and a single spray foam can. Even treating just the rim joist bays delivers 5 to 10 percent whole-home heating savings and costs under $100 in materials. Skip the wall insulation for now and address it in a future phase when budget allows.
- Older Home Pre-1980 with Masonry Walls and No Framing: Many older basements have bare poured concrete or block walls with no stud framing at all. In this case, you have two options: apply closed-cell spray foam directly to the masonry surface at 2 inches thick (R-12 to R-14), which requires a licensed installer, or frame out a new interior 2×3 or 2×4 wall set one inch away from the masonry and insulate that framed wall with rigid foam between studs. The second option is DIY-friendly but adds 4 to 5 inches of depth to each wall.