Your crawl space might be out of sight, but it is never out of mind when you are standing on cold floors in January or watching your energy bill climb every summer. The crawl space sits between your living area and the ground, and without proper insulation and moisture control, it acts like a giant thermal sponge, pulling conditioned air out of your home and pushing cold, damp air in. The U.S. Department of Energy estimates that up to 15 to 25 percent of a home’s heating and cooling energy is lost through the floor and crawl space in homes with inadequate insulation.
There are two fundamentally different strategies for dealing with a crawl space: the traditional vented approach, where you insulate the floor joists above and allow outside air to circulate below, and the encapsulated approach, where you seal and condition the entire crawl space as part of your home’s thermal envelope. Each method has a different cost, difficulty level, and payback period, and the right choice depends heavily on your climate, existing moisture conditions, and budget.
This guide will walk you through both strategies with honest numbers, clear steps, and the building science behind why each one works. Whether you want a weekend DIY project or are considering a full professional encapsulation, you will leave knowing exactly what to do, what it costs, and what to expect on your energy bill afterward.
What You’ll Need
Click on an item below to shop for the recommended items for this recipe on Amazon.
As an Amazon Associate, we earn from qualifying purchases.
How to Do It
- Inspect the crawl space thoroughly before starting. Look for standing water, existing mold, damaged wood, or pest activity. Address any moisture intrusion or pest issues before adding insulation, because trapping moisture under new insulation accelerates rot.
- Install a 6 mil polyethylene vapor barrier over the entire ground surface if one is not already present. Overlap seams by 12 inches and tape them with housewrap tape. Run the barrier 6 inches up the foundation walls and secure it with construction adhesive or mechanical fasteners.
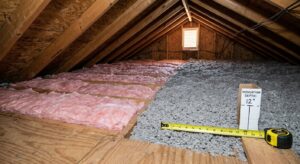
- Measure your joist bay depth to select the correct batt thickness. A standard 2×10 joist bay holds R-30 batts (about 9.5 inches). Use unfaced batts if the floor sheathing above already has a vapor retarder, or kraft-faced batts with the facing up against the subfloor in most climates.
- Cut batts to fit snugly between joists without gaps or compression. Compression reduces R-value significantly: an R-30 batt compressed to 75 percent of its rated thickness performs closer to R-22. Fit around pipes and blocking carefully.
- Secure batts using wire insulation supports (also called tiger claws or insulation wire hangers) spaced every 18 to 24 inches across the joist span. Do not use staples alone on unfaced batts as they will sag over time and create gaps.
- Seal all penetrations through the floor above, including plumbing, wiring, and HVAC boots, using expanding foam or fire-rated caulk. Air sealing at the top of the crawl space (the floor above) is often worth more than the insulation itself in terms of heat loss reduction.
- Have the crawl space professionally inspected or do a thorough DIY inspection first. Encapsulation seals in any existing problems, so fix active water intrusion, replace rotted wood, and treat any mold before proceeding. This step is not optional.
- Seal all crawl space vents completely using rigid foam insulation cut to fit and secured with foam adhesive, then caulked around the perimeter. In most humid climates, sealing vents and conditioning the crawl space outperforms the vented approach for moisture control.
- Install a heavy-duty vapor barrier (minimum 12 mil, ideally 20 mil reinforced polyethylene) over the entire ground surface and up all foundation walls to the sill plate. Overlap seams by 12 inches and seal with specialized crawl space tape. Mechanically fasten the top edge to the foundation wall with termination bars and sealant.
- Insulate the foundation walls with rigid foam board insulation (XPS or polyiso) at R-10 minimum, R-15 or more in colder climates. Cut panels to fit from the sill plate to the ground and adhere or mechanically fasten them to the wall. Tape all seams. This replaces floor joist insulation in an encapsulated system.
- Add a small conditioned air supply from your HVAC system (typically 1 CFM per 50 square feet of crawl space) or install a dedicated crawl space dehumidifier rated for the square footage. Building codes in most states require some air exchange in a sealed crawl space to prevent moisture accumulation.
- Install a condensate drain line from the dehumidifier to a sump pit or to the exterior. Set the dehumidifier to maintain relative humidity below 60 percent (ideally 50 to 55 percent). Check and empty or verify the drain monthly for the first season.
Why It Works: The Benefits
Properly insulating a crawl space reduces annual heating and cooling costs by 10 to 25 percent depending on your climate zone and starting conditions. Homes in climate zones 4 and above with uninsulated crawl spaces see the largest gains.
Adding R-19 or greater under the floor joists raises floor surface temperatures by 5 to 10 degrees Fahrenheit on cold days, directly improving comfort without changing the thermostat setting.
A 6 to 20 mil vapor barrier combined with proper sealing can reduce crawl space relative humidity by 20 to 40 percentage points in humid climates, dramatically lowering the risk of mold, wood rot, and pest activity.
Encapsulation keeps ducts and water pipes inside conditioned space, preventing duct condensation in summer, reducing freeze risk in winter, and recovering the 20 to 30 percent of heating and cooling energy typically lost through ducts running through unconditioned vented crawl spaces.
Because of the stack effect, up to 40 percent of the air you breathe on the first floor comes from below. Sealing and insulating the crawl space reduces infiltration of soil gases, mold spores, and humid air, which can noticeably improve air quality for allergy and asthma sufferers.
💰 Savings Impact by Action
Installing a ground vapor barrier alone reduces moisture-driven heat loss and protects insulation from performance degradation, contributing roughly 5 to 10 percent improvement in crawl space energy performance.
Adding R-19 to R-30 batt insulation in previously uninsulated floor joists reduces floor heat loss by up to 15 percent of total heating and cooling costs in climate zones 4 and above.
A complete sealed and conditioned crawl space reduces total annual heating and cooling costs by 15 to 25 percent by eliminating duct losses, moisture infiltration, and stack effect air leakage simultaneously.
Sealing and insulating the rim joist with rigid foam eliminates one of the single largest air leakage points in homes with crawl spaces, saving up to 8 percent on heating costs alone.
Bringing HVAC ducts inside a conditioned crawl space envelope recovers 20 to 30 percent of heating and cooling output that would otherwise be lost to the unconditioned crawl space air.
🏠 Key Concepts Explained
The Science Behind It
The building science behind crawl space insulation comes down to where you draw the thermal boundary of your home. In a vented crawl space, the boundary is at the floor above: the subfloor, floor joists, and insulation batts between them are supposed to separate the conditioned living space from the unconditioned crawl space below. This works reasonably well in dry climates, but the physics work against you in humid conditions. Outside air vented into the crawl space in summer carries enormous amounts of moisture. When that humid air contacts the cooler surfaces of the floor joists and subfloor (which are kept cooler by the conditioned air above), it drops below its dew point and deposits liquid water. That condensation feeds mold and wood decay without any visible sign of flooding.
Encapsulation solves this by relocating the thermal boundary to the crawl space walls and ground. The crawl space becomes a semi-conditioned buffer zone, and because it shares temperature with the rest of the house, humid outside air no longer condenses on the framing. This is why research from the Advanced Energy Corporation and Oak Ridge National Laboratory consistently shows that sealed, conditioned crawl spaces maintain lower wood moisture content and lower relative humidity than vented crawl spaces in the same climate, even though it seems counterintuitive to seal a space rather than ventilate it.
The energy savings from encapsulation extend well beyond the insulation R-value itself. HVAC ducts running through a vented crawl space sit in an environment that may be 20 to 30 degrees Fahrenheit colder than your target heating temperature in winter, and equally hot and humid in summer. Studies from the Florida Solar Energy Center found that ducts in unconditioned spaces lose 20 to 30 percent of their thermal output before the air reaches your living areas. Moving those ducts inside the conditioned envelope by encapsulating the crawl space is effectively a free efficiency upgrade that costs nothing beyond the encapsulation itself.
Frequently Asked Questions
▼ My crawl space insulation keeps falling down. How do I stop batts from sagging?
Sagging batts are almost always caused by using too few wire insulation supports or relying only on staples. Install wire hangers (also called tiger claws) every 18 inches across the full length of each joist bay. For long spans over 8 feet, add a horizontal wire or a 1×4 board nailed across the joists mid-span to create an intermediate support point. Faced batts should also be stapled to the joist faces every 12 inches as a secondary measure.
▼ I sealed my crawl space vents but now I smell musty odors inside the house. What went wrong?
A musty smell after sealing vents almost always means there was pre-existing moisture or mold that is now concentrating in the sealed space instead of being diluted by outside air. Open a vent temporarily to reduce the odor, then inspect for standing water, condensation on the vapor barrier, or visible mold on framing. You likely need a dehumidifier rated for your crawl space square footage and may need professional mold remediation before re-sealing.
▼ How long will it take to see the savings on my energy bill after insulating?
You should see a measurable reduction on the first full heating or cooling bill after the work is complete, typically within 30 to 60 days. The savings are most visible during peak heating months (December through February) in northern climates. To get a clean comparison, compare the same month year-over-year rather than month-to-month, and account for degree-day differences using free tools like degreedays.net.
▼ Can I insulate my crawl space if there are knob-and-tube wiring or old pipes down there?
Old knob-and-tube wiring should not be covered with insulation because it requires open air to dissipate heat, and covering it creates a fire risk. Have an electrician evaluate and replace or reroute any knob-and-tube circuits before insulating. Old galvanized pipes are fine to insulate around, but inspect them for active leaks first and consider wrapping them separately with pipe insulation before adding batt insulation around them.
▼ Is a vented crawl space or encapsulation better in my climate?
As a general rule, encapsulation outperforms venting in climate zones 4 through 8 and in any humid climate where summer dew points regularly exceed 60 degrees Fahrenheit. Vented insulation can work adequately in dry climates (zones 2 through 3B) where moisture is not a concern. The DOE’s Building America program recommends sealed, conditioned crawl spaces as the default best practice in most of the continental United States based on long-term field monitoring data.
Quick Tips
- Measure your crawl space height before planning any work. A crawl space under 18 inches makes DIY insulation extremely difficult and physically demanding, and a professional crew with experience in tight spaces is worth the cost.
- Buy 10 to 15 percent more batt insulation than your square footage calculation suggests. Crawl spaces have irregular joist bays, blocking, bridging, and pipe runs that create waste and odd-sized cuts.
- In climate zones 5 and above, consider adding a continuous layer of rigid foam board under the floor sheathing in addition to batt insulation in the joist bays. This breaks the thermal bridge through the joists and can boost real-world performance by 15 to 20 percent over batts alone.
- Take photos of every penetration, pipe run, and duct connection before you start insulating. Once insulation is in place, finding and fixing air leaks becomes much harder, and having reference photos saves significant time if you need to access something later.
Variations for Your Situation
- Tight Budget (under $500): Focus first on installing a basic 6 mil vapor barrier over the ground and sealing all penetrations through the floor above with expanding foam. These two steps alone can reduce moisture infiltration by 30 to 50 percent and cut heating losses meaningfully at minimal cost. Add batt insulation in sections as budget allows, starting with the areas directly under main living spaces and bathrooms.
- Older Home (pre-1980): Homes of this era often have no existing vapor barrier, minimal or deteriorated batt insulation, and open rim joists that are major air leakage points. Prioritize the rim joist first: cut rigid foam to fit each bay and seal with foam, which delivers dramatic results for about $100 to $200 in materials. Test or have tested any existing insulation for asbestos before removal, especially if it is a gray or white fibrous material rather than yellow or pink fiberglass.
- Home with HVAC Ducts in Crawl Space: If your furnace, air handler, or ductwork runs through the crawl space, encapsulation is strongly preferred over floor-joist insulation because it brings the ducts inside conditioned space. A professional energy audit using a duct blower test can quantify your current duct leakage, often 20 to 30 percent in older homes, and help you build the ROI case for a full encapsulation investment in the $5,000 to $10,000 range.