Your HVAC system could be running perfectly and still be wasting nearly a third of the energy you pay for. The culprit is almost always the ductwork. According to the U.S. Department of Energy, the typical American home loses 20 to 30% of conditioned air through leaks, gaps, and poorly connected duct sections before that air ever reaches a living space. That translates directly to higher utility bills, uneven room temperatures, and an AC or furnace that runs longer than it should.
The frustrating part is that most duct leaks are completely invisible from the ground floor. They hide behind drywall, in attics baking at 140 degrees, and in crawl spaces you rarely visit. Homeowners often assume their aging system or poor insulation is the problem, spend money on the wrong fixes, and never address the real energy drain hiding in the ducts. The good news is that several reliable signs and simple hands-on tests can expose duct leakage before you commit to a professional diagnostic.
This guide walks you through the free visual and physical checks any homeowner can do in an afternoon, a low-cost DIY pressurization test using supplies from the hardware store, and exactly what to look for so you can walk into a contractor conversation already knowing what questions to ask. Whether you are a weekend DIYer or just want to understand your home better, these steps will tell you whether your ducts deserve serious attention.
What You’ll Need
Click on an item below to shop for the recommended items for this recipe on Amazon.
As an Amazon Associate, we earn from qualifying purchases.
How to Do It
- Turn your HVAC system on and set the fan to run continuously. Stand at every supply and return register and hold your hand 2 to 3 inches away. Weak or inconsistent airflow at registers far from the air handler is a strong indicator of leakage in that duct branch.
- Go to your attic, basement, or crawl space while the system is running. Hold a lit incense stick or a thin strip of tissue paper near all accessible duct joints, seams, and connections. Movement of the smoke or tissue toward or away from the joint confirms air escaping or being pulled in.
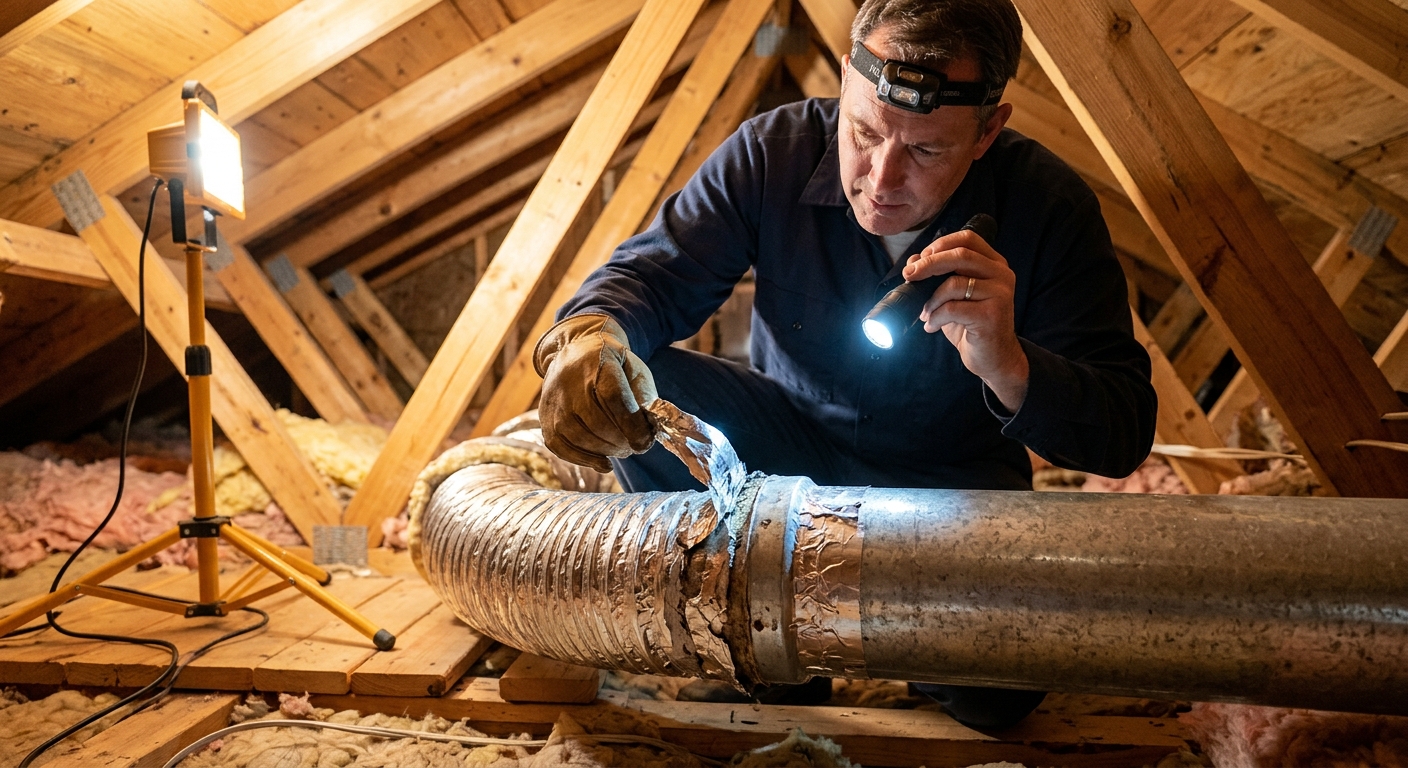
- Inspect all visible duct connections for gaps, separated joints, or missing sections of tape. Look specifically at the collar where ducts connect to the air handler, at any elbows or tees, and at boot connections where ducts meet floor or ceiling registers.
- Check for shiny, reflective foil tape that is peeling, bubbling, or has visible cracks. This is standard duct tape failure and a confirmed leak point. Note: standard grey cloth duct tape was never appropriate for ductwork and fails within a few years.
- Look at your energy bills. If your cooling or heating costs have risen 15% or more without a change in usage or rates, and your system is over 10 years old, leaking ducts are among the most likely causes.
- Note your home’s temperature evenness. Walk through every room while the system runs and note which rooms are consistently 4 or more degrees warmer or cooler than the thermostat setting. Map these rooms relative to where your ducts run.
- Seal all supply and return registers in the house using painter’s tape and plastic sheeting or large zip-lock bags. This temporarily closes off all intentional airflow outlets, so any air movement you detect is from an unintended leak.
- Turn the HVAC fan on to its highest setting using only the fan, not heating or cooling. This pressurizes the duct system to its working pressure without running the compressor.
- Move through every accessible section of ductwork in your attic, crawl space, basement, or utility closet holding a thin strip of tissue paper or a lit incense stick close to every joint, seam, and connection.
- Mark every confirmed leak point with blue painter’s tape so you can find it again. Take photos of each leak location on your phone for reference when sealing or for showing a contractor.
- Measure the approximate gap size at each leak. Gaps under a quarter inch can be sealed with UL-181-rated foil tape. Gaps over a quarter inch or separated joints require mastic sealant applied with a brush, which bridges larger openings and remains flexible as ducts expand and contract.
- After sealing, remove all register covers, restore airflow, and repeat the tissue paper test at your patched locations to confirm the seals are holding. Run the system normally and compare room-to-room temperature balance over the following 48 hours.
- Contact a certified HVAC contractor or building performance auditor who has a duct blaster unit. Ask specifically whether they will provide a written report showing leakage as a percentage of system airflow, which is the standard metric.
- Before the appointment, make sure your attic and crawl space access points are clear. The technician needs to move through all unconditioned spaces where ducts run.
- During the test, the technician seals all registers, connects a calibrated fan to the air handler or a central return, and uses a digital manometer to measure how much air escapes at a standardized pressure. Leakage above 10% of system airflow is considered significant by ENERGY STAR standards.
- Review the report carefully. Ask the technician to show you the worst leak locations on a diagram of your duct system. Prioritize sealing at the air handler cabinet itself, which is often the single largest leak point in older systems.
- Get two to three quotes for professional duct sealing if the leakage rate exceeds 15%. Ask each contractor whether they use mastic, UL-181 foil tape, or Aeroseal, a pressurized sealant that seals leaks from the inside and is especially effective for ducts inside walls or ceilings where manual sealing is impossible.
- After sealing, request a post-seal duct blaster test to verify the result. A well-sealed system should test at 6% or lower total leakage. Many utility companies offer rebates of $100 to $400 for documented duct sealing that brings leakage below their threshold.
Why It Works: The Benefits
Sealing duct leaks typically reduces heating and cooling costs by 20 to 30%, which for the average U.S. household spending $900 per year on HVAC represents $180 to $270 in annual savings.
Rooms that are consistently too hot in summer or too cold in winter are a classic symptom of duct leakage. Sealing the system can eliminate the 5 to 8 degree temperature swings between rooms caused by pressure loss.
Leaky return ducts pull air from attics, crawl spaces, and wall cavities that carries dust, mold spores, insulation fibers, and in some regions radon. Sealing ducts is one of the most effective ways to reduce indoor particulate levels.
A leaky duct system forces your blower motor and heat exchanger to work harder and run longer. Sealing ducts reduces run time, which can add years to compressor and blower motor life and delay costly equipment replacements.
Unlike insulation upgrades that show savings gradually over seasons, duct sealing often produces a noticeable difference in comfort and airflow within the first full HVAC cycle after the work is completed.
💰 Savings Impact by Action
Sealing supply and return duct leaks from a typical 25% leakage rate to under 10% reduces conditioned air loss by up to 25% of total HVAC energy use.
Sealing the air handler cabinet seams alone, the most common single leak point, can recover 8 to 12% of total system airflow at near-zero cost.
Correcting the pressure imbalance caused by leaky ducts reduces whole-house air infiltration by approximately 8%, cutting the outdoor air load the system must condition.
A properly sealed duct system reduces average HVAC runtime by 10 to 20%, directly lowering compressor and blower motor wear and electricity consumption.
Sealing return duct leaks in humid climates reduces moisture infiltration, cutting the latent cooling load by up to 12% and allowing the AC to dehumidify more effectively.
🏠 Key Concepts Explained
The Science Behind It
Duct systems operate as a pressurized delivery network. The blower motor creates positive pressure in the supply side and negative pressure in the return side simultaneously. When a hole or gap exists anywhere in the supply duct, the pressurized conditioned air takes the path of least resistance and escapes into whatever space surrounds the duct, whether that is a 140-degree attic or a damp crawl space. The living area effectively receives less than what the system produced, while the lost energy heats or cools a space you are not paying to condition.
The return side leak is actually more damaging in many homes. Return ducts operate under negative pressure, meaning they pull air in from their surroundings rather than pushing it out. A gap in a return duct running through a crawl space will pull in unconditioned outside air, along with moisture, dust, and any soil gases present beneath the home. This air goes directly into your system, raises the humidity load your AC must handle, and in worst cases carries radon or mold spores into the living space. Because the return is under suction, these leaks are often larger than supply leaks but harder to detect with touch alone.
The energy penalty compounds through a mechanism called pressure imbalance. Leaky supply ducts dump air into attics and crawl spaces, making those spaces slightly positive in pressure. Meanwhile the living area loses the air it should have received, becoming slightly negative. That depressurization pulls outdoor air in through every small gap in the building envelope, including electrical outlets, window frames, and baseboards. The result is that duct leakage does not just waste the conditioned air that escapes directly. It actively undermines every other energy efficiency measure in the home by driving infiltration that adds to the heating or cooling load continuously while the system runs.
Frequently Asked Questions
▼ My smoke test shows no obvious leaks but one room is still much hotter than the rest. What is going on?
Not all duct problems are leaks. A damper stuck in the partially closed position, a kinked or collapsed flex duct section, or an undersized duct branch will all produce the same symptom as a leak. Open the register in the problem room fully, visually trace that duct branch from the register back to the trunk, and check for any visible compression or sharp bends. If the duct path runs through the attic or an interior wall, a professional with a flow hood can measure actual airflow at the register and confirm whether the issue is leakage, restriction, or undersizing.
▼ How do I know if the problem is my ducts or just bad insulation?
Insulation problems tend to affect temperature uniformly across the whole house, especially on top floors, and are worse on the hottest or coldest days. Duct problems typically cause specific rooms to be off while others feel fine, regardless of outdoor temperature. If running your system longer eventually brings the problem room to the right temperature, you likely have a duct flow problem. If the room simply never catches up regardless of runtime, you may be dealing with insulation or air sealing issues in that specific room.
▼ Can I use spray foam to seal duct leaks instead of mastic?
Only use low-expanding foam in very limited spots, such as where a duct boot penetrates a floor or ceiling, and never on metal duct joints that flex and expand with temperature changes. Rigid spray foam cracks when the duct moves thermally, re-opening the leak within a season or two. Mastic sealant stays flexible through thousands of expansion and contraction cycles, which is exactly why it is the professional standard for duct sealing.
▼ My house is a two-story with ducts in the walls. Can I still do anything myself?
Focus your DIY effort on the accessible portions, specifically the air handler cabinet, the main trunk lines in the basement, attic, or utility closet, and the boot connections at each register. These areas typically account for 60 to 70% of total system leakage even in two-story homes. For leaks inside wall cavities, the only practical solution is Aeroseal, a professionally applied pressurized sealant that travels through the duct system and seals leaks from the inside without requiring physical access.
▼ Will sealing ducts void my HVAC warranty?
Applying mastic or UL-181 foil tape to the outside of duct joints does not affect your HVAC equipment warranty because you are not modifying the air handler, coil, or any mechanical component. If you are considering Aeroseal or any internal sealant process, confirm with your equipment manufacturer first. Always use materials rated specifically for HVAC ductwork to avoid any ambiguity.
Quick Tips
- Check duct leakage in winter too, not just summer. A room that is 5 to 8 degrees colder than the thermostat in January is pointing directly at a duct leak in that branch.
- Flexible ducts that are kinked, compressed, or have too many bends lose airflow efficiency dramatically even without leaks. Straighten any flex duct runs longer than 5 feet with a gentle, smooth curve.
- Mastic sealant dries in 4 to 8 hours depending on temperature and humidity. Do not run the system during that curing window or the sealant may shift before it sets.
- After sealing ducts, check and change your air filter. Duct leakage often allows bypass air to carry extra dust into the system, and filters in leaky systems get dirty faster than normal.
Variations for Your Situation
- Apartment or Condo: Renters typically cannot access or modify central ductwork, but you can still diagnose the problem. Hold tissue paper at every supply register and note any that show very weak airflow. Document this with video and submit a written maintenance request to your landlord citing specific register locations and the DOE statistic on duct leakage costs. For your own comfort, a portable air purifier with a HEPA filter addresses the air quality side effect of leaky return ducts pulling in particulates from shared building spaces.
- Tight Budget (Under $20): Skip the professional test entirely and focus the free visual inspection on your air handler cabinet and main trunk connections. A $6 roll of UL-181 foil tape and a $10 tub of mastic from a hardware store are all you need to seal confirmed leaks. Start at the air handler cabinet seams and work outward, prioritizing any joint where you can see daylight or feel airflow. This alone can recover 30 to 50% of the total leakage in many older systems.
- Older Home (Pre-1980): Homes of this era often have original duct systems with sheet metal joints held only by sheet metal screws and long-failed duct tape. Before sealing anything, inspect all accessible duct insulation for signs of asbestos, which appears as crumbly gray-white fibrous wrap on older rigid ductwork. Have any suspect material tested before disturbing it. If the inspection is clear, expect to find more and larger gaps than in newer construction and budget accordingly. A professional duct blaster test is strongly recommended here because total leakage rates of 35 to 45% are not uncommon, making the documented savings case for sealing very strong for rebate applications.