Every fall, plumbers across cold-climate states get flooded with emergency calls from homeowners dealing with burst pipes, water damage, and ruined landscaping systems. The cause is almost always the same: water was left sitting in outdoor pipes when temperatures dropped below 32°F. Water expands about 9% when it freezes, and that expansion generates enough pressure to crack copper, split PVC, and blow out faucet bodies, sometimes causing $1,000 to $15,000 in repair and water damage costs.
The good news is that preventing this damage is genuinely simple. Draining your outdoor hose bibs, irrigation systems, and exterior supply lines takes under an hour for most homes, requires few or no tools, and costs nothing beyond a little time. This is one of the few home maintenance tasks where the payback period is literally immediate: one avoided burst pipe more than pays for years of careful winterization.
This guide walks you through exactly how to drain outdoor pipes before the first hard freeze, whether you have a basic hose bib setup or a full in-ground irrigation system. You will learn the building science behind why pipes burst, the right sequence of steps to remove every last drop of standing water, and what to watch for if your home has older plumbing or a well system.
What You’ll Need
Click on an item below to shop for the recommended items for this recipe on Amazon.
As an Amazon Associate, we earn from qualifying purchases.
How to Do It
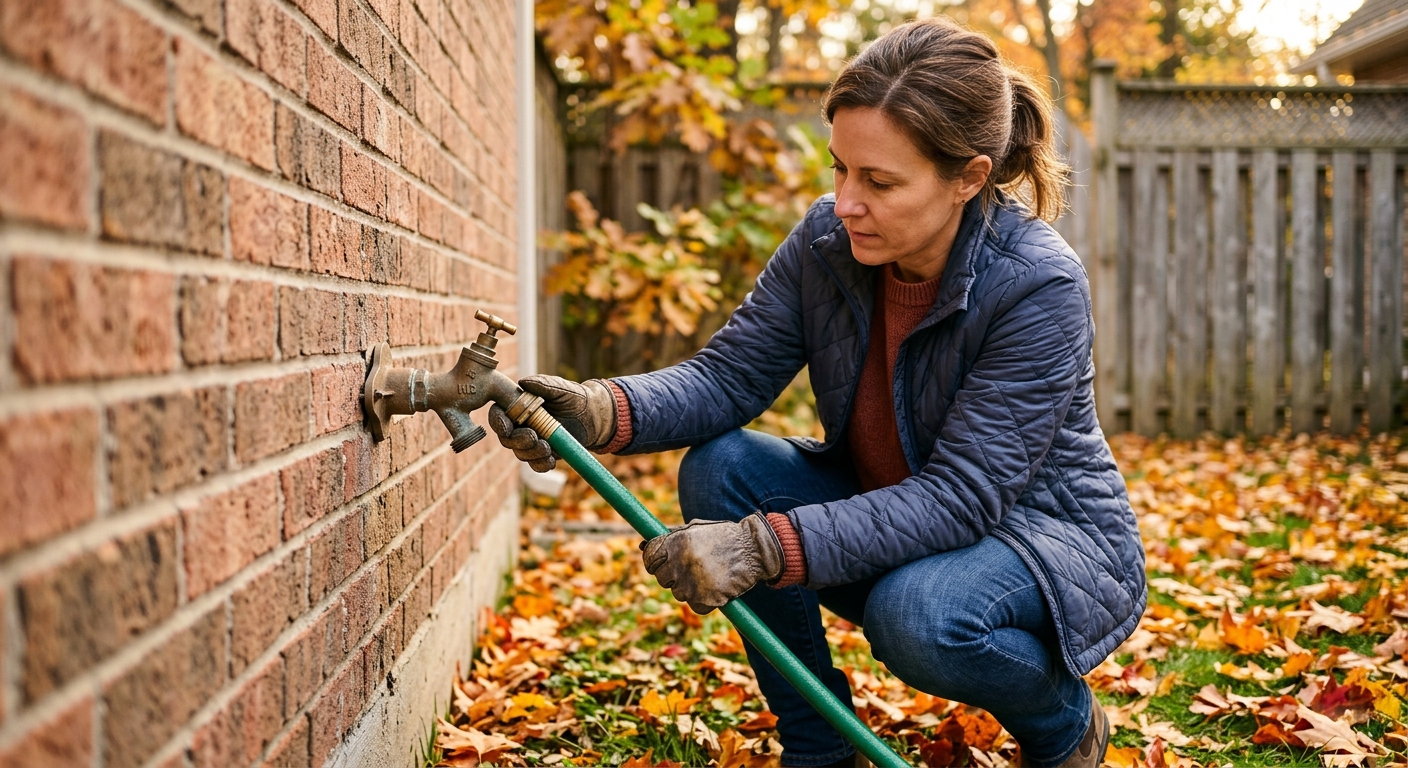
- Walk the exterior of your home and locate every outdoor hose bib, spigot, or faucet. Most homes have one to four. Note whether each has its own interior shutoff valve, typically found in the basement, crawl space, or utility room on the pipe feeding that faucet.
- Disconnect and remove all garden hoses from every outdoor faucet. A hose left attached traps water in the spout and prevents the self-draining mechanism on frost-free bibs from working, which is the single most common cause of freeze damage.
- Go inside and close the interior shutoff valve for each outdoor faucet. Turn it clockwise until fully closed. If you cannot find a dedicated shutoff, note the location for future reference and proceed with the exterior drain steps.
- Return outside and open the outdoor faucet fully to allow any remaining water in the pipe between the shutoff valve and the spigot to drain out by gravity. Leave it open for 60 seconds until no more water drips out.
- Go back inside and locate the small bleeder cap on the interior shutoff valve if one is present. Place a small rag or cup underneath and unscrew the cap slightly to release any trapped air lock and allow the last water to drain. Retighten the cap.
- Optional but recommended: install a foam faucet cover over each exterior spigot for about $3 to $5 each. These add an extra layer of insulation against brief unexpected cold snaps and are available at any hardware store.
- Shut off the main irrigation water supply valve. This is typically a dedicated ball valve near where the irrigation line branches off your main supply, often in a basement or utility room.
- Rent or borrow a gas-powered air compressor rated at 20 to 50 CFM from a tool rental shop, typically $60 to $80 per day. Connect it to the blow-out port on your irrigation system, usually a quick-connect fitting near the backflow preventer or manifold.
- Put on ANSI-rated safety glasses before proceeding. Pressurized irrigation blow-outs can eject debris, dirt, and water forcefully from heads and valves.
- Activate zone 1 using your irrigation controller or the manual bleed screw on that zone valve. Turn on the compressor and allow air to flow through the zone until only mist or no moisture exits the sprinkler heads, typically 20 to 60 seconds per zone. Do not run any single zone for more than 3 minutes continuously as this can overheat and damage the solenoid valves.
- Repeat for each zone in sequence, moving from the farthest zone from the compressor back toward the supply. Run each zone 2 to 3 times until heads produce only dry air.
- Drain and blow out the backflow preventer separately by opening its test cocks and allowing air to pass through. Wrap the backflow preventer in pipe insulation foam or a purpose-made backflow preventer cover rated for your climate zone.
- Shut down the irrigation controller or switch it to its rain or off mode. Disconnect the compressor and cap the blow-out port. Tag the main shutoff valve with a note indicating it is closed for winter.
- Schedule service in September or early October before your region’s first expected freeze. Most irrigation companies book up in late October, so early scheduling secures better pricing and availability.
- Ask the technician to document the number of zones, note any valves or heads that show wear, and confirm the backflow preventer is fully drained and protected.
- Request that the technician leave your irrigation controller in the off or rain delay mode and confirm the main irrigation shutoff is closed before they leave.
- Ask for a written summary or invoice noting what was serviced, any components that should be replaced before spring startup, and the date of service. Keep this with your home maintenance records.
Why It Works: The Benefits
A burst outdoor pipe or cracked irrigation backflow preventer costs $200 to $2,000 in plumbing repairs alone. If water reaches finished interior spaces, remediation and repairs can exceed $10,000 according to the Insurance Institute for Business and Home Safety.
In-ground sprinkler systems cost $2,500 to $5,000 to install. Failing to winterize them can crack zone valves, manifolds, and backflow preventers, with replacement parts and labor running $300 to $800 per season.
Frozen pipe claims are one of the most common causes of homeowners insurance payouts, averaging $11,000 per incident per the Insurance Information Institute. Multiple claims can raise your premium or result in non-renewal.
Hose bibs and irrigation heads that are properly drained and protected last 15 to 20 years. Those subjected to repeated freeze-thaw cycles often fail within 5 to 7 years, requiring $50 to $200 per fixture in replacement costs.
Once your outdoor plumbing is properly drained and shut off for winter, you do not need to worry about emergency calls or monitoring forecasts for sudden overnight freezes, which is a real quality-of-life benefit for homeowners in Zones 5 through 7.
💰 Savings Impact by Action
Properly draining and shutting off outdoor pipes eliminates nearly all risk of freeze-related pipe bursts, which average $11,000 per insurance claim.
Annual blow-out winterization prevents freeze damage to backflow preventers and zone valves, avoiding $300 to $800 in seasonal repair costs.
Hose bibs that are drained and covered each winter last up to 40% longer than those subjected to repeated freeze-thaw cycles, deferring $50 to $200 per fixture in replacement costs.
Avoiding frozen pipe claims reduces the likelihood of premium increases or policy non-renewal, which can add 10 to 30% to annual homeowners insurance costs after a paid claim.
🏠 Key Concepts Explained
The Science Behind It
The physics behind frozen pipe damage comes down to a property of water that is actually unusual among liquids: it expands when it freezes. Most substances contract as they cool and solidify, but water molecules form a crystalline lattice structure as ice that takes up about 9% more volume than liquid water. Inside a sealed pipe, that 9% expansion has nowhere to go, so it generates internal pressure that can exceed 2,000 psi. Standard copper pipe is rated to handle roughly 300 to 700 psi in typical plumbing applications, so a fully frozen section of trapped water will reliably split or crack the pipe wall.
What makes outdoor plumbing especially vulnerable is the combination of exposure and geometry. Above-grade exterior pipes, hose bibs, and irrigation heads sit in ambient air temperatures that can swing 50 degrees in 24 hours during early winter cold fronts. Unlike interior pipes, which benefit from the thermal buffer of conditioned wall cavities and heated interior air, exterior fixtures cool rapidly. A copper hose bib mounted through an uninsulated rim joist in a crawl space can reach 32°F within one to two hours of outside air temperatures dropping to that level. The horizontal or slightly downward-sloping pipe segment between the interior shutoff valve and the exterior spigot is the highest-risk zone because water sits there by gravity and has no place to drain unless the outer faucet is opened after shutting off the interior valve.
For in-ground irrigation systems, the risk is concentrated in the backflow preventer and the upper sections of lateral lines closest to the surface. Soil provides excellent insulation once you get below the local frost depth, which ranges from 12 inches in Zone 6 regions to 60 inches or more in northern Minnesota and similar climates. But the backflow preventer, manifold, and zone valves are typically above grade or within inches of the surface, making them prime freeze targets. The blow-out method works by using compressed air at low pressure but high volume to push water out from the highest point in the system through the sprinkler heads, relying on airflow rather than gravity to evacuate every trapped pocket.
Frequently Asked Questions
▼ How do I know if my outdoor pipe already froze and burst?
Signs of a burst pipe include a sudden drop in water pressure when you turn on an interior faucet, visible water staining or wet spots on walls or ceilings near exterior pipe runs, or the sound of dripping inside a wall. If you suspect a burst pipe, shut off your main water supply valve immediately and call a plumber. Do not attempt to thaw a pipe you cannot fully see, as the burst section may be hidden inside the wall.
▼ My hose bib does not have an interior shutoff valve. What do I do?
Without a dedicated shutoff, you cannot fully isolate and drain the exterior line. Your best immediate options are to install a foam faucet insulating cover over the exterior spigot and ensure no hoses are attached. For a more reliable long-term fix, have a plumber add a ball valve shutoff on the supply pipe inside your home, typically costing $100 to $200 in labor and materials. This is well worth doing before next winter.
▼ Can I skip winterizing if I live somewhere that only gets a few light freezes?
If your region rarely drops below 28°F and freezes last less than four hours, your risk is lower but not zero. A single unexpected hard freeze while you are traveling can still cause a burst. At minimum, disconnect garden hoses and install foam faucet covers, which take five minutes and cost under $15 total. For irrigation systems, even one freeze event can crack a backflow preventer, a $150 to $400 repair.
▼ My irrigation controller says it has a freeze sensor. Do I still need to winterize?
Yes. A freeze sensor tells the controller not to run a scheduled watering cycle when temperatures are near freezing, which prevents you from watering frozen ground. It does not drain or blow out the water currently sitting in your pipes and backflow preventer. Winterization must still be performed manually or by a professional each fall regardless of what sensors or smart features your system has.
▼ How far in advance of the first freeze should I do this?
Complete outdoor pipe winterization before your region’s first forecast low of 32°F, ideally in the two-week window before that event. Doing it too early, say in August, is unnecessary and means your outdoor water is unavailable for late-season tasks. Mid-October is the right timing for most of Zones 5 through 7, while Zones 3 and 4 should target late September.
Quick Tips
- Mark your calendar for October 1st as your annual outdoor plumbing winterization reminder, before the first freeze advisory hits your area.
- If you discover a hose bib that does not have a dedicated interior shutoff valve, have a plumber install a ball valve on that supply line. It costs $100 to $200 and is the single best upgrade you can make to protect that fixture.
- In climates with hard winters, replace standard hose bibs with frost-free sillcocks, which self-drain when the faucet is closed. They cost $15 to $40 at hardware stores and can be DIY-installed in about an hour.
- Store removed garden hoses in a garage or shed over winter. Hoses left outside contract in the cold, develop cracks in the material, and lose years of service life.
Variations for Your Situation
- Apartment or Condo: Renters and condo owners typically do not control shared plumbing systems, but you are still responsible for any hose bibs on your private patio or balcony. Disconnect your garden hose before the first freeze and notify your building manager in writing if you notice an unsecured outdoor spigot on common areas. For window AC units with drain hoses routed outside, pull and store the unit or cap the drain to prevent water backflow.
- Tight Budget (Under $50): Focus on the zero-cost steps first: disconnect every garden hose and open exterior faucets to drain residual water after closing interior shutoff valves. Then spend $10 to $20 on foam faucet insulating covers for all exterior bibs. If you have an irrigation system but cannot afford a professional blow-out, shut off the main irrigation supply and manually activate each zone to release pressure, then drain the backflow preventer test cocks by opening them with a flathead screwdriver. This is not as thorough as a full blow-out but dramatically reduces risk.
- Older Home Pre-1980: Homes built before 1980 often lack dedicated interior shutoff valves for exterior faucets, have galvanized steel supply lines that are already partially corroded, and may have irrigation systems installed without proper backflow protection. Prioritize getting a plumber to add interior shutoff valves and inspect the condition of supply pipes at exterior penetrations. Budget $300 to $600 for this work and consider it insurance against a much larger repair. Foam faucet covers and hose disconnection are especially important for older homes since their rim joists and crawl spaces are rarely insulated.