
Switching to LED bulbs is one of the smartest energy moves a homeowner can make, cutting lighting energy use by up to 75% compared to incandescent bulbs. But millions of homeowners run into the same frustrating problem: their brand-new LEDs flicker, buzz, or refuse to dim smoothly. Rather than blaming the bulbs, most people assume they got a defective batch and go back to the store. The real problem is almost never the bulbs.
The issue comes down to a mismatch between your LED bulbs and your existing dimmer switch. Most homes built before 2015 have dimmers designed specifically for incandescent bulbs, which work on a completely different electrical principle than LEDs. When you pair an old-style dimmer with a modern LED, you get flickering, buzzing, limited dimming range, and in some cases, shortened bulb life. This is a known, well-documented incompatibility, and the fix is straightforward.
In this post, you will learn exactly why LED flickering happens, how to confirm a dimmer mismatch is your problem, and how to fix it yourself in under 30 minutes with a $15 to $20 dimmer switch. You will also find out how to avoid the same issue when buying bulbs or dimmers in the future, and when it might be worth calling an electrician instead.
What You’ll Need
Click on an item below to shop for the recommended items for this recipe on Amazon.
As an Amazon Associate, we earn from qualifying purchases.
How to Do It
- Turn off the circuit breaker controlling the flickering light fixture. Use a non-contact voltage tester to confirm power is off before touching any wires.
- Remove the dimmer switch cover plate and unscrew the dimmer from the wall box. Take a photo of the wiring before disconnecting anything so you have a reference.
- Look up the brand and model number printed on your current dimmer. Search the manufacturer’s website for an LED compatibility list and confirm your bulbs are not listed.
- Purchase an LED-rated dimmer switch labeled ‘LED/CFL compatible’ from brands like Lutron Caseta, Leviton, or GE. Match the amperage rating (most residential circuits use 15A). Budget for a $15 to $20 single-pole dimmer or $20 to $25 for a 3-way model.
- Connect the new dimmer following the included wiring diagram. Most single-pole LED dimmers need only a hot wire, a load wire, and optionally a ground. Restore power and test full dimming range from 1% to 100%.
- If flickering persists after the swap, check that your bulbs are labeled ‘dimmable’ on the packaging. Non-dimmable LED bulbs will flicker on any dimmer, regardless of compatibility.
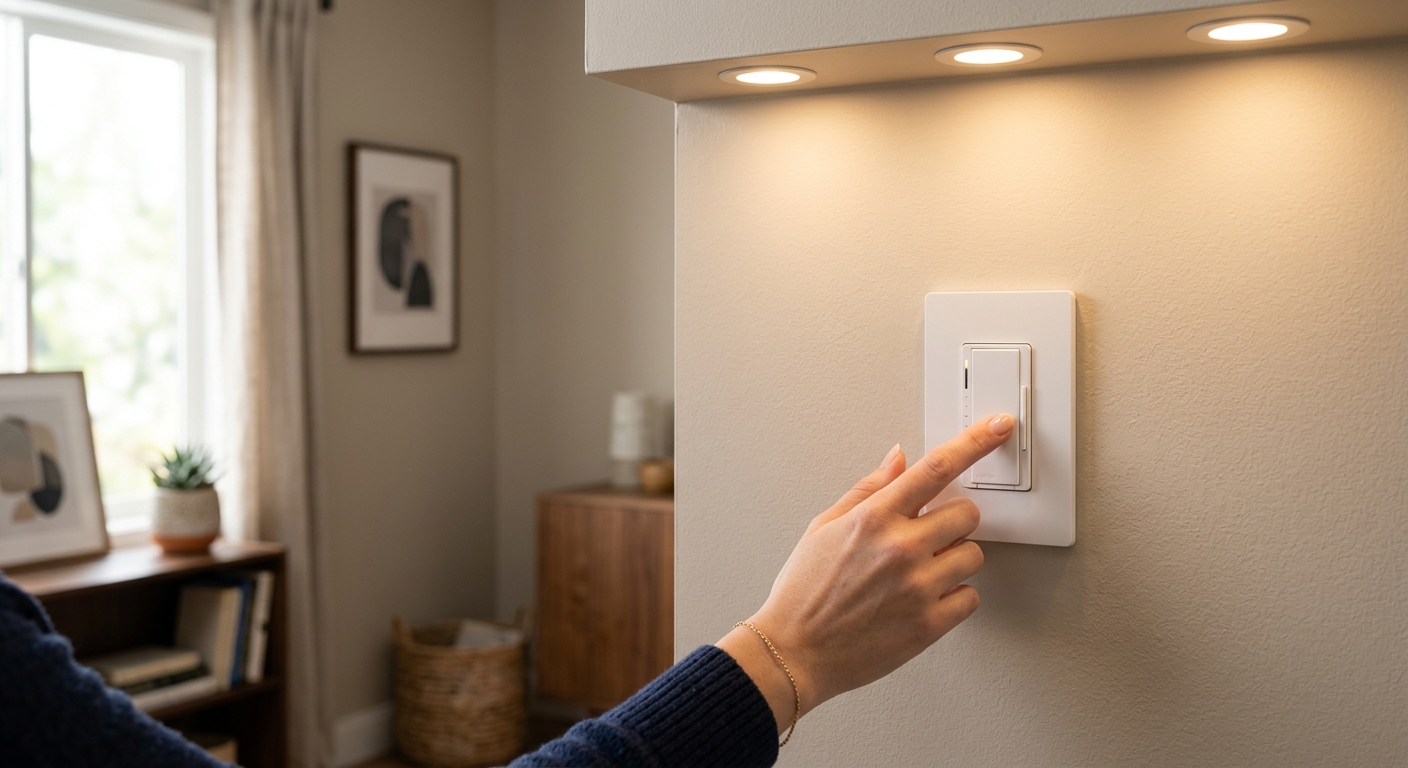
- Turn off the circuit breaker and verify power is off with a non-contact voltage tester. Remove the existing switch or dimmer and identify the wires: hot (usually black), load (black or red going to fixture), neutral (white, if present), and ground (bare copper or green).
- Photograph all wire connections before removal. Count wires in the box to determine if a neutral wire is available. A neutral wire is white and connects to a bundle of other white wires in the box, not to the existing switch.
- Select a smart LED dimmer compatible with your setup. Lutron Caseta works without a neutral wire and has excellent LED compatibility. Leviton Decora Smart and GE Enbrighten are reliable neutral-required options at $40 to $65.
- Connect the smart dimmer per the included wiring diagram. Attach ground first, then neutral if applicable, then hot and load wires. Smart dimmers typically use push-in connectors or screw terminals, both equally reliable.
- Restore power, download the manufacturer’s app, and pair the dimmer to your home Wi-Fi or hub. Set a dimming schedule to automatically lower lights to 40% after 9 PM, which saves an additional 30 to 40% on lighting energy during evening hours.
- Calibrate the dimmer’s minimum dimming level through the app or manual adjustment trim screw (usually inside the switch plate) so the bulb does not flicker at low settings. Set maximum level to 90% to reduce heat buildup and extend bulb life.
- Call a licensed electrician if your home was built before 1970, as it may have aluminum branch circuit wiring that requires special connectors and anti-oxidant compound when installing any new switch.
- Request that the electrician assess all dimmer locations at once to identify neutral wire availability throughout the home before you purchase smart dimmers, saving you from buying incompatible products.
- Have the electrician install a whole-room or whole-floor LED dimmer system such as Lutron RadioRA 3 or Caseta with Pico remotes, which supports 3-way and 4-way configurations without requiring extra wiring runs.
- Ask for a written record of which dimmer model is installed with which bulb brand, so you can maintain compatibility when replacing bulbs in the future.
Why It Works: The Benefits
Replacing an incompatible incandescent dimmer with an LED-rated model resolves flicker in virtually all cases immediately, protecting your eyesight comfort and preventing headaches associated with high-frequency flicker.
Compatible dimmers reduce electrical stress on LED drivers, helping bulbs reach their rated lifespan of 15,000 to 25,000 hours instead of failing prematurely. A single quality LED bulb lasting its full life saves $50 to $100 in replacement costs over 20 years compared to incandescents.
LEDs use 75% less energy than incandescent bulbs, and dimming them by just 25% saves an additional 20% in electricity. A compatible dimmer lets you actually use that dimming range, compounding your savings.
An LED-compatible dimmer gives you a full 1% to 100% dimming range instead of the choppy 30% to 100% range typical with mismatched dimmers, improving comfort and ambiance in living spaces.
Voltage irregularities from incompatible dimmers can overheat LED drivers, causing bulbs rated for 20,000 hours to fail within 1,000 to 3,000 hours, wasting your upfront investment in quality bulbs.
💰 Savings Impact by Action
Replacing a 60-watt incandescent with a 9-watt LED reduces lighting energy consumption by 75% per bulb.
Dimming compatible LEDs to 75% brightness reduces their energy draw by approximately 20%, compounding savings on top of the base LED efficiency.
Automating lights to dim or turn off on a schedule reduces lighting runtime by 15% on average in typical households.
Using a compatible dimmer prevents premature LED driver failure, protecting 10 to 30% of bulb lifespan that would otherwise be lost to electrical stress.
🏠 Key Concepts Explained
The Science Behind It
Standard household current in North America is 120-volt alternating current cycling at 60 Hz, meaning the voltage rises and falls in a smooth sine wave 60 times per second. Incandescent bulbs work by heating a tungsten filament, and because the filament retains heat between cycles, it glows continuously even as voltage fluctuates. Old TRIAC dimmers work by clipping part of each AC cycle, reducing average power delivered to the filament. The filament’s thermal mass smooths over the interruptions and you see steady light.
LED bulbs work completely differently. They do not have a filament. Instead, they use an internal driver circuit that rectifies AC power into smooth DC current to feed the LED chips. When a leading-edge incandescent dimmer clips the AC waveform, many LED drivers cannot process the irregular signal cleanly. The driver may output pulsing DC current, causing the LED chips to flicker at a rate between 50 and 120 Hz, which is visible to most people and causes eye strain. Some drivers lose regulation entirely at low dim levels, producing chaotic flickering or shutting off completely, which is why many mismatched LED setups only dim from about 30% to 100% before the light dies.
LED-compatible dimmers solve this in two ways. First, they use a lower minimum load threshold, sometimes as low as 5 to 10 watts, so a small cluster of LED bulbs does not fall below the switch’s operating floor. Second, many use trailing-edge or enhanced TRIAC dimming that produces a cleaner waveform the LED driver can process smoothly across the full dimming range. The result is stable DC output from the driver, steady light output from the chips, and quiet operation with no buzzing from the switch or bulb.
Frequently Asked Questions
▼ I replaced the dimmer with an LED-compatible model but my bulbs still flicker. What now?
First confirm your bulbs are explicitly labeled dimmable on the box. Non-dimmable LEDs will flicker on any dimmer. If they are dimmable, check the dimmer manufacturer’s compatibility list and verify your exact bulb model is listed. If the bulbs are not on the list, try a different bulb brand known to be compatible, such as Lutron’s own bulbs, Cree, or Philips Hue White.
▼ My LED bulbs flicker only at low dim settings, not at high brightness. Is that normal?
This is a very common symptom of a minimum dim level mismatch. Most LED dimmers have a small trim screw inside the wall plate or a digital calibration setting in an app that lets you raise the floor so the bulb never goes below its stable operating range. Adjust the minimum trim setting upward until flickering stops at low levels. If your dimmer has no trim adjustment, the bulb and switch are likely incompatible.
▼ Can renters replace a dimmer switch without landlord permission?
Most leases prohibit permanent electrical modifications, and dimmer replacement technically alters a fixture. Ask your landlord first, as many will say yes since it does not damage anything. If permission is denied, save the old dimmer and offer to reinstall it when you move out. Alternatively, switch to non-dimmable LED bulbs and bypass the dimmer by setting it to maximum output only.
▼ My LED bulbs glow faintly even when the switch is off. Is something wrong?
Yes, this is called ghost voltage or phantom power, and it is caused by an incompatible dimmer leaving residual current flowing through the LED driver even in the off position. Replacing the dimmer with an LED-compatible model eliminates this. It is not a safety hazard in most cases, but it does waste a small amount of energy and shortens bulb life over time.
▼ How much will I actually save on my electric bill after switching to LEDs with a proper dimmer?
A standard 60-watt incandescent replaced by a 9-watt LED saves about 51 watts per bulb. Running that fixture 4 hours per day saves roughly $7 to $9 per bulb per year at average U.S. electricity rates. A home with 20 bulbs saves $140 to $180 per year on lighting alone. Using your new dimmer to run lights at 75% brightness adds another 15 to 20% on top of that.
Quick Tips
- Always buy dimmable LEDs when you plan to use a dimmer. The packaging will clearly say ‘dimmable.’ Non-dimmable LEDs will flicker on any dimmer and may fail early.
- Stick to one bulb brand per dimmer circuit when possible. Mixed bulb brands on a single dimmer increase the chance of compatibility conflicts even with an LED-rated switch.
- If you have a 3-way switch setup (two switches controlling one fixture), both switches must be replaced with LED-compatible dimmers or one dimmer plus one compatible companion switch, not just one location.
- Set your smart dimmer’s default level to 70 to 80% in living areas. Most people cannot perceive the difference between 80% and 100% brightness, and that 20% reduction translates directly into 20% less electricity used by the fixture.
Variations for Your Situation
- Apartment/Rental: Renters who cannot replace switches should focus on buying the right bulbs instead. Swap any non-dimmable LEDs for dimmable ones rated for your wattage, and set the existing dimmer to its highest stable setting to avoid flicker without touching the wiring. Products like Philips Warm Glow or GE Reveal dimmable LEDs are widely compatible with older incandescent dimmers and cost $5 to $10 per bulb.
- Tight Budget (under $50): A single Leviton or GE LED-compatible dimmer costs $15 to $20 at any hardware store and solves the problem in 90% of cases without any additional spending. Prioritize replacing the dimmer in the room where you spend the most time, typically the living room or kitchen, and leave other rooms for later. The energy savings from proper LED operation will recover that $20 in 2 to 4 months.
- Older Home (pre-1980): Homes from this era often have only two wires in the switch box (hot and load, no neutral) and may have aluminum branch wiring. Before buying any dimmer, open the box and look at the wire color and material. Copper wires are your standard setup; silver-colored strands indicate aluminum wiring, which requires a licensed electrician and CO/ALR rated devices. If wiring is copper but no neutral is present, choose a no-neutral LED dimmer like the Lutron Caseta PD-6WCL ($45 to $55), which is designed for exactly this situation.