If you live in a dry climate and you’re still running a conventional air conditioner all summer, you may be leaving hundreds of dollars on the table every year. Evaporative coolers, sometimes called swamp coolers, use a simple and brilliant trick: they push hot outside air through water-soaked pads, dropping the temperature by 15 to 40 degrees Fahrenheit through evaporation alone. They use roughly 75% less electricity than a central AC system of comparable capacity. That’s a real difference on a real utility bill.
The catch is that evaporative cooling is entirely dependent on humidity. In Phoenix or Denver, a swamp cooler is a workhorse. In Houston or Miami, it’s practically useless and can actually make your home feel worse. Understanding the science behind that limitation is the key to knowing whether this technology is right for your home, and if you already own one, how to squeeze every degree of cooling out of it.
This guide covers the climate conditions where evaporative coolers thrive, the settings and maintenance habits that maximize their output, and a frank look at when a conventional AC system is the smarter investment. Whether you’re shopping for a cooler, tuning up an existing unit, or troubleshooting why yours isn’t performing, you’ll find specific numbers and actionable steps here.
What You’ll Need
Click on an item below to shop for the recommended items for this recipe on Amazon.
As an Amazon Associate, we earn from qualifying purchases.
How to Do It
- Check your outdoor humidity before running the cooler. Pull up a weather app and look at the relative humidity reading. If it is above 60%, do not expect meaningful cooling. Below 40% is ideal. This one check tells you whether your cooler problem is mechanical or climatic.
- Open windows or interior vents on the side of the home opposite the cooler’s discharge point. Start with a 2 to 4 inch gap and increase until you feel strong airflow without hearing loud rushing. This cross-ventilation path is what allows the cooler to move air rather than pressurize the house.
- Run the cooler in fan-only mode for 5 minutes before switching to cool mode. This pre-wets the pads so you get full cooling immediately when you need it, instead of waiting 10 to 15 minutes for saturation.
- Set the cooler to run at high speed during the early morning hours (5 to 10 AM) when outdoor temperatures and humidity are at their daily low. Flush the house with the coolest possible air, then scale back or switch to fan-only as outdoor humidity rises through the afternoon.
- Inspect the water level in the reservoir. Most units have a float valve similar to a toilet tank. Adjust it so water sits 2 to 3 inches below the top of the reservoir. Too low means dry pads; too high risks overflow and wasted water.
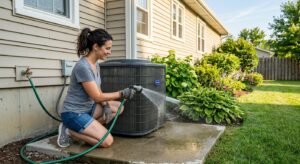
- Turn off power to the cooler at the breaker and disconnect the water supply line before opening the unit. Evaporative coolers combine electricity and water, so this step is non-negotiable.
- Remove the side panels and pull out the cooling pads. Inspect them for mineral scale (white or yellowish crust), mold (black or green patches), or physical breakdown. If any of these are present, replace the pads rather than cleaning them. Aspen pads typically last one season. Rigid cellulose or synthetic media pads last 3 to 5 years with proper maintenance.
- Clean the water reservoir with a stiff brush and a mixture of equal parts white vinegar and water to dissolve mineral deposits. Rinse thoroughly. This step prevents scale buildup from clogging the pump and distribution tubes.
- Remove the pump and inspect it for sediment. Most small submersible pumps can be flushed by running them briefly in a bucket of clean water. If flow is weak or the pump makes grinding noises, replace it. A replacement pump costs $15 to $35 and takes about 10 minutes to swap.
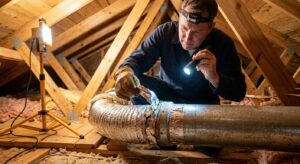
- Check the water distribution tubes or spider-style drip lines that run across the top of the pads. Hold them up to light and confirm each hole is open. Use a toothpick or thin wire to clear any blocked holes. Uneven distribution causes dry hot spots on the pad and dramatically reduces cooling output.
- Install the new pads (if replacing), reassemble the panels, restore water and power, and run the cooler for 10 minutes while watching for leaks at the reservoir and supply line. Verify pads are fully saturated and air coming from vents feels noticeably cool.
- Consult with an HVAC contractor who has specific experience with evaporative systems. Ask for a Manual J load calculation to properly size the unit for your square footage and local climate data.
- Choose an indirect-direct (two-stage) unit. The indirect first stage cools incoming air over a heat exchanger without adding moisture, then the direct second stage provides additional evaporative cooling. This design can achieve supply air temperatures 10 to 15 degrees cooler than a single-stage unit while adding far less humidity.
- Confirm your ductwork or discharge openings are sized for the higher airflow of an evaporative system. Evaporative coolers move 3 to 4 air changes per hour, roughly double what a typical AC system delivers. Undersized ducts create noise and reduce efficiency.
- Ask your contractor about a hybrid installation that pairs the evaporative system with a small backup mini-split or window AC unit for the rare humid days. This pairing can cover 90 to 95% of cooling hours with the evaporative system while providing conventional backup without paying for a full-size AC system.
- After installation, verify the unit is connected to a float-valve water supply and that a bleed-off or bleed valve is set to drain a small continuous stream of water. This prevents mineral concentration in the reservoir, which is the top cause of scale damage in hard-water areas.
Why It Works: The Benefits
A typical whole-house evaporative cooler draws 250 to 700 watts. A comparable central AC system draws 3,000 to 5,000 watts. Running 8 hours a day for 90 days, that difference translates to $150 to $400 in electricity savings per cooling season at average U.S. rates.
Because evaporative coolers constantly bring in fresh outside air, they flush out stale indoor air and add beneficial moisture in arid climates where indoor humidity often drops below a comfortable 30%. This can reduce dust, static electricity, and respiratory discomfort during dry desert summers.
A whole-house evaporative cooler installed on a rooftop typically costs $1,500 to $3,500 installed, compared to $4,000 to $12,000 for a central AC system. A quality portable or window unit starts at $150 to $400, giving renters and apartment dwellers a practical option.
Evaporative coolers use no refrigerants and consume far less electricity. Their carbon footprint per cooling-hour is roughly 75% lower than a central AC system powered by the average U.S. grid mix.
With no compressor, condenser coil, or refrigerant circuit, evaporative coolers have far fewer components that can fail expensively. Annual maintenance consists primarily of replacing pads, cleaning the reservoir, and inspecting the pump, tasks most homeowners can complete in under two hours.
💰 Savings Impact by Action
Evaporative coolers use 75% less electricity per hour than a central AC system of comparable cooling capacity in optimal dry-climate conditions.
Replacing degraded or clogged cooling pads restores up to 25% of lost cooling output compared to running the unit with worn media.
Running the cooler during early morning low-humidity hours and pre-cooling thermal mass reduces afternoon runtime by roughly 15% without sacrificing comfort.
Properly sizing and positioning exhaust openings improves airflow efficiency and can reduce the time needed to cool the home to setpoint by up to 20%.
Upgrading from a single-stage to an indirect-direct two-stage unit extends the usable humidity range and improves average cooling output by 25 to 30% on moderate-humidity days.
🏠 Key Concepts Explained
The Science Behind It
The physics behind evaporative cooling is the same reason you feel cold stepping out of a swimming pool on a dry day. When liquid water evaporates, it absorbs energy from the surrounding air, specifically about 1,060 BTUs per pound of water evaporated. That energy transfer cools the air directly. The critical variable is how much evaporation can actually occur, and that is entirely controlled by how much moisture the surrounding air can still absorb. Relative humidity is a measure of how saturated the air already is relative to its maximum capacity at that temperature. Air at 10% RH is desperately thirsty for moisture and will support rapid, powerful evaporation. Air at 80% RH is nearly saturated and will barely evaporate any water at all.
Engineers use a metric called wet-bulb temperature to predict exactly how much cooling is achievable through evaporation. You can look up your location’s design wet-bulb temperature in ASHRAE climate data. A perfectly efficient evaporative cooler would cool incoming air all the way down to the wet-bulb temperature. Real single-stage units achieve about 70 to 80% of that theoretical maximum, called saturation efficiency. On a 100°F day in Albuquerque with a wet-bulb of 65°F, a good single-stage cooler can deliver supply air around 68 to 72°F. On a 90°F day in Atlanta with a wet-bulb of 78°F, that same unit can only deliver air around 80 to 82°F, which is warmer than most people’s comfort setpoint.
Two-stage indirect-direct systems improve on this by first passing incoming air through a heat exchanger cooled by evaporation on the exhaust side, without adding any moisture to the supply air. This indirect stage can drop the incoming air temperature by 15 to 20°F before the direct evaporative stage takes over, effectively lowering the starting temperature and allowing the direct stage to achieve supply air well below the outdoor wet-bulb. This is why two-stage systems can operate comfortably in climates with summer humidity levels that would overwhelm a standard unit.
Frequently Asked Questions
▼ Why is my swamp cooler blowing warm air even though it’s running?
The most likely causes are dry pads, a failed pump, or outdoor humidity that is simply too high for evaporative cooling to work. Start by checking the pads. Open the side panel while the unit is running and feel the pads. They should be dripping wet and cool to the touch. If they are damp but not soaked, the pump is weak or the distribution lines are clogged. If outdoor relative humidity is above 65%, the cooler cannot cool effectively regardless of its mechanical condition.
▼ My evaporative cooler is making the house feel humid and muggy. What’s wrong?
This almost always means you have inadequate ventilation. The cooler is adding moisture to the air faster than it can escape the house. Open windows or vents on the side of the house opposite the cooler’s supply, aiming for a 4 to 6 inch gap. If outdoor humidity is already above 50 to 55%, the only real fix is to run the cooler less or switch to a conventional AC on those days. Running the unit with good cross-ventilation is the single most important operating habit for an evaporative cooler.
▼ How do I know if my climate is actually suitable for an evaporative cooler?
Look up the average afternoon relative humidity for your location during your hottest months. If your summer afternoons regularly stay below 40% RH, you are in ideal territory. Between 40 and 55% is workable with a quality unit. Above 60%, comfort will be marginal and a two-stage system or conventional AC is a better choice. A quick heuristic is that locations west of the 100th meridian (roughly the eastern border of the Texas Panhandle) are generally suitable, while most locations east of that line are not.
▼ Can I use an evaporative cooler at the same time as my central AC?
You can, but it is generally wasteful and counterproductive. The evaporative cooler adds moisture to the air, which makes the AC work harder to dehumidify. The better strategy is to use the evaporative cooler on dry days (below 50% RH) and switch to AC only when outdoor humidity climbs. Some homeowners in semi-arid climates use evaporative cooling for 80 to 90% of cooling hours and reserve AC for the few weeks of the year when monsoon moisture makes evaporative cooling impractical.
▼ My cooler smells musty or moldy. Is it safe to run?
Do not run it until you have addressed the source. A musty smell means mold or bacterial growth on the pads or in the reservoir, and the cooler is distributing those spores throughout your home. Turn off the unit, remove and discard the pads, scrub the reservoir and housing with a diluted bleach solution (1 tablespoon bleach per gallon of water), rinse thoroughly, and install new pads. This should resolve the odor completely. If the smell returns within a few weeks, check whether the bleed valve is working, as stagnant water concentration accelerates biological growth.
Quick Tips
- Check your local weather station’s dew point reading, not just humidity percentage. A dew point above 55°F is a reliable signal that evaporative cooling will be marginal that day.
- Position portable evaporative coolers near an open window with airflow directed into the room, not toward a wall. The cooler needs a continuous supply of fresh dry air on one side and an exhaust path on the other.
- In hard-water areas, add a small inline water filter or pre-treatment cartridge to the supply line. This reduces mineral scale on pads by 40 to 60% and can double the life of your pump.
- During shoulder seasons when nights drop below 65°F, close windows around midnight and let the cooler run on fan-only to move the stored cool air through the house, extending the effect of the cooler without adding more moisture.
Variations for Your Situation
- Apartment or Rental: Renters can use a portable or window-mounted evaporative cooler without landlord permission in most cases since they require no permanent installation. Look for units in the 3,000 to 5,500 CFM range, which can cool a single large room or an open-plan apartment effectively. Models from Hessaire, Bonaire, or Champion retail for $150 to $400. Place the unit near an open window with the intake facing outward and crack a window on the opposite side of the space. Avoid units with only recirculating mode since they add humidity without drawing in fresh dry air.
- Tight Budget (under $50): The highest-impact free steps are optimizing your ventilation path and adjusting your operating schedule to early morning hours. If you have an existing cooler, spend $15 to $25 on replacement aspen pads and a vinegar cleaning session. This alone can restore 20 to 30% of lost cooling capacity in a neglected unit. Beyond that, a $10 outdoor thermometer-hygrometer lets you monitor real-time humidity so you stop running the cooler when conditions make it useless, saving water and electricity at the same time.
- Older Home (pre-1980): Older homes in the Southwest were often built with evaporative cooling in mind and may have original whole-house units on the roof or built-in vents designed for this airflow pattern. If the existing unit is more than 10 to 15 years old, replacing it with a modern unit of the same type is likely cost-effective since efficiency has improved substantially. Check that original roof penetrations and duct boots are still properly sealed and insulated around the unit. Pre-1980 homes also tend to have lower ceilings, which works in your favor since cooled air stratifies downward and the shorter vertical distance means better comfort at the living level.