Multi-story homes have a built-in enemy: physics. Heat rises, cold air sinks, and your HVAC system fights this constantly. The result is a bedroom floor that feels like a sauna in winter while your ground floor stays chilly, or a downstairs that overheats while the upstairs never quite warms up. If you’re cranking the thermostat to compensate, you’re paying for comfort you’re not getting.
The good news is that most uneven heating problems come down to airflow distribution, not a failing furnace or a fundamental flaw in your home. Supply and return vents, dampers inside your ductwork, and simple fan settings on your thermostat all work together to move conditioned air where you need it. When they’re not balanced properly, the system defaults to heating whatever space is closest to the return air path and ignoring the rest.
This post walks you through two practical approaches, from a 15-minute no-cost fix to a more thorough DIY balancing job, so you can stop fighting your thermostat and start feeling the difference in every room. We’ll also cover the building science behind why floors heat unevenly, so you know what you’re actually solving.
What You’ll Need
Click on an item below to shop for the recommended items for this recipe on Amazon.
As an Amazon Associate, we earn from qualifying purchases.
How to Do It
- Walk every room in your home and locate all supply vents (rectangular grilles that blow air) and return vents (larger grilles that pull air in). Make a simple sketch or phone notes listing which rooms have vents and whether they are currently open, partially closed, or fully closed.
- On the upper floor, fully open all supply vents by rotating the louver lever to the parallel position. On the lower floor, partially close supply vents to about 50 to 75% open by angling the louvers. This redirects more air pressure upward where heat is most needed in winter.
- Go to your thermostat and switch the fan setting from AUTO to ON. This runs the blower continuously, which circulates air between floors even between heating cycles and reduces floor-to-floor temperature differences by 2 to 4 degrees Fahrenheit.
- Wait 24 hours, then walk each floor and compare comfort. If the upper floor is still significantly warmer, try closing lower-floor vents slightly further to 40 to 50% open. Make one adjustment at a time and allow the system a full heating cycle to respond before evaluating.
- Check that furniture, rugs, and curtains are not blocking any supply or return vents. A blocked return can reduce system airflow by up to 15% and create pressure imbalances that worsen uneven heating.
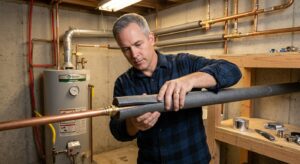
- Access your main duct trunk lines near the furnace. Look for manual damper levers on each branch duct that feeds different zones or floors. A damper lever parallel to the duct means fully open; perpendicular means fully closed. If you do not see dampers, you can add them yourself using inline duct dampers available at home improvement stores for $8 to $15 each.
- Label each damper with masking tape and a marker indicating which room or zone it serves. Run the furnace for one full heating cycle, then use a digital thermometer to measure supply air temperature at each vent in every room. Record the readings.
- Partially close the branch dampers serving your lower floor by rotating the lever 20 to 30 degrees toward the closed position. This increases static pressure in the trunk and pushes more air volume to the upper-floor branches.
- Run the system for another full cycle and re-measure vent temperatures. You are aiming for supply air temperatures that are within 5 degrees Fahrenheit of each other across all floors. Continue adjusting dampers in small increments until readings are balanced.
- Install adjustable floor or ceiling vent deflectors in rooms that still receive too much or too little airflow after damper balancing. Deflectors cost $8 to $20 each and redirect airflow along walls or toward the center of the room for more even distribution.
- Once satisfied with the balance, mark each damper position with a permanent marker on the duct so you can return to the correct setting after any future maintenance. Revisit the balance in summer since cooling requires the opposite strategy, with more airflow directed to upper floors.
- Schedule an HVAC contractor to perform a duct leakage test and airflow measurement. Ask specifically for a ‘system air balancing’ service. The technician will measure cubic feet per minute (CFM) at each register and compare it against the design specifications for your home size.
- Review the contractor’s findings and request a written report showing airflow at each register. Gaps of more than 20% from design CFM indicate a duct issue, not just a balancing issue, and should be addressed with duct sealing or resizing.
- If your home has two or more distinct living areas, ask about adding a zoning system. A zoned system installs motorized dampers in the main trunk lines controlled by separate thermostats on each floor, allowing independent temperature targets for upstairs and downstairs. This typically reduces floor-to-floor variance to 1 to 2 degrees Fahrenheit.
- Have the technician seal any duct leaks found during testing with mastic sealant or metal tape. Duct sealing alone can recover 20 to 30% of lost conditioned air and is often the single highest-impact fix for chronic uneven heating.
Why It Works: The Benefits
Properly balanced airflow means your thermostat reaches its setpoint faster and cycles off sooner. Homeowners who balance vents and adjust fan settings typically see 10 to 20% reductions in heating costs because the system stops overworking to compensate for poor distribution.
Correct vent balancing can close the gap between floors from 8 to 12 degrees Fahrenheit down to 2 to 4 degrees, making every room genuinely livable without fighting the thermostat.
When your furnace runs shorter, more efficient cycles instead of prolonged runs trying to overcome poor airflow, it experiences less wear on the heat exchanger, blower motor, and controls, extending equipment life by several years.
Keeping the fan circulating continuously or in a balanced system passes air through the filter more often, reducing dust stratification between floors and improving filtration by up to 30% compared to AUTO-only mode.
The quick-fix approach costs $0 and takes 15 minutes. Even the full DIY balancing approach requires only basic tools and optional vent deflectors or damper keys, keeping the total investment under $50 in most cases.
💰 Savings Impact by Action
Redirecting airflow to underserved floors reduces overheating cycles and thermostat overcorrection, saving 10 to 15% on heating costs.
Running the blower continuously reduces stratification by 3 to 4 degrees Fahrenheit and allows the thermostat setpoint to be lowered, saving up to 8% annually.
Sealing leaky duct joints with mastic recovers 20 to 30% of conditioned air that would otherwise be lost to unconditioned spaces before reaching living areas.
Adding and adjusting branch dampers to match design airflow reduces blower runtime and eliminates heating overcorrection, cutting bills by up to 12%.
🏠 Key Concepts Explained
The Science Behind It
The core reason floors heat unevenly comes down to a principle called the stack effect, which is the same physics that makes chimneys work. Warm air is less dense than cold air, so it rises and accumulates at the top of your home’s interior. In a two-story house, this creates a predictable pressure pattern: warm air escapes at the upper level and cold air is drawn in at the lower level. Your furnace is constantly fighting this natural stratification, and without deliberate airflow balancing, it typically loses.
Your duct system was designed with a specific total airflow volume measured in cubic feet per minute (CFM). Each branch duct and register is sized to deliver a fraction of that total to its target room. When supply vents on one floor are wide open and those on another are partially blocked by furniture or adjusted incorrectly, the pressure distribution inside the duct changes. Air follows the path of least resistance, overloading some rooms and starving others. The result is that the thermostat may read a satisfied temperature at its location while rooms 20 feet away are 8 to 12 degrees different.
Running the blower fan continuously rather than only during heating cycles addresses stratification directly. During a typical heating cycle, the furnace runs for 10 to 15 minutes per hour in mild weather. In AUTO mode, air sits still the other 45 to 50 minutes and re-stratifies by floor. Continuous fan operation keeps air moving through the filter and across all supply registers, reducing the degree of stratification between cycles. Studies from Lawrence Berkeley National Laboratory found that continuous fan operation in forced-air systems reduced floor-to-ceiling temperature gradients by an average of 3 degrees Fahrenheit in single-zone homes.
Frequently Asked Questions
▼ Why is my upstairs still too hot even after I partially closed the downstairs vents?
The stack effect is likely stronger than vent adjustments alone can overcome in your home. First, check whether your upper floor has accessible return air vents. If all returns are on the ground floor, the system structurally favors heating that level. Adding a return grille to the upper floor is a professional job but can resolve the root cause. In the meantime, try running the fan on continuous ON mode and using ceiling fans set clockwise on low speed to push stratified warm air back down from upper ceilings.
▼ Can closing vents damage my furnace?
Yes, if you close too many at once. Closing more than 30 to 40% of your total supply vents raises static pressure inside the duct system beyond what the blower motor was designed for, causing it to strain and potentially overheat the heat exchanger. Partially closing a few vents on one floor is fine. If you hear new banging or popping sounds from the ducts after adjusting vents, that is duct flex from pressure and a sign to reopen some vents.
▼ My house is one temperature everywhere but it still feels cold downstairs. What’s going on?
When air temperature is even but lower floors feel colder, thermal mass is usually the culprit. Concrete slabs, tile, and masonry on ground floors absorb heat slowly and radiate cold, making the space feel cooler even when air temperature matches upstairs. Adding area rugs over hard flooring and using draft-stoppers under exterior doors can reduce this effect noticeably without changing your HVAC setup at all.
▼ How long does it take to notice a difference after adjusting vents?
For thermostat fan mode changes, you should feel a difference within one to two hours as the system circulates more evenly. For vent position adjustments, allow at least 24 hours and one or two full heating cycles before evaluating, since it takes time for the room air mass to respond to changed airflow. Resist the urge to keep tweaking every few hours, because the system needs time to reach a new steady state.
▼ What if I rent my home and cannot access the ductwork or modify vents?
You can still make meaningful improvements without touching the ductwork. Switch the thermostat fan to ON mode if you have access to it, and ask your landlord to do so if not. Use magnetic vent covers to partially restrict vents on overheated floors, which are removable and leave no damage. Add inexpensive vent deflectors to redirect airflow from floor vents toward the center of rooms. Place area rugs on cold lower floors and use a portable tower fan to circulate air between levels through stairwells.
Quick Tips
- In winter, adjust lower-floor vents to 50 to 70% open and upper-floor vents to 100% open. In summer, reverse this, opening lower-floor vents fully and partially restricting upper-floor vents to counteract heat gain at the top of the home.
- Place an inexpensive digital thermometer on each floor at thermostat height (about 5 feet) and check readings at the same time each morning for a week before and after making adjustments. Real data removes the guesswork from balancing.
- Check your furnace filter. A clogged filter increases system static pressure and reduces total airflow volume by 15 to 25%, which amplifies uneven distribution. Replace filters every 60 to 90 days during heavy heating season.
- If you have a smart thermostat with remote sensors, place one sensor on the floor you want to prioritize. Many smart thermostats can average readings across multiple sensors or follow a specific sensor during certain time periods, effectively creating a basic zoning behavior.
Variations for Your Situation
- Apartment or Rental: Renters typically cannot access branch dampers or modify the HVAC system directly. Focus on removable magnetic vent covers (about $5 to $10 each) to partially restrict over-supplied rooms, adjustable vent deflectors to redirect airflow, and the thermostat fan ON setting if accessible. A portable tower fan placed at the base of the stairwell pointing upward can move 200 to 400 CFM between floors at a cost of $30 to $60 and no landlord permission required.
- Tight Budget Under $25: Start with the zero-cost steps: fully open upper-floor vents, partially close lower-floor vents by hand, switch the fan to ON mode, and reposition any furniture blocking returns. Then add one or two vent deflectors at $8 to $12 each on the most problematic registers. This combination alone can close the temperature gap by 3 to 6 degrees Fahrenheit with no professional help required.
- Older Home Pre-1980: Homes built before 1980 often have undersized return air systems, uninsulated duct runs, and significant duct leakage averaging 30 to 40% airflow loss. Vent balancing alone will help but will not fully resolve the problem. Prioritize duct sealing with mastic or metal tape on accessible joints first, then balance. If the home has no dampers at all on branch ducts, adding them is a half-day DIY project that costs $40 to $80 in parts and delivers the biggest improvement in floor-to-floor balance.