Every summer, HVAC companies get flooded with emergency calls from homeowners whose air conditioners stopped working during a heat wave. What most of those homeowners don’t realize is that their system was sending distress signals for weeks, sometimes months, before it finally quit. The problem is that most people don’t know what those signals look like until they’re already sweating.
A failing air conditioner doesn’t just cost you comfort. An emergency replacement can run $3,000 to $7,000 depending on system size and complexity, and during peak summer demand, you may wait five to ten days for an available technician. A planned replacement or proactive repair, by contrast, lets you shop around, choose the right contractor, and often costs 20 to 30% less than an emergency call. That difference can be $500 to $1,500 out of your pocket.
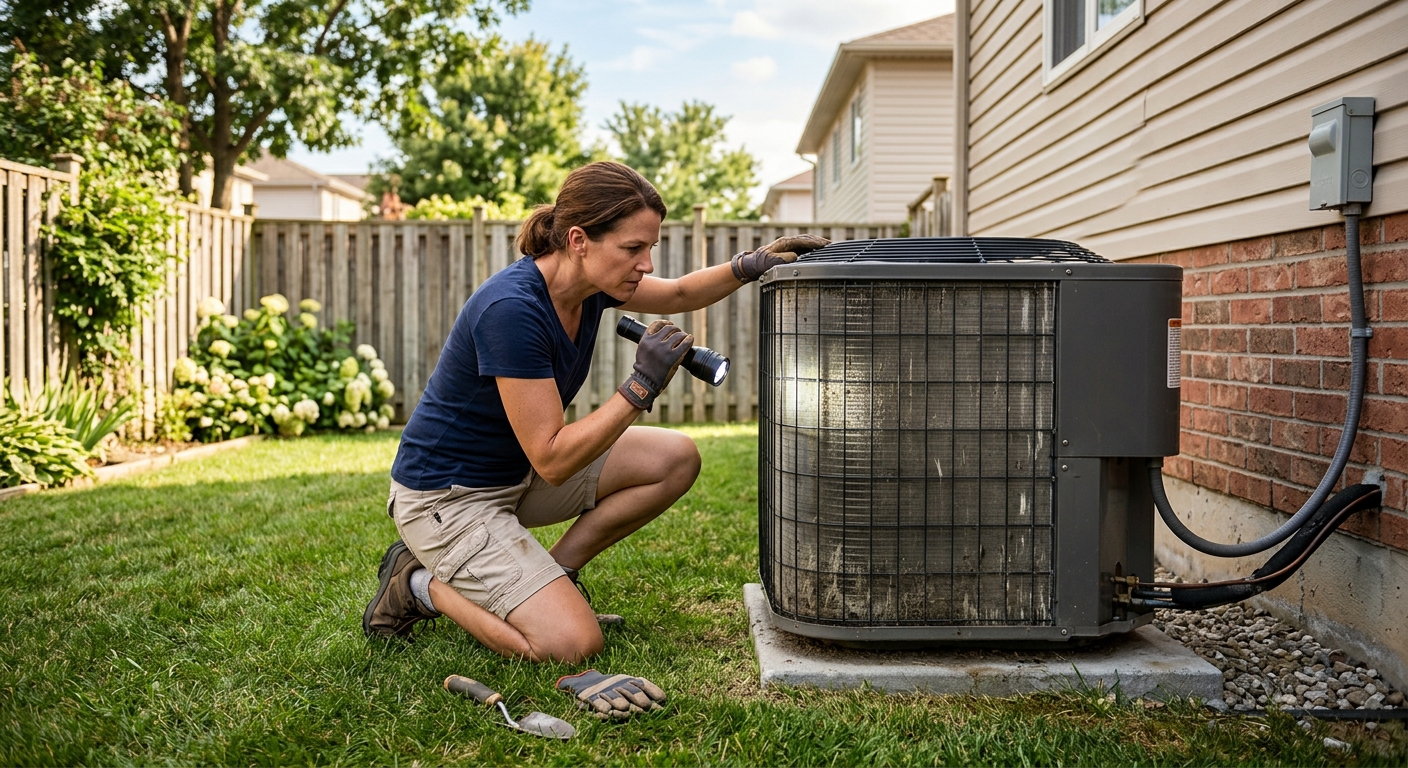
This post walks you through the seven most reliable warning signs that your AC is on its way out, what each sign actually means mechanically, and exactly what to do when you spot them. Some of these you can address yourself in under an hour. Others are clear signals to call a licensed HVAC technician before the system fails completely.
What You’ll Need
Click on an item below to shop for the recommended items for this recipe on Amazon.
As an Amazon Associate, we earn from qualifying purchases.
How to Do It
- Check and replace the air filter if it is gray or visibly clogged. A dirty filter is responsible for a surprising number of service calls and causes icing, short-cycling, and poor airflow. Replace with a MERV 8 to 11 filter.
- Go outside and look at the condenser unit. The fins should be clean and uncrushed. If they are packed with cottonwood, grass clippings, or debris, gently rinse them from the inside out with a garden hose on low pressure.
- Listen to the system start up. A healthy AC starts with a smooth hum. Clicking, clanking, banging, or a grinding noise on startup indicates a mechanical problem in the compressor or fan motor.
- Check your supply vents. Hold your hand near three or four vents throughout the house. Airflow should feel strong and consistently cold. Weak airflow from multiple vents points to a blower, duct, or coil problem.
- Look at the refrigerant lines running into your indoor unit. Ice forming on the copper lines or on the outdoor unit in warm weather is a sign of low refrigerant or restricted airflow.
- Check your thermostat by setting it five degrees below the current room temperature and waiting 10 minutes. If the system doesn’t start at all or starts and stops within two to three minutes, write down the behavior to tell your technician.
- Call a licensed HVAC technician for a cooling season tune-up. Ask specifically that the visit includes refrigerant level check, capacitor test, coil cleaning, and amperage draw measurement on the compressor and fan motors.
- Ask the technician to test static pressure in your duct system. A reading above 0.5 inches of water column suggests significant duct leakage or restriction that is reducing efficiency and stressing the blower motor.
- Request a written report of all readings. Compressor amperage draw, supply and return temperatures, refrigerant subcooling and superheat values, and capacitor microfarad readings should all be documented.
- If the technician finds the refrigerant is low, ask them to identify and repair the leak before recharging. Simply topping off refrigerant without fixing the leak is a temporary fix that will repeat within one to two seasons.
- Ask directly: how many more years does this system realistically have? A technician can estimate remaining compressor life based on amperage readings and system age. If the answer is one to two years, start budgeting and shopping now rather than waiting for a failure.
- Get three written quotes from licensed HVAC contractors. Require each quote to include a Manual J load calculation, which is the only proper way to size a new system for your specific home.
- Look for units rated at 16 SEER2 or higher. These meet current federal minimum efficiency standards and can save 30 to 50% on cooling costs compared to a 10 to 12 SEER unit from 15 years ago.
- Ask each contractor about available rebates before signing. Federal tax credits through the Inflation Reduction Act provide up to 30% credit (capped at $600) for qualifying high-efficiency central AC systems. Many utilities offer additional rebates of $100 to $500.
- If your ductwork is older than 20 years, ask for a duct leakage test during the quote process. Leaky ducts can waste 20 to 30% of conditioned air and will undermine the performance of even a brand-new system.
- Schedule installation for late spring or early fall when HVAC companies are less busy. You’ll have more scheduling flexibility and may negotiate a better price.
Why It Works: The Benefits
Emergency HVAC replacements during peak summer demand carry a 20 to 35% premium over planned replacements. On a $5,000 system, that’s $1,000 to $1,750 saved by acting before the system fails.
A struggling AC system may be consuming 20 to 40% more electricity than it should, because it runs longer cycles to achieve the same cooling. Catching and fixing the underlying cause can cut your cooling bill by $30 to $80 per month during peak summer.
Many early warning signs, like low refrigerant, dirty coils, or a weak capacitor, can be corrected for $100 to $400 and add two to five years of life to an otherwise functional system.
A failing AC often struggles to dehumidify properly, allowing indoor humidity to climb above 60%, which promotes mold growth in ductwork and around vents within days of sustained high humidity.
A planned replacement lets you get three competitive bids, check reviews, and choose an ENERGY STAR-certified unit with better efficiency ratings. Units with a 16 SEER2 rating or higher can cut cooling costs by 30 to 50% compared to a 10 to 12 SEER unit from 15 years ago.
💰 Savings Impact by Action
Replacing a system proactively rather than under emergency conditions saves 20 to 30% by allowing competitive bidding and avoiding peak-demand surcharges.
Keeping a clean filter maintains proper airflow and prevents efficiency losses of up to 15% caused by restricted air circulation across the evaporator coil.
Replacing a 10 SEER unit with a 16 SEER2 system reduces the electricity used for cooling by up to 40% based on DOE efficiency comparisons.
Professionally cleaning dirty evaporator and condenser coils can restore 10 to 20% of lost system capacity and reduce runtime needed to reach setpoint.
Sealing leaky ductwork recovers the 20 to 30% of conditioned air that escapes into unconditioned attic or crawl space on average in U.S. homes.
🏠 Key Concepts Explained
The Science Behind It
Your air conditioner doesn’t actually create cold air. It moves heat from inside your home to the outside by cycling refrigerant between two coils. The indoor evaporator coil absorbs heat from your air as liquid refrigerant evaporates into a gas, and the outdoor condenser coil releases that heat as the gas is compressed back into a liquid. This continuous loop depends on precise refrigerant pressures and temperatures to work efficiently. When any component is degraded, the pressures shift out of balance and the entire system works harder to achieve less.
The compressor is the component that pressurizes the refrigerant, and it operates under enormous stress, compressing gas thousands of times per hour in temperatures that can exceed 130 degrees Fahrenheit inside the cabinet. Capacitors are what give it the voltage kick to start each cycle. As capacitors age, their capacitance (measured in microfarads) drops below the rated value, making each startup harder on the compressor windings. This is why capacitor failure is so common in units over 8 years old and why a $150 capacitor replacement can prevent a $2,000 compressor failure.
Airflow is equally critical to system health. The evaporator coil needs a consistent volume of warm air passing over it to keep the refrigerant from getting too cold. When a clogged filter or dirty coil restricts airflow, the refrigerant drops below 32 degrees Fahrenheit and the coil freezes. A frozen coil blocks all airflow entirely and can cause liquid refrigerant to return to the compressor, a condition called flooding that destroys compressor valves. This chain reaction, starting from a $5 filter that wasn’t changed, is one of the most common and preventable causes of complete AC failure.
Frequently Asked Questions
▼ My AC is running but the house won’t cool below 78 degrees even on a mild 88-degree day. What’s wrong?
This is a classic sign of reduced system capacity, most commonly caused by low refrigerant, a dirty evaporator coil, or a failing compressor that can no longer build adequate pressure. First check your filter and make sure all supply vents are open and unblocked. If those are fine, measure the temperature split at your return and supply vents. A split below 14 degrees Fahrenheit confirms a refrigerant or coil problem and you should call a technician for a diagnostic visit.
▼ My AC turns on and off every few minutes instead of running a full cycle. Is that bad?
Yes, this is called short-cycling and it is one of the most damaging operating patterns for a compressor. Each startup draws a surge of electricity and puts mechanical stress on the motor windings. Common causes include a failing capacitor, a refrigerant overcharge or undercharge, a dirty condenser coil, or an oversized system. Turn the system off and call a technician, because continued short-cycling will shorten compressor life significantly.
▼ I hear a loud clicking or banging when the AC starts up. Do I need to replace the whole system?
Not necessarily. A single click on startup and shutdown is normal as the contactor switch engages. Repeated clicking usually means the capacitor is failing and can’t get the motor started, which is a $100 to $250 repair. Banging or clanking, however, suggests a loose or broken component inside the compressor, which is much more serious and may warrant a replacement cost analysis. Have a technician diagnose it before assuming the worst.
▼ How much warning do I typically get before an AC fails completely?
It varies widely depending on the cause. A failing capacitor often gives one to two seasons of increasingly hard starting before it quits. A slow refrigerant leak may take two to three years to deplete enough to cause problems. A compressor failure due to liquid flooding can happen in a single hot afternoon with no warning. This is why annual tune-ups are valuable, because a technician can measure compressor amperage draw trends over time and give you a much more accurate timeline.
▼ Can I just keep recharging refrigerant every summer instead of fixing the leak?
Technically yes, but it becomes expensive and less effective over time. A refrigerant recharge typically costs $150 to $400 depending on the type and amount needed, and refrigerant prices have increased significantly as older R-22 systems are phased out. More importantly, a slow leak means refrigerant oil is also escaping, which lubricates the compressor. Running low on refrigerant also causes the compressor to overheat, shortening its life. Fix the leak and recharge properly rather than treating symptoms annually.
Quick Tips
- Change your air filter every 60 to 90 days during cooling season, or monthly if you have pets. This single habit prevents the most common cause of avoidable AC breakdowns.
- Keep at least 18 to 24 inches of clearance around your outdoor condenser unit and trim vegetation seasonally. Restricted airflow around the condenser forces the compressor to work against higher head pressures.
- If your AC is over 12 years old and needs a repair costing more than $500, apply the 50% rule: if the repair costs more than 50% of a new system’s price, replacement is almost always the smarter financial choice.
- Write down your system’s model number, serial number, and installation date and keep it somewhere accessible. The serial number often encodes the manufacture date and helps technicians quickly find compatible parts.
Variations for Your Situation
- Apartment or Condo: If you rent, you are generally not responsible for HVAC maintenance costs, but you are responsible for reporting problems promptly in writing. Document any warning signs with photos or video, submit a written maintenance request to your landlord or property manager, and keep a copy. In most states, a landlord is required to maintain functional heating and cooling within a reasonable timeframe. If you have a window or portable AC unit that you own, the same warning signs apply and a professional cleaning kit ($15 to $25) can restore meaningful efficiency.
- Tight Budget (under $50): Focus on the free and low-cost steps first. Replace the filter ($8 to $15), clean the outdoor condenser fins with a garden hose, and clear a 2-foot perimeter around the unit. These three steps resolve a significant percentage of efficiency problems at minimal cost. Then call your utility company, many offer free or subsidized HVAC diagnostics to residential customers as part of energy efficiency programs, so you can get a professional assessment without paying a service call fee.
- Older Home (pre-1990): Homes of this era are more likely to have R-22 refrigerant systems, which are no longer manufactured and are now very expensive to recharge (up to $100 per pound versus $15 to $25 per pound for modern R-410A or R-32 systems). If your older system has a refrigerant leak, the economics of repair shift dramatically in favor of replacement. Additionally, ductwork in homes of this age often has significant leakage, so budget for a duct leakage test and possible sealing when planning a replacement, since new equipment will underperform if installed on leaky ducts.