Your air conditioner has dozens of components, but few are as quietly destructive when they fail as the expansion valve. This small, inexpensive part controls exactly how much refrigerant flows into your evaporator coil. When it sticks open, floods the compressor with liquid refrigerant, or restricts flow entirely, your system can lose 20 to 40% of its cooling capacity while your electricity meter spins faster than ever. Most homeowners never suspect the expansion valve because the symptoms look like a dozen other problems.
The tricky part is that a bad expansion valve rarely causes a dramatic failure. Instead, it degrades your system gradually. Your home never quite reaches the set temperature, your AC runs in long exhausting cycles, and your energy bills creep up month after month. By the time most homeowners investigate, the compressor has already absorbed unnecessary wear from liquid slugging or overheating, turning a $200 valve repair into a $1,500 to $3,000 compressor replacement.
This post covers exactly what the expansion valve does, how to recognize the warning signs before they escalate, what a technician will check during diagnosis, and the realistic costs and payback periods for repair versus replacement. Whether you want to do some informed troubleshooting yourself or simply walk into a service call knowing what questions to ask, this guide gives you the building science and the practical steps you need.
What You’ll Need
Click on an item below to shop for the recommended items for this recipe on Amazon.
As an Amazon Associate, we earn from qualifying purchases.
How to Do It
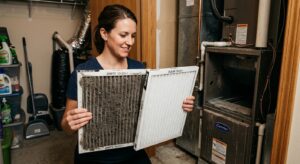
- Check your air filter first. A clogged filter reduces airflow across the evaporator coil and mimics expansion valve symptoms including poor cooling and coil icing. Replace any filter that looks gray or matted before calling a technician.
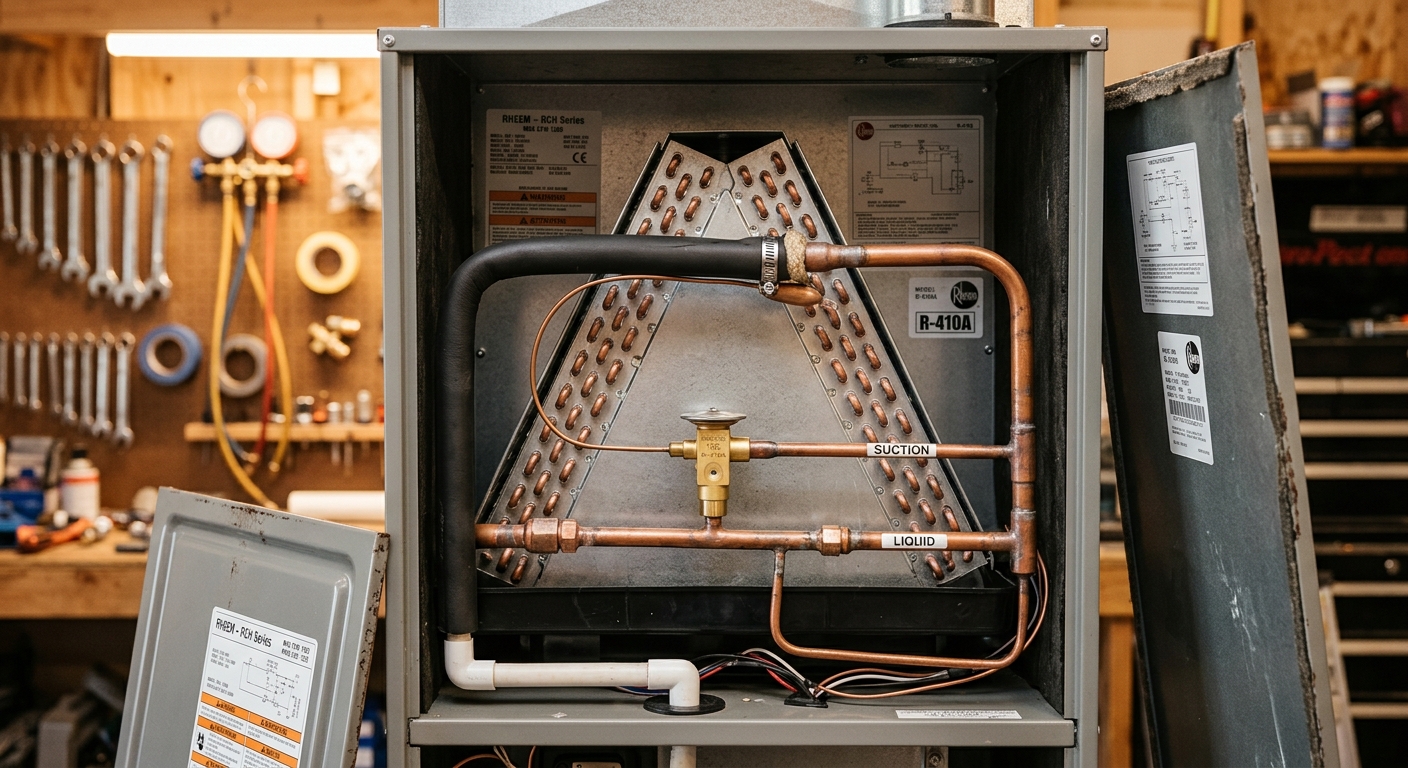
- Inspect the evaporator coil access panel (usually on the indoor air handler above the filter slot). If you see ice on the coil or copper lines, turn the AC to Fan Only mode for 2 to 4 hours to allow it to thaw completely before the technician arrives. Document what you saw with a photo.
- Check outdoor unit airflow. Clear any debris (leaves, grass clippings, shrubs) from within 2 feet of the condenser. A restricted condenser can inflate high-side pressures and confuse diagnosis.
- Note your symptoms in writing: when cooling problems started, whether the system short-cycles or runs too long, any unusual sounds (gurgling or hissing from the refrigerant lines), and your recent energy bill trend. Technicians diagnose faster with this timeline.
- Verify the system age and refrigerant type (usually printed on the outdoor unit data plate). Systems over 12 to 15 years old using R-22 refrigerant have different repair economics than newer R-410A systems, and this affects whether repair or full replacement makes more sense financially.
- Request a technician who will measure both superheat and subcooling with manifold gauges, not just check pressures. Ask them to document the readings before and after the repair so you have a baseline for future service calls.
- Ask whether the system has a thermal expansion valve (TXV) or an electronic expansion valve (EEV). TXV replacements typically cost $150 to $350 in parts and labor. EEV replacements on newer variable-speed systems can run $250 to $600 due to the additional electrical diagnosis and programming involved.
- Confirm the technician will flush or nitrogen-purge the refrigerant lines before installing a new valve if there is any evidence of compressor oil breakdown or debris in the system. Contaminated lines will clog a new valve within one season.
- If the system requires refrigerant topping off after the repair, ask for the exact amount added and the final refrigerant weight on the system. This protects you against unnecessary recharging on future visits.
- After repair, run the system for 20 to 30 minutes and ask the technician to confirm final superheat and subcooling readings match manufacturer specifications for your unit model. This is your proof the repair was successful, not just that the problem symptoms went away temporarily.
- Request a written service report with the diagnostic readings, parts replaced, refrigerant amounts, and the technician’s EPA 608 certification number. This documentation is valuable for warranty claims and future service.
Why It Works: The Benefits
A properly metering expansion valve restores the system’s designed efficiency rating. Homeowners who repair a failing TXV or EEV report cooling bill reductions of 15 to 40% depending on how long the valve had been degraded, because the compressor no longer runs extended cycles fighting a coil that cannot absorb heat correctly.
Restoring correct refrigerant flow eliminates the freeze-thaw cycles that cause coil fins to corrode and refrigerant lines to develop micro-cracks. A coil that repeatedly ices and thaws has a significantly shortened service life, and coil replacements typically cost $600 to $2,000 installed.
Fixing a bad expansion valve before it causes liquid slugging protects the most expensive component in your system. Compressor replacements run $1,200 to $3,000 installed for most residential systems, making a $150 to $400 valve repair one of the best preventive investments available in home HVAC.
A properly metering valve delivers a steady, predictable cooling output. Homeowners typically notice that hot spots disappear and the thermostat is satisfied at the scheduled time rather than the system short-cycling or running past the setpoint by 2 to 4 degrees F.
Valve flooding causes refrigerant to migrate into the compressor oil during off cycles. This dilutes the oil’s lubricating properties and can cause compressor oil foaming on startup. Fixing the valve stops this migration cycle, preserving the correct refrigerant charge and oil condition without requiring repeated costly recharges.
💰 Savings Impact by Action
Restoring correct refrigerant metering recovers 15 to 40% of lost cooling efficiency, reducing compressor runtime and electricity consumption proportionally.
Eliminating evaporator icing restores full airflow and heat transfer surface area, recovering up to 30% of capacity that a half-iced coil blocks entirely.
Keeping the air filter clean maintains design airflow across the coil and prevents the low-airflow conditions that mimic and worsen expansion valve problems, saving up to 15% on cooling costs.
A clean outdoor condenser lowers high-side pressure and compressor discharge temperature, improving system efficiency by 5 to 10% and reducing stress on both valve and compressor.
🏠 Key Concepts Explained
The Science Behind It
Your air conditioner moves heat using refrigerant in a continuous pressure-change cycle. High-pressure liquid refrigerant leaves the condenser and reaches the expansion valve, where it undergoes a rapid pressure drop. This drop causes the refrigerant to partially flash into a low-pressure mist as it enters the evaporator coil. As this cold mist travels through the coil, warm indoor air passes over the fins and the refrigerant absorbs that heat, evaporating fully into a vapor. The compressor then pulls that vapor back, compresses it to high pressure (which also raises its temperature), and sends it to the outdoor condenser to dump the heat outside. The cycle repeats roughly every 10 to 15 minutes in a well-functioning system.
The expansion valve’s job is to meter refrigerant flow so that the refrigerant absorbs its full latent heat capacity before leaving the evaporator. Latent heat is the energy absorbed during phase change from liquid to vapor, and it is the real workhorse of your AC system. A pound of R-410A absorbs roughly 90 BTUs during evaporation. If the valve allows too much refrigerant in, the coil cannot evaporate it all and unevaporated liquid exits into the suction line and compressor. If the valve restricts flow too much, only a fraction of the coil surface is active for heat absorption, cutting capacity sharply even though the compressor is still consuming nearly its rated wattage. Both conditions collapse the coefficient of performance (COP) of the system, meaning you get far fewer BTUs of cooling per watt of electricity consumed.
Modern thermostatic expansion valves use a sensing bulb filled with a refrigerant charge that expands and contracts with temperature changes at the evaporator outlet. This mechanical signal opens or closes the valve to maintain a target superheat. When the sensing bulb loses its charge due to a pinhole leak in the capillary tube, the valve defaults to fully closed or fully open depending on its spring design, instantly degrading system performance. Electronic expansion valves replace this mechanical feedback with a stepper motor and a thermistor or pressure sensor, giving the control board precise flow authority. Both designs fail over time due to contamination, mechanical wear, or in the case of EEVs, electrical faults. Understanding which type your system uses is the first step toward an accurate diagnosis and repair estimate.
Frequently Asked Questions
▼ How do I know if it is the expansion valve causing my AC problems and not a refrigerant leak?
Both problems can look similar from the outside, but a technician can differentiate them by measuring superheat and subcooling while checking system pressures. A refrigerant leak typically shows low pressures on both high and low sides with elevated superheat. A restricted TXV shows low low-side pressure but near-normal or elevated high-side pressure with very high superheat. A flooding TXV shows high low-side pressure and low superheat near zero. These pressure signatures point clearly to the cause, which is why manifold gauge readings are essential and not optional during diagnosis.
▼ My AC is cooling but just not as well as it used to. Could that still be the expansion valve?
Yes. Partial valve failure is more common than complete failure. A TXV that is partially stuck or a sensing bulb that has lost part of its charge will reduce efficiency and capacity without stopping cooling entirely. If your system is taking noticeably longer to reach the setpoint, your energy bills are rising without a change in usage, or the supply air coming from your vents feels less cold than in past summers, a partially failing valve is a realistic cause worth investigating during your next service call.
▼ My technician says I need a new expansion valve but also recommends a full system replacement. Which should I do?
Use the 5000 rule as a rough guide: multiply the system age in years by the repair cost in dollars. If the result exceeds $5,000, replacement is generally more cost-effective. For example, a 12-year-old system with a $350 valve repair scores 4,200, which favors repair. A 14-year-old system needing a $600 EEV replacement plus refrigerant scores closer to 8,400, which leans toward replacement, especially if the system uses the phased-out R-22 refrigerant. Also ask the technician what efficiency rating a new system would carry versus your existing unit. Moving from a 10 SEER system to a 16 SEER system can cut cooling costs by 35 to 40% annually, which often changes the math significantly.
▼ Can a dirty air filter actually cause symptoms that look like a bad expansion valve?
Absolutely, and this is the most common and expensive misdiagnosis in residential HVAC. A severely clogged filter drops airflow across the evaporator coil, which lowers coil temperature, causes icing, and produces exactly the same symptoms as a restricted TXV: poor cooling, iced coil, long run times, and rising energy bills. Always replace the filter and run the system for a full 24-hour period before agreeing to any refrigerant-side diagnosis or repair. If the symptoms resolve, the valve was fine.
▼ How long does an expansion valve replacement actually last once it is done?
A quality OEM or equivalent TXV installed in a clean system typically lasts 10 to 15 years, often the remaining life of the system itself. EEVs have a similar lifespan but are more sensitive to refrigerant contamination and moisture in the system. If your technician does not flush the lines or install a new filter-drier alongside the valve replacement, contaminants from the old valve failure can clog the new valve within one to two seasons. Always confirm a new filter-drier is included in the repair scope.
Quick Tips
- Schedule AC maintenance in March or April before peak cooling demand. A technician has more time to thoroughly check valve performance and superheat readings when they are not racing between emergency calls in July.
- Ask your HVAC technician to check the TXV sensing bulb insulation during any service visit. The bulb must be tightly clamped to the suction line and wrapped with insulating tape to read suction line temperature accurately. A loose or uninsulated bulb can cause a perfectly good valve to behave as if it is malfunctioning.
- Keep your indoor air handler filter on a strict monthly or bi-monthly replacement schedule. Restricted airflow from a dirty filter reduces evaporator coil temperature, which can mimic TXV restriction symptoms and lead to misdiagnosis.
- If your system has been low on refrigerant and required repeated recharging over two or more seasons, investigate whether the root cause is a leaking expansion valve seat or sensing bulb capillary tube before simply recharging again.
Variations for Your Situation
- Apartment or Rental: If you rent, you cannot authorize HVAC repairs, but you can and should document symptoms in writing to your landlord or property manager. Take dated photos of any iced coil, note the dates your AC fails to reach the thermostat setpoint, and reference your lease’s habitability clause if cooling is required. Some states treat functional air conditioning as a habitability requirement, giving tenants legal leverage to compel timely repairs. Keep a log of your energy bills as evidence of degraded performance.
- Tight Budget (under $200): You cannot replace the expansion valve cheaply, but you can eliminate every other possible cause before spending money on a service call. Replace the air filter, clean the outdoor condenser fins with a garden hose from the inside out, clear debris from around the unit, and verify the system has power and the thermostat is set correctly. If symptoms persist, get quotes from at least two licensed HVAC companies. Some offer free or discounted diagnostic visits when combined with a service agreement. Ask explicitly for the superheat and subcooling readings as documentation, which allows you to get a second opinion without paying for a second diagnostic.
- Older Home with Aging System (pre-2005 equipment): Systems built before 2005 are more likely to use R-22 refrigerant, which is no longer manufactured in the US and now costs $50 to $150 per pound. If your older system needs a valve replacement plus refrigerant top-off, get a full replacement quote in parallel. A new 16 SEER or higher system qualifies for the federal Energy Efficient Home Improvement Credit (25C), which covers 30% of the installed cost up to $600 for high-efficiency central AC, potentially making replacement the better financial choice even before factoring in the monthly energy savings.